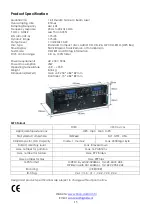
background image


TIME BAR: 

Indicates the playing time. 

TRACK:

 Shows the track number. 

MINUTES: 

Shows the minutes elapsed or remaining depending on time mode setting

SECONDS:


Shows the seconds elapsed or remaining depending on time mode setting

FRAMES:


The CD Player breaks down a second into 75 frames for accurate cueing. This shows the 

frames elapsed or remaining depending on mode setting

MODE DISPLAY:


The mode display consists of 9 alphanumeric characters just beneath the time display  

and shows useful info such as the MP3 file’s name, folder number etc. The folder name will not be  
displayed. 

PITCH: 

Indicates the current pitch.


PG:


Lights to indicate there’s a program list existing in normal playback. Blinks when the program list  

is running

.


MT:


Lights up when performing master tempo function. 

RELOOP:


Lights up when performing the loop function. 


              BPM:


Shows


BPM value.


14.


Jogwheel


      While not in search or scratch mode, the jogwheel will function the same as the pitch bend fader  
      allowing you speed up (forward) or slow down (rewind). The maximum pitch range is 16%. 
      In search mode the jogwheel


can be used to search forward or backwards in the music track, as  

      well as fine tuning of the cue point in pause mode.  
      In scratch mode the jog wheel can be used for scratch effects. 

15. Search button 

      This button allows you to toggle the search mode on or off. While in search mode, the 

LCD display  

      (13)

 shows 

SEARCH

 and the buttons LED is lit. See page 12 “Frame search”. 

16. Loop In button 
      

The loop in button allows you to set the start point for the loop.  

17.


Loop Out button 

      The loop out button allows you to set the end point for the loop. Pushing the button again, allows you  
      to edit the loop.  

18.


Reloop/ Exit


button 

      Use this button to either exit or call the Loop playback. 

19.


Track/trim         button


      Use this button to go back to the beginning of the current track or select a previous track for playing. 

20.


Track/trim         button


      Use this button to skip to the next track. 

21. MT button 
      

Allows you to toggle the master tempo mode on or off indicated by the button’s built in LED and 

MT


      in the 

LCD display (13)

, the LED in the button will light up. In master tempo mode, the pitch fader  

      allows you to shift the pitch of the song played back while the tempo of the song stays unchanged. 

22.


Cont.


button 

      Use this button to switch between the single play mode and continuous play mode. 
      The selected mode is indicated by S

ingle

 or 

Cont.

 in the 

LCD display (13)

.  

      In single play mode, the unit stops playing after each track.  
      In continuous play mode, the unit plays all tracks and then stops.


23.


Cue


button


      Push this button during playback to return to the position at which playback started. 

24.


Play/pause


button


      This button allows you to toggle between pause mode and playback mode.  

25.


Pitch bend – button


      The CD slows down while pushing and holding this button. Release the button to return to the original   
      BPM. 

26.


Pitch bend + button  

      The CD speeds up while pushing and holding this button. Release the button to return to the original  
      BPM. 

27.


BPM/ tap button


      Tap this button to determine the BPM of the music manually. 
      Push and hold this button to start auto BPM mode. 

28. Disc holder 

      Place the disc in the holder. Press the 

open/close 


(1/29)

 button to open and close the disc holder.


Summary of Contents for CDMP-2200

Page 1: ...CDMP 2200 ORDERCODE D1166 Highlite International B V Vestastraat 2 6468 EX Kerkrade The Netherlands...

Page 2: ...P Audio for more excellent audio products We design and manufacture professional audio equipment for the entertainment industry New products are being launched regularly We work hard to keep you our c...

Page 3: ...r 10 Loading CD s 10 Selecting tracks 10 Starting playback 11 Stop playback 11 Pausing 11 Setting a cue point 11 Setting a hot cue Point 11 Cueing 11 Frame search 12 Scanning fast forward fast backwar...

Page 4: ...dition and to ensure a safe operation it is absolutely necessary for the user to follow the safety instructions and warning notes written in this manual Please consider that damages caused by manual m...

Page 5: ...t use fuses of same type and rating only WARRANTY Till one year after date of purchase OPERATING DETERMINATIONS This system is not designed for permanent operation Consistent operation breaks will ens...

Page 6: ...ged due to shipping Transportation damage has to be reported to us within one day after receipt of the delivery Any return shipment has to be made post paid at all times Return shipments must be accom...

Page 7: ...io LCD display with blue backlight Pitch control 8 16 100 Electronic anti shock buffer 8 seconds Seamless loop function Beat related auto loop function Scratch function Cue function 2 hot cues Program...

Page 8: ...21 MT button 6 Hot cue A button 22 Cont button 7 Hot cue B button 23 Cue button 8 Folder button 24 Play pause button 9 Prog button 25 Pitch Button 10 Pitch button 26 Pitch Button 11 Pitch control fade...

Page 9: ...pply before cleaning or servicing Damages caused by non observance are not subject to warranty Set Up and Operation Before plugging the unit in always make sure that the power supply matches the produ...

Page 10: ...menu While in the folder menu Folder will appear in the display Select a folder by pushing the Track trim 19 and Track trim 20 buttons and open the folder by pushing the folder 8 button again 9 Prog...

Page 11: ...or the loop 17 Loop Out button The loop out button allows you to set the end point for the loop Pushing the button again allows you to edit the loop 18 Reloop Exit button Use this button to either exi...

Page 12: ...in damage 38 AC power cable Connect the CDMP 2200 to a 230Vac wall socket only Operations Opening and closing of the disc holder Turn the unit s power on Press the open close 1 29 button to open the...

Page 13: ...pause 24 button to enter pause mode 2 The play pause 24 button and the cue 23 button will blink while the unit is in pause mode 3 Dial the jogwheel 14 to go to your desired cue point if necessary 4 P...

Page 14: ...REMAIN This display mode can only be activated if a disc is formatted as CD Changing pitch There are three tools available for matching the BPM of the CD Use the pitch control fader to adjust the BPM...

Page 15: ...ars you plan to record for the auto loop The range is 1 32 to 32 32 1 bars Default the loop length is 2 1 Auto loop play 1 Push the rec auto 5 button The LED in the button will light up 2 Push the loo...

Page 16: ...ays store the disc in the jewel case to protect from dirt or damage Do not place discs in the following areas 1 Areas exposed to face sunlight for a considerable time 2 Areas subject to accumulation o...

Page 17: ...rating temperature 5 C 35 C Weight 8 76 kg Dimensions DxWxH Main unit 250 482 89 mm Controller 73 482 89 mm MP3 Format DISC USB Devices Applicable file extensions MP3 mp3 Mp3 mP3 File Systems Compatib...

Page 18: ...2011 Dap Audio...

Reviews: