background image


COM-ART 

Ordercode: D1414 

Set Up and Operation 


Connection 

01)


Connect the COM-AT (transmitter) to your mixer’s main XLR output. 

02)


Connect the COM-AR (receiver) to an amplifier/active speaker. 


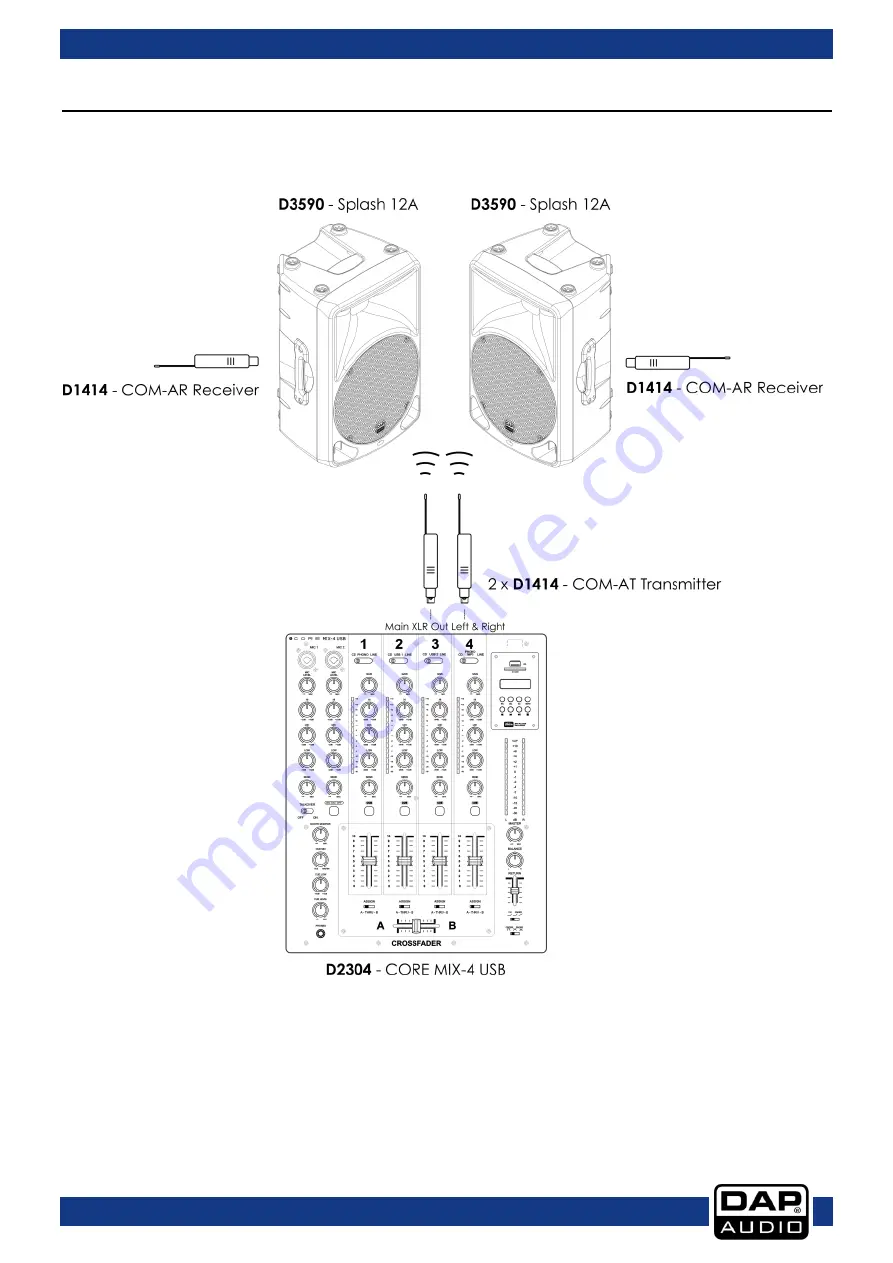
Fig. 04 

 
Note: In order to produce stereo sound, it is necessary to purchase 2 sets of D1414 (see fig. 04). 
 

Power On/Off 

01)


The device will switch on automatically, upon receiving power. The display will show the currently 
selected frequency preset and will blink 3 times. When no button is pressed for 5 seconds, the display 
will turn off. 

02)


In order to switch the device off, press and hold down the SET button (07) for 2 seconds. 

03)


In order to switch the device on, again press and hold down the SET button (07) for 2 seconds. 


Summary of Contents for COM-AT

Page 1: ...COM ART V1 Highlite International B V Vestastraat 2 6468 EX Kerkrade the Netherlands Ordercode D1414 MANUAL ENGLISH...

Page 2: ...Determinations 3 Return Procedure 4 Claims 4 Description of the device 5 Features 5 Frontside 6 Backside 6 Installation 7 Power Supply 7 Replace the Battery 7 Location 7 Set Up and Operation 8 Connect...

Page 3: ...shipment includes DAP Audio COM AT transmitter DAP Audio COM AR receiver User manual Safety Instructions Every person involved with the installation operation and maintenance of this system has to be...

Page 4: ...ck disconnect mains power supply immediately Have a qualified engineer inspect for safety before operating If the system has been exposed to drastic temperature fluctuation e g after transportation do...

Page 5: ...er 04 A brief description of the symptoms Claims The client has the obligation to check the delivered goods immediately upon delivery for any short comings and or visible defects or perform this check...

Page 6: ...ountry regulations Frequency response 30 Hz 17 kHz 3dB Oscillation mode PLL UHF SYNTHESIZED Range 50 m Frequency stability 0 005 10 50 C T H D 1 kHz 0 3 Modulation mode FM F3E Signal to noise 98 dB Dy...

Page 7: ...dercode D1414 Frontside Fig 01 COM AR receiver 3 pin XLR IN 5V Mini USB power connector IN COM AT transmitter 3 pin XLR OUT 5V Mini USB power connector IN Backside Fig 02 LED display Battery indicator...

Page 8: ...of a USB cable Replace the Battery 01 Press and pull the battery cover to open the battery housing 02 Insert an AA battery Note Only use disposable batteries It is not recommended to use rechargeable...

Page 9: ...o purchase 2 sets of D1414 see fig 04 Power On Off 01 The device will switch on automatically upon receiving power The display will show the currently selected frequency preset and will blink 3 times...

Page 10: ...975 It is possible that the COM ART will not function properly within certain frequencies It may be caused by the presence of other digital equipment producing interference Try testing all the 16 freq...

Page 11: ...500 mA Dimensions 114 x 22 x 23 mm LxWxH Weight 0 02 kg COM AR Receiver Channel Multi channel up to 16 frequency presets per each frequency band Frequency band UHF 606 630 MHz dependent on applicable...

Page 12: ...2017 DAP Audio...

Reviews: