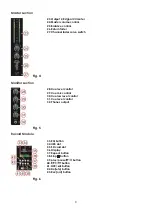
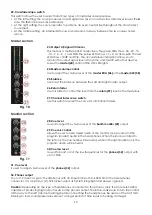
background image


16 

Operations 


Replacing a (cross)fader 

Replacing a (cross)fader should only be carried out by a qualified technician. Damages caused by 
unproper (cross)fader replacement are not subject to warranty. 
 

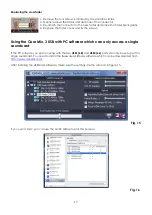
Removing the fader cover 
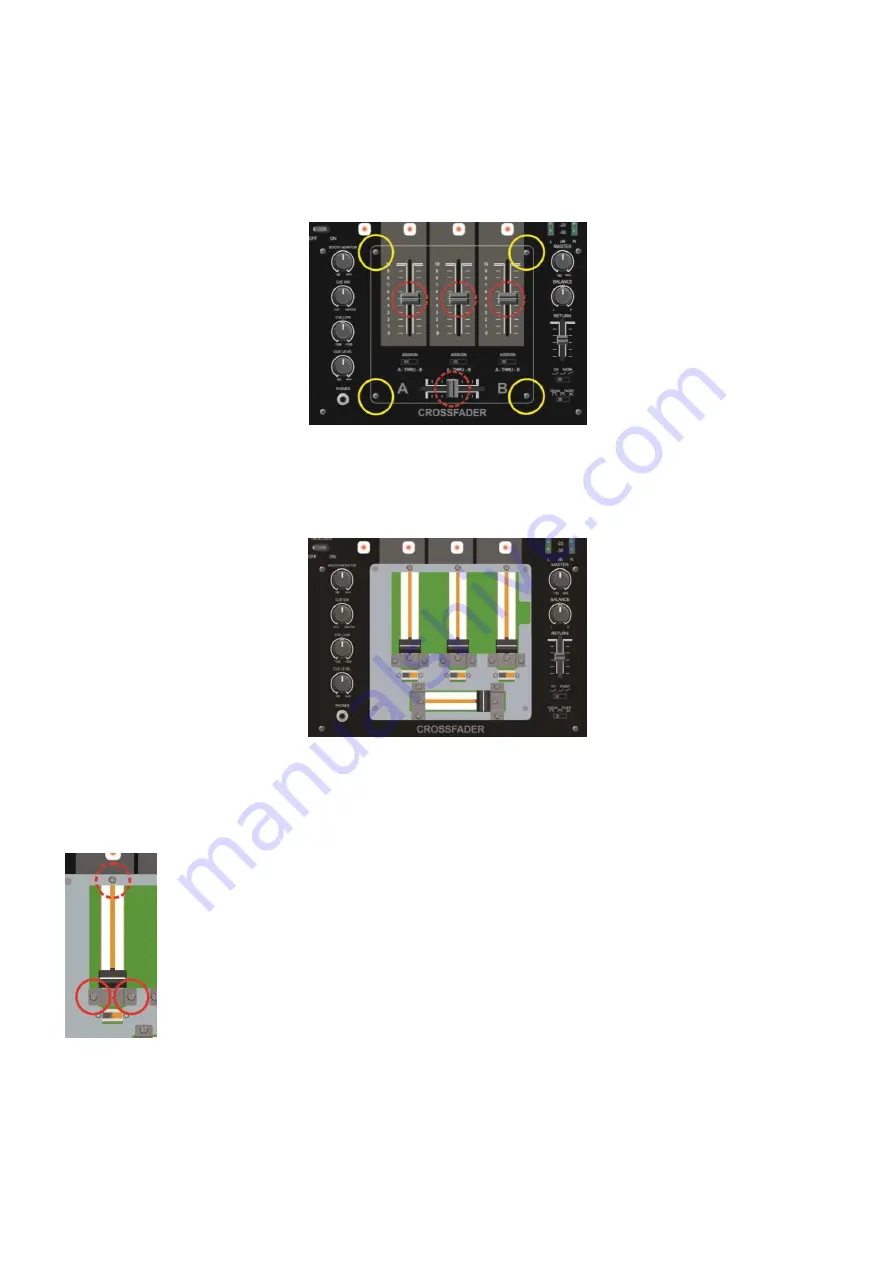


Fig. 15


1.  Remove the buttons of the faders indicated by the dotted line circles. 
2.  Remove the four screws indicated by the solid line circles. 
3.  Now you’re able to remove the fader cover. 
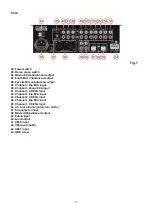
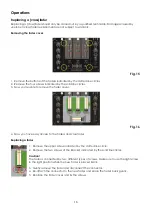
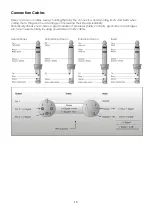


Fig. 16


4.  Now you have easy access to the faders and crossfader. 
 

Replacing a fader 


1.  Remove the upper screw indicated by the dotted line circle. 
2.  Remove the two screws of the bracket indicated by the solid line circles. 
   

Caution! 

The fader is connected by two different types of screws. Make sure to use the right screw 
in the right position when the new fader is placed back. 
 
3.  Gently remove the fader and disconnect the connector. 
4.  Re-attach the connector to the new fader and place the fader back gently. 
5.  Replace the fader cover and fix the screws. 


Summary of Contents for Core Mix-3 USB

Page 1: ...Core Mix 3 USB ORDERCODE D2303 Highlite International B V Vestastraat 2 6468 EX Kerkrade The Netherlands...

Page 2: ...n DAP Audio for more excellent audio products We design and manufacture professional audio equipment for the entertainment industry New products are being launched regularly We work hard to keep you o...

Page 3: ...ain Channels 7 Master section 8 Monitor section 8 Record Module 8 Rear 9 Installation 10 Set Up and Operation 10 Functions 10 Microphone Channels 10 Main Channels 11 Master section 12 Monitor section...

Page 4: ...ystem To maintain perfect condition and to ensure a safe operation it is absolutely necessary for the user to follow the safety instructions and warning notes written in this manual Please consider th...

Page 5: ...y to reduce the input signal level by using the INPUT control To emphasize a frequency range you don t necessarily have to move its respective control upward try lowering surrounding frequency ranges...

Page 6: ...method to use Note If you are given an RMA number please include the following information on a piece of paper inside the box 1 Your name 2 Your address 3 Your phone number 4 A brief description of th...

Page 7: ...y for party jocks MC s Low tone control on the headphone output makes it possible to adjust your favorite sound All the pots are firmly locked on the internal chassis for extra stability The Core Mix...

Page 8: ...8 Talkover switch Fig 2 Main Channels 9 Selection switch CD USB 1 Line 10 Channel VU meter 11 Selection switch CD USB2 Line 12 Selection switch CD Phono MP3 Line 13 Gain control 14 Hi control 15 Mid c...

Page 9: ...curve switch Fig 4 Monitor section 28 Cue level control 29 Cue mix control 30 Cue low level control 31 Cue level control 32 Phones output Fig 5 Record Module 33 EQ button 34 USB slot 35 SD card slot 3...

Page 10: ...e RCA input 50 Channel 3 phono RCA input 51 Channel 3 CD RCA input 52 Channel 2 line RCA input 53 Channel 2 CD RCA input 54 Channel 1 line RCA input 55 Channel 1 CD RCA input 56 AC inlet with integrat...

Page 11: ...ind of equipment Note When connecting signal sources please make sure that the corresponding Channel s level control and the master faders are at their minimum settings Otherwise unpleasant plug in no...

Page 12: ...do not light up 14 15 16 Channel EQ Hi Mid Low controls Each channel is fitted with 3 band EQ The Hi 14 Mid 15 and Bass 16 bands have their center frequencies fixed at 12 Khz 1kHz and 80 Hz respectiv...

Page 13: ...he level from the return 59 input in the mastermix 27 Channel fader curve switch Use this switch to select the curve for all channel faders Fig 10 Monitor section 28 Cue level Is used to adjust the vo...

Page 14: ...e pause mode and again to resume playback 40 button Tapping this button allows you to skip to the next track Pushing and holding this button allows you to play a track fast forward 41 button Tap this...

Page 15: ...phono RCA input Use to connect a turntable 51 Channel 3 CD RCA input Use to connect a CD player 52 Channel 2 line RCA input Use to connect a line level device 53 Channel 2 CD RCA input Use to connect...

Page 16: ...tputs to connect an amplifier with balanced inputs 59 Return input To connect the stereo outputs of your effectprocessor 60 Send output To connect the stereo inputs of your effectprocessor 61 USB 2 in...

Page 17: ...le to remove the fader cover Fig 16 4 Now you have easy access to the faders and crossfader Replacing a fader 1 Remove the upper screw indicated by the dotted line circle 2 Remove the two screws of th...

Page 18: ...the Core Mix 3 USB with PC software which can only access a single soundcard If the PC software you plan on using with the two USB1 68 and USB2 66 ports can only be set up with a single soundcard You...

Page 19: ...s and twists when coiling them This gives the advantage of increasing their life and reliability Periodically check your cables A great number of problems faulty contacts ground hum discharges etc are...

Page 20: ...nnections are thoroughly dry before linking equipment or supplying electric power Troubleshooting DAP Audio Core Mix 3 USB This troubleshooting guide is meant to help solve simple problems If a proble...

Page 21: ...cy 1 kHz Mid range 26dB 12dB Low frequency 70 Hz Low range 26dB 12dB Microphone EQ High frequency 5 kHz High range 12dB 12dB Mid frequency 800 kHz Mid range 12dB 12dB Low frequency 120 Hz Low range 12...

Page 22: ......

Reviews: