


19
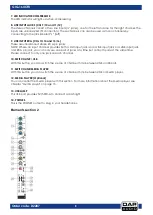
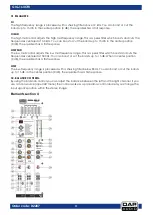
GIG-164CFX
Order code: D2287
Maintenance
The DAP GIG-164CFX requires almost no maintenance. However, you should keep the unit clean.
Disconnect the mains power supply, and then wipe the cover with a damp cloth. Do not immerse in
liquid. Do not use alcohol or solvents.
Keep connections clean. Disconnect electric power, and then wipe the audio connections with a damp
cloth. Make sure connections are thoroughly dry before linking equipment or supplying electric power.
Replacing the Fuse
Power surges, short-circuit or inappropriate electrical power supply may cause a fuse to burn out. If the
fuse burns out, the product will not function whatsoever. If this happens, follow the directions below.
01)
Unplug the unit from electric power source.
02)
Insert a screwdriver into the slot in the fuse cover. Gently pry up the fuse cover. The fuse will come
out.
03)
Remove the used fuse. If brown or unclear, it is burned out.
04)
Insert the replacement fuse into the holder where the old fuse was. Reinsert the fuse cover. Be sure to
use a fuse of the same type and specification. See the product specification label for details.
Troubleshooting
DAP GIG-164CFX
This troubleshooting guide is meant to help solve simple problems. If a problem occurs, carry out the steps
below in sequence until a solution is found. Once the unit operates properly, do not carry out following
steps.
01)
If the device does not operate properly, unplug the device.
02)
Check power from the wall, all cables, connections, etc.
03)
Replace the fuse. See page 19 for replacing the fuse.
04)
If all of the above appears to be O.K., plug the unit in again.
05)
If nothing happens after 30 seconds, unplug the device.
06)
Return the device to your DAP Audio dealer.
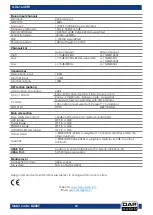
Product Specifications
Model:
DAP Audio GIG-164CFX
Power supply:
AC 100- 240V 50Hz/60Hz
Power connection:
IEC power connector
Rated power consumption:
30W
Fuse:
T1,25AL/250V
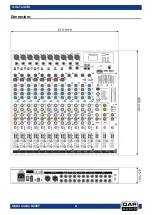
Dimensions:
415 x 405 x 65 mm (LxWxH)
Weight:
6,75 kg
Mono channels
Microphone input:
XLR balanced
Frequency response:
10Hz to 55KHz,+/-3dB
Distortion(THD+N):
<0.03% at +0dB ,22Hz~22KHz A-weighted
Gain range:
0dB to 50dB
Max. Input:
+15 dB
LOW CUT:
75Hz
SNR:
<-114dBr A-weighted
Phantom power:
+48V with switch control
Line input:
1/4' TRS balanced
Frequency response:
10Hz to 55KHz,+/-3dB
Distortion(THD+N):
<0.03% at +0dB ,22Hz~22KHz A-weighted
Sensitivity range:
+15dB~ -35dB
COMPRESSOR:
GAIN:0~9dB
THRESHOLD:20dB---> ↓5dB
Summary of Contents for GIG-164CFX
Page 22: ...21 GIG 164CFX Order code D2287 Dimensions...
Page 23: ...22 GIG 164CFX Order code D2287 Notes...
Page 24: ...2017 DAP Audio...