background image

3

  Make sure you don’t use the wrong kind of cables or defective cables.

  Make sure that the signals into the mixer are balanced, otherwise hum could be created.

  Make sure you use DI boxes to balance unbalanced signals; All incoming signals should be clear.

  Make sure that the available voltage is not higher than stated on the rear panel.

  Make sure that the power-cord is never crimped or damaged. Check the system and the power-cord

from time to time.

  In system setup, the amplifier's output power must be 50%-100% more than the loaded

loudspeakers rated power.

  Please turn off the power switch, when changing the power cord or signal cable, or select the input

mode switch.

  Extreme frequency boosts in connection with a high input signal level may lead to overdriving your

equipment. Should this occur, it is necessary to reduce the input signal level by using the INPUT
control.

  To emphasize a frequency range, you don’t necessarily have to move its respective sliding control

upward; try lowering surrounding frequency ranges instead. This way, you avoid causing the next
piece of equipment in your sound path to overdrive. You also preserve valuable dynamic reserve
(“headroom”)

  Avoid ground loops! Always be sure to connect the power amps and the mixing console to the same

electrical circuit to ensure the same phase!

  If system is dropped or struck, disconnect mains power supply immediately. Have a qualified

engineer inspect for safety before operating.

  If the system has been exposed to drastic temperature fluctuation (e.g. after transportation), do not

switch it on immediately. The arising condensation water might damage your system. Leave the
system switched off until it has reached room temperature.

  If your Dap Audio device fails to work properly, discontinue use immediately. Pack the unit securely

(preferably in the original packing material), and return it to your Dap Audio dealer for service.

  Repairs, servicing and electric connection must be carried out by a qualified technician.

  For replacement use fuses of same type and rating only.


WARRANTY: Till one year after date of purchase.

OPERATING DETERMINATIONS

If this system is operated in any other way, than the one described in this manual, the product may suffer
damages and the


warranty becomes void.

Any other operation may lead to dangers like short-circuit, burns, electric shock, etc.

You endanger your own safety and the safety of others!

Improper installation can cause serious damage to people and property !

Summary of Contents for Gig 8

Page 1: ...Gig 8 ORDERCODE D2203...

Page 2: ...Audio for more excellent audio products We design and manufacture professional audio equipment for the entertainment industry New products are being launched regularly We work hard to keep you our cus...

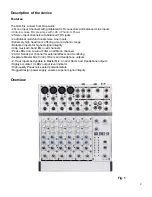
Page 3: ...Warning Safety instructions Operating Determinations Description Features Overview Front and Backside Installation Set Up and Operation Mono Input Channel Stereo Input Channel Master Section Set Up C...

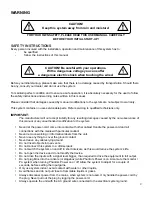
Page 4: ...ains with particular caution Never remove warning or informative labels from the unit Never use anything to cover the ground contact Never leave any cables lying around Do not insert objects into air...

Page 5: ...rve valuable dynamic reserve headroom Avoid ground loops Always be sure to connect the power amps and the mixing console to the same electrical circuit to ensure the same phase If system is dropped or...

Page 6: ...offering a more dynamic range Balanced inputs for highest signal integrity Ultra musical 3 band EQ on all channels Peak LEDs and Low Cut Filter on all Mono channels 2 AUX Sends per channel for extern...

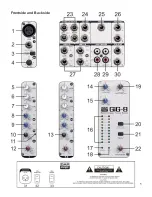
Page 7: ...5 Frontside and Backside...

Page 8: ...s These are ideal for accepting outputs from MIDI and other electronic instruments Channel Outputs A high quality rotary potentiometer feeds the Master Mix via a constant power Channel Pan potentiomet...

Page 9: ...th Aux Sends 8 9 are mono and post EQ Aux Send 1 8 is set pre fader while Aux Send 2 9 is post fader Aux 2 can be made pre fader on mono channels Aux 2 see Modification for more details 4 Fading and P...

Page 10: ...rmanently assigned to the Master Mix If you connect a jack only to the left socket the Aux Return 1 2 operates in mono This enables you to provide a wet cue mix signal with effect i e reverb for the h...

Page 11: ...ed for easy connection to DAT cassette deck etc Level is ultimately determined by a precision Master Mix volume control 22 5 Monitoring The Gig 8 has a separate headphone output 25 The phones signal f...

Page 12: ...channel volume to unity gain 12 set to 0 All other channel volume controls should be set fully counter clockwise minus infinity 2 Generate a signal i e a voice through a microphone There should now b...

Page 13: ...ecomes void Links should not be threaded into holes on the PCB They should be soldered to the tinned areas around the holes and bowed slightly upwards in between Mono Channel Aux Send 2 pre fader All...

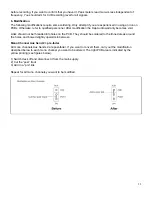
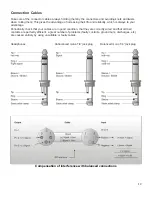
Page 14: ...always to your advantage Periodically check that your cables are in good condition that they are correctly wired and that all their contacts are perfectly efficient a great number of problems faulty...

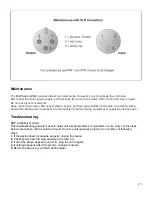
Page 15: ...dry before linking equipment or supplying electric power Troubleshooting DAP Audio Mixer GIG 8 This troubleshooting guide is meant to help solve simple problems If a problem occurs carry out the steps...

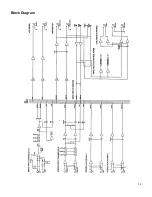
Page 16: ...14 Block Diagram...

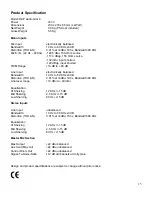
Page 17: ...width 10 Hz to 60 KHz 3 dB Distortion THD N 0 01 at 4dBu 1Khz Bandwidth 80 KHz Line level range 10 dBu to 40 dBu Equalization Hi Shelving 12 KHz 15 dB Mid Shelving 2 5 KHz 15 dB Low Shelving 80 Hz 15...

Page 18: ...2004 DapAudio...
Reviews: