background image


UBR-180BT 

Ordercode: D1258  

Installation 

UBR-108BT Installation 

Remove all packing materials from the device. Check that all foam and plastic padding is removed.  
 
Screw the device in a 19“ Rack. Connect all cables. 

 
Always disconnect from electric mains power supply before cleaning or servicing. 
Damages caused by non-observance are not subject to warranty.


Set Up and Operation


Before plugging the unit in, always make sure that the power supply matches the product specification 
voltage. The power supply is printed on the back of the device. 
Do not attempt to operate a 115V specification product on 230V power, or vice versa.
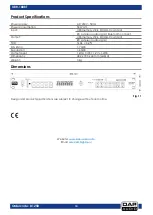


Connections 
01)


Turn off the 

Power (1) 

switch.  

02)


Connect the 

Line Output (25)

 and the 

Bluetooth Output (27)

 to the inputs of your mixer. 

03)


Connect the source you want to record to the 

Aux Input


(26)

 input. 

 
Be sure that the power is off, when connecting the cables. 
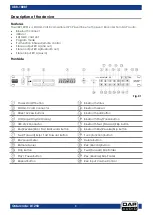
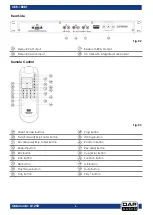
 

Names and Functions  

Below is a description of the functions of the controls. 
 

1)


Power On/Off:


When the power switch is pressed the device turns on.


2) SD MMS card: 

Use this port to connect your SD/MMS card for playback/recording.


3, 29) Direct Access buttons: 

Press track 0-9 buttons to select tracks directly. 
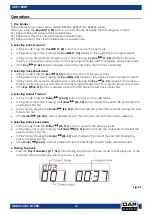
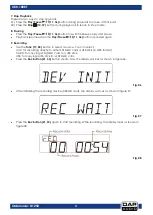
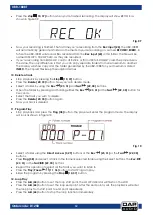
 
4) LCD: 

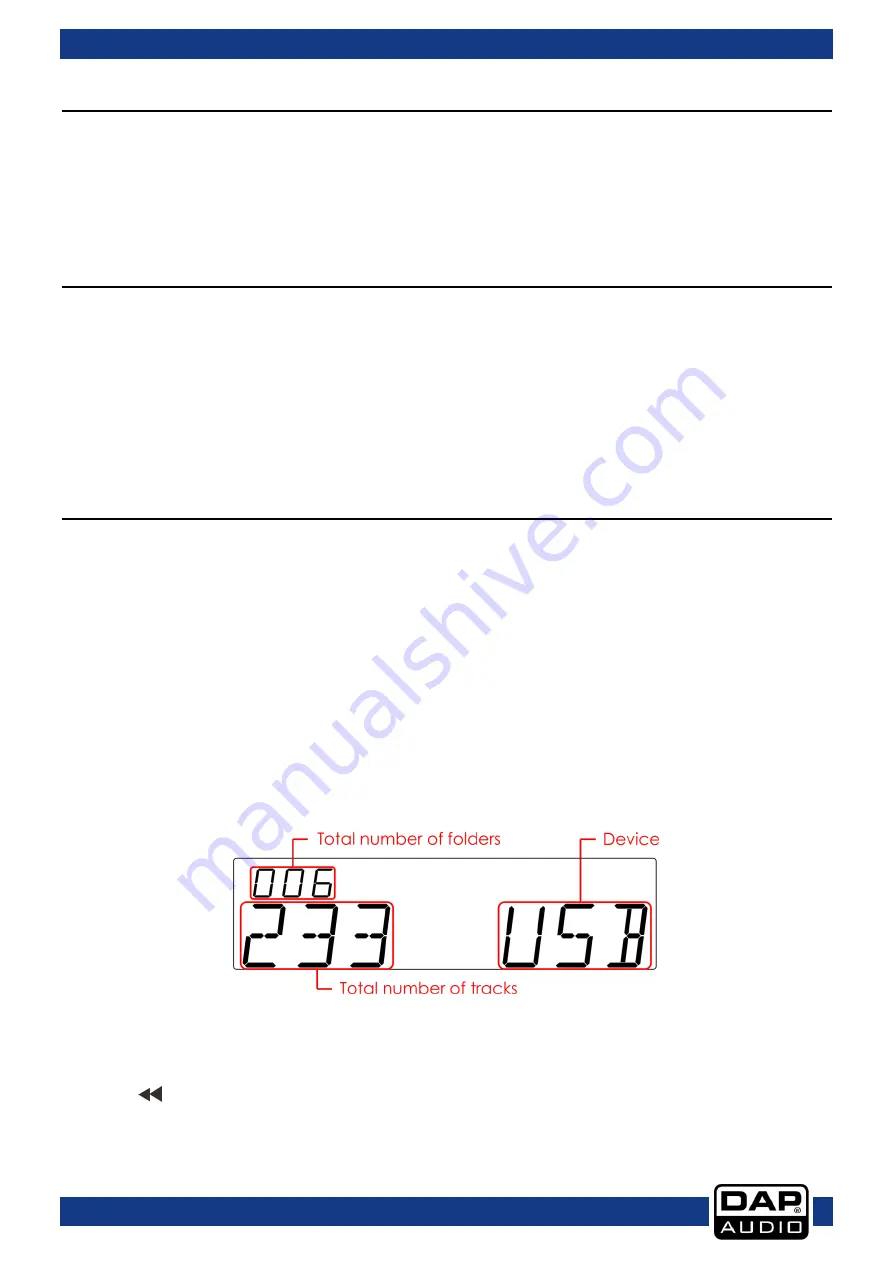
When powering on the UBR-108BT without a USB stick or a SD/MMC card inserted, the UBR-108BT      
will start searching for a source, indicated by “USB” in the display. If the UBR-108BT does not  
detect a source within approximately 6 seconds, the display will show “WAIT”. If you insert a USB  
stick or a SD/ MMC card, the display will look as shown in figure 4. 


Fig. 04 


5) USB: 

Use this port to connect your USB stick for playback/recording.


6, 41) Rev 


Press this button to go back to the beginning of the current track or select a previous track for  
playing. Press and hold this button to play the track fast backwards. 


Summary of Contents for ubr-180bt

Page 1: ...UBR 180BT Highlite International B V Vestastraat 2 6468 EX Kerkrade the Netherlands Ordercode D1258 MANUAL ENGLISH...

Page 2: ...mote Control 6 Installation 7 Set Up and Operation 7 Names and Functions 7 Operations 10 1 Play Modes 10 2 Selecting Tracks Forward 10 3 Selecting Tracks Backwards 10 4 Selecting Folders Forward 10 5...

Page 3: ...follow the instructions of this manual Before you initial start up please make sure that there is no damage caused by transportation Should there be any consult your dealer and do not use the system...

Page 4: ...e the input signal level by using the INPUT control Avoid ground loops Always be sure to connect the power amps and the mixing console to the same electrical circuit to ensure the same phase If system...

Page 5: ...e Note If you are given an RMA number please include the following information on a piece of paper inside the box 01 Your name 02 Your address 03 Your phone number 04 A brief description of the sympto...

Page 6: ...ig 01 Power On Off button Bluetooth status SD MMC card connector Bluetooth sensor Direct Access Buttons Bluetooth pair button LCD Liquid Crystal Display Bluetooth Play Pause button USB stick connector...

Page 7: ...ted Fuse Holder Remote Control Fig 03 Direct Access Buttons Prog Button Fwd Forward Skip Folder Button ID3 Tag Button Rev Reverse Skip Folder Button Random Button Repeat Button Rev Skip Button Rec But...

Page 8: ...d to the Aux Input 26 input Be sure that the power is off when connecting the cables Names and Functions Below is a description of the functions of the controls 1 Power On Off When the power switch is...

Page 9: ...is paired 14 Bluetooth sensor Bluetooth sensor 15 Bluetooth Pair Unpair button Press this button for 3 seconds to connect to another Bluetooth device To cancel the pair Press this button for 5 seconds...

Page 10: ...te Please make sure that the supply voltage matches the operation voltage before connecting the unit to mains Replace the fuse only with a fuse of same specification T630mA 34 Intro Button When this k...

Page 11: ...41 will skip to the previous track for normal play pause mode to the next program index track for program play pause mode If the Rev 6 41 button is pressed while at the first track the last track is s...

Page 12: ...ed again 9 Recording Use the Func 19 43 button to select a source You can select AUX for recording directly to either SD MMC card or USB stick in MP3 format CARD for copying a SD MMC card to a USB sti...

Page 13: ...mode Select a folder by using the Rev 23 31 and Fwd 22 30 buttons Open the folder by pressing and holding either the Rev 23 31 or the Fwd 22 30 button for 3 seconds Select the track you wish to delet...

Page 14: ...r source 02 Insert a flat head screwdriver into a slot in the fuse cover Gently pry up the fuse cover The fuse will come out 03 Remove the broken fuse If brown or unclear it is burned out 04 Insert th...

Page 15: ...signal Bluetooth connect Output USB memory stick SD MMC card slot RCA stereo audio signal THD 1kHz 0 2 S N Ratio 70dB Separation 60dB Output level 1 kHz 0 dB 1 2V 2dB Dimensions 482 x 185 x 44 mm LxWx...

Page 16: ...2015 DAP Audio...

Reviews: