PVE400 USER’S GUIDE
2.6 Battery replacement
If the capacity is below 10%, the
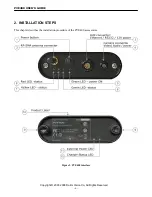
red LED
(Figure 2- 8) will start
blinking. When the
status red LED
is solid, the battery capacity
is below 5% and it must be recharged or replaced with a fully
charged battery. More accurate battery status can be monitored
using the web interface on the
BATTERY
tab (refer to
section 3.5).
To replace the battery, turn off the unit by pressing and holding
the power button until
all LEDs
are off and ensure that PVE-PS
supply is disconnected.
Unscrew the thumb screws (Figure 2 - 10) on the bottom cap of
the unit and pull out the battery. Insert the replacement battery
positioning the contacts inside the unit. Put the cap back and
thoroughly tighten the thumb screws to compress the rubber gasket. The battery has internal protection from
overcharging and over discharging or short circuit. The battery life time is about 500 cycles (while maintaining
about 70% of the initial capacity) depending on operational conditions. Do not charge the battery if the
temperature is below 0°C (32°F) to prolong the battery life. Store the spare batteries in a dry place; preferably
the temperature should not exceed 30°C (86°F).
Warning
:
The battery used in this device may present a risk of fire or chemical burn hazard if mistreated.
Do not recharge, disassemble, heat above 60°C (140°F) or incinerate. Replace battery with Saft model
1S1P MP 176065 only. Use of another battery may present a risk of fire or explosion.
La batterie utilisée dans cet appareil peut présenter un risque d’incendie ou de brûlure chimique en cas de
mauvais emploi. Ne pas recharger, démonter, chauffer à plus de 60C (140F) ni incinerer. Remplacer la
batterie uniquement par le model Saft 1S1P MP 176065. Une autre batterie peut provoquer un incendie ou
une explosion.
2.7 Using wired network connection
PVE400 has a standard 10/100Base-T Ethernet adapter accessible
via AUX connector. Since AUX connector is also used for
RS232 interface and external power, a special cable is required to
use Ethernet function. PVE-AUX is 5 feet (1.5m) CAT5E grade
cable with RJ45 plug (T568B) on one side and Automatic
Latching, Self Aligned 10 pin connector on the other side.
Gently plug and rotate AUX side of the connector until it mates,
and push to lock. In this position the connector is securely
locked and pulling cable will not disconnect it. To unplug, pull
the bottom sleeve of the connector. If AUX connector is not used,
make sure that the protection cap is always put.
Addendum 8.3 has AUX connector pin out and wiring diagram
for PVE-AUX cable.
Copyright © 2007-2008 Darim Vision Co, All Rights Reserved
- 9 -


