background image

NOTICE 

B-DVR User’s Guide


iv 

Shielded cables and I/O must be used for this equipment to comply with the relevant FCC regulations. 


Changes or modifications not expressly approved in writing by Darim Vision Co. Ltd. May void the user’s 

authority to operate this equipment. 


Limited Warranty   


Our company warrants this product against defects in materials and workmanship for a period of one year 

from the date of purchase.    During the warranty period, products determined by us to be defective in form 

or  function  will  be  repaired  or  replaced  at  our  option.    This  warranty  does  not  apply  if  the  product  has 

been damaged by accident, abuse misuse, or as a result of service or modification other than by us. 


This warranty is in lieu of any other warranty expressed or implied.    In no event shall we be held liable 

for  incidental  or  consequential  damages,  such  as  lost  revenue or lost business  opportunities  arising  from 

the purchase of this product.


Summary of Contents for B-DVR

Page 1: ...B DVR MPEG 2 DIGITAL VIDEO RECORDER User s Guide Rev 2 0 0 Darim Vision Co Ltd...

Page 2: ...B DVR User s Guide ii...

Page 3: ...mation This equipment has been tested and found to comply with the limits for a Class B digital device pursuant to Part 15of the FCC Rules These limits are designed to provide reasonable protection ag...

Page 4: ...or a period of one year from the date of purchase During the warranty period products determined by us to be defective in form or function will be repaired or replaced at our option This warranty does...

Page 5: ...___________________________________________ 19 5 3 Basic Function____________________________________________________ 20 5 4 JOG SHUTTLE Function __________________________________________ 26 5 5 MARK...

Page 6: ...___________________________________________ 62 6 15 Play Clip List Items _______________________________________________ 63 6 16 Change the names of the Clip List items ______________________________...

Page 7: ...79 9 TROUBLESHOOTING__________________________________________________ 81 9 1 How to solve the trouble of B DVR ___________________________________ 81 9 2 Messages occurred B DVR activation__________...

Page 8: ...CONTENTS B DVR User s Guide viii...

Page 9: ...onvert AV data into real time high quality MPEG 2 and save it to the Hard Disk And it gives you related function by connecting stored hard disk to a PC using high storage of high quality MPEG 2 Now wi...

Page 10: ...INSTRUCTION B DVR User s Guide 2...

Page 11: ...704x480 at 30FPS PAL 704x576 at 25FPS Compression Constant Bit rate Normal Compression rate 4 5Mbps Super Compression rate 6 0Mbps Maximum recording time 40hours 30fps 4 5Mbps Normal Audio With 80GB...

Page 12: ...SPECIFICATION B DVR User s Guide 4 Power 115 230 V AC 50 60Hz Power Consumption Approx 50W Size WxHxD 420x88x380 Weight Approx 7Kg Table 2 1 Specification...

Page 13: ...ton 3 Jog 13 PASUE STILL button 4 VFD window 14 DISPLAY button 5 Right hand direction button 15 RECORD button 6 LIST button 16 MARK OUT button 7 Upward button 17 Downward button 8 MENU button 18 SELEC...

Page 14: ...d Names 1 S Video input 9 Cooling Fan 2 S Video output 10 Composite Video input 3 Composite Video output 11 Audio Left input 4 Audio Left output 12 Audio Right input 5 Audio Right output 13 Power cord...

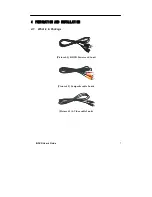
Page 15: ...B DVR User s Guide 7 4 PREPARATION AND INSTALLATION 4 1 What is in Package Picture 4 1 B DVR Power cord 1 unit Picture 4 2 Composite cable 2 units Picture 4 3 S Video cable 2 units...

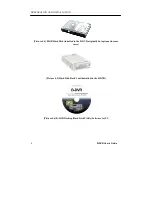
Page 16: ...N B DVR User s Guide 8 Picture 4 4 80GB Hard Disk installed in the B DVR originally but optional in some cases Picture 4 5 Hard Disk Rack 1 unit installed in the B DVR Picture 4 6 B DVR Desktop Hard D...

Page 17: ...PREPARATION AND INSTALLATION B DVR User s Guide 9 Picture 4 7 User s Guide Picture 4 8 Limited Warranty...

Page 18: ...the mentioned usable voltage limit of the B DVR back panel suits the type of voltage system to be connected The voltages 220V 50Hz 220V 60Hz are suitable for B DVR Confirm again the voltage type to be...

Page 19: ...s guide if you are going to connect other devices The B DVR can be connected with various I O devices or its own use Refer to the following table according to the type of input or output There are Co...

Page 20: ...de 12 Follow the instruction to connect each cable at the following Sample 1 Connect S Video into input connector and use the monitor to play from B DVR Composite S Video and RGB Picture 4 10 In the s...

Page 21: ...PREPARATION AND INSTALLATION B DVR User s Guide 13 Picture 4 11 For S Video input and Composite output Picture 4 12 For S Video input and RGB output...

Page 22: ...TION AND INSTALLATION B DVR User s Guide 14 Sample 2 Connect Composite to input connector port and use monitor to play from B DVR Composite S Video and RGB Picture 4 13 For Composite input and S Video...

Page 23: ...PREPARATION AND INSTALLATION B DVR User s Guide 15 Picture 4 14 For Composite input and Composite output Picture 4 15 For Composite input and RGB output...

Page 24: ...PREPARATION AND INSTALLATION B DVR User s Guide 16...

Page 25: ...TILL button Searching by one frame forward or backward after pause Pause playing 4 VFD window 14 DISPLAY button Display B DVR information Display time or List in the VFD window 5 Right hand direction...

Page 26: ...to the Main menu Select the item 9 Left hand direction button 19 MARK IN button Moves to the item in the Menu setup and List Moves back to the clip in playback in the Play list Search backward by 5 in...

Page 27: ...setup for playing or recording on the defined date and time 2 REC display Indicates the video source is being recorded 3 FB PAUSE PLAY FF display Indicates B DVR is occupied in Fast backward Pause Pl...

Page 28: ...n you press the button continuously Note that DISPLAY button is only activated in the STOP mode It doesn t work in other modes 5 3 1 1 Time Display The RTC Real Time Clock is installed in the B DVR wh...

Page 29: ...nstalled Hard Disk in real time to a monitor by connecting to the output port When you start B DVR after switching on Power button it remembers the information of the item lately used after searching...

Page 30: ...playback goes to 1 2x 1 4x 1 8x To stop the execution of slow playback press PAUSE button as shown at Picture 5 10 5 3 3 STOP Button Picture 5 7 STOP button You can stop the command processing by pre...

Page 31: ...the video source presently input to the B DVR It is shown in VFD window as Picture 5 9 simultaneously by pressing RECORD button The 12 05 25 displays the Time Code value related to the recording It m...

Page 32: ...t enables users to search the file exactly Picture 5 11 VFD display in play pause mode Press PAUSE button when you want to pause in play mode The display shown in Picture 5 11 appears when pressing PA...

Page 33: ...se in record mode The display shown in Picture 5 12 appears when pressing PAUSE button The 12 05 25 indicates the Time Code value related to pause It means to pause for processing for 12 hour 05 minut...

Page 34: ...ideo source is playing You can search by one frame either forward or backward in the position of pause When you turn the Jog in clockwise direction from the front side the still image being played by...

Page 35: ...B DVR FUNCTION B DVR User s Guide 27 Picture 5 14 Fast Forward on screen Picture 5 15 Fast Forward on VFD Picture 5 16 Fast Rewind on screen...

Page 36: ...B DVR FUNCTION B DVR User s Guide 28 Picture 5 17 Fast Rewind on VFD...

Page 37: ...ording video As shown at Picture 5 18 there are two buttons MARK IN for indicating the starting part and MARK OUT for the ending part 5 5 1 Using Marking Function Refer to 6 15 1 Play Clip List Items...

Page 38: ...LAY button again until the ending part of the video for the new clip or use Jog Shuttle and then press PAUSE button Press MARK OUT button in the state of pause Picture 5 20 MARK OUT OSD appears as sho...

Page 39: ...B DVR FUNCTION B DVR User s Guide 31 Picture 5 21 New Clip...

Page 40: ...ecific clip saved previously and standby 5 6 1 Using Bookmark Function Refer to 6 15 1 Play Clip List Items and select a video clip to apply to the Bookmark function Make sure that the selected video...

Page 41: ...gh using JUMP function Out of 100 Clip you can skip 5 or 1 either forward or backward you can control the JUMP function from 0 95 that you can easily search the video 5 7 1 Using JUMP Function Refer t...

Page 42: ...B DVR FUNCTION B DVR User s Guide 34...

Page 43: ...e four items on the Main Menu DVR Setup Play mode Beep Date and Time can be set Screen Setup OSD related can be set Video Setup Input and output and video compression rate can be set Schedule Setup Sc...

Page 44: ...ral Setting The above screen appears on pressing MENU button Using button to move to each item and select the item and press the SELECT button Picture 6 3 SELECT button To move item use button To chan...

Page 45: ...e system can be set Date Date can be set Time Time can be set Play Mode Play times Once or Repeat can be set Buzzer On or Off can be set 6 2 1 General Setting Main Menu appears on pressing MENU button...

Page 46: ...2 2099 Month 01 12 Day 01 31 30 29 28 Hour 00 23 Min 00 59 Sec 00 59 Play Mode Repeat Repeats playing a clip 1 Pause Plays once then pauses at the end of clip 1 Stop Plays once then goes back to live...

Page 47: ...n Display 6 3 1 General Setting Main Menu appears on pressing MENU button Using button move to the Screen Setup On pressing SELECT button Screen Setup is done as shown on Picture 6 5 Using button valu...

Page 48: ...3 The contents of error are listed on the upper side of the screen Simple 1 Command appears on the upper left 2 The contents of error are listed on the upper side of the screen None 1 Only the content...

Page 49: ...ite and out put is S Video Composite respectively Such setup is also applied when a new Hard Disk is connected Quality represents the degree of compression when digitizing input video the Hard Disk in...

Page 50: ...ture 6 6 Using button move to Input Output Quality To change the value use button The following shows the value of each item Item Value Contents Input Composite S Video Output S Video Composite RGB Co...

Page 51: ...eps explain how to set up for the schedule Picture 6 7 Schedule Setup 6 5 1 General Setting Press MENU button to display Main Menu To go to Schedule Setup use buttons Press SELECT button then move to...

Page 52: ...change the value The menu Mode designates either schedule recording or playback the clips which can be selected by the user In case the value Record is selected the user enables to select the Bitrate...

Page 53: ...B DVR MENU B DVR User s Guide 45 on the specified time then the alarm in red will be displayed on VFD window as shown in Picture 6 9 Picture 6 9 Example of Schedule Setup...

Page 54: ...e menu Factory Setting is to set up to default setting Picture 6 10 System Info 6 6 1 General Setting Press MENU button to display Main Menu To go to System Info screen use buttons Press SELECT button...

Page 55: ...reen Setup Input Video input port Video Setup Output Video output port Video Setup Quality Bitrate Video Setup The following picture shows the screen when the menu Factory Setting is selected Picture...

Page 56: ...Category Initial Value DVR Setup Play Mode 1 Pause Buzzer On Screen Setup Online Info Detail Video Setup Input Composite Output Composite S Video Quality Normal Schedule Setup Record on Schedule Off S...

Page 57: ...G 2 file saved in the B DVR displays Picture 6 12 LIST button There are 5 commands of the Play List Menu as followings PLAY command to play the selected Play List EDIT command to edit the selected Pla...

Page 58: ...Processing Press LIST button to display Play List Menu Move to the specified item of Play List using button After moving to each command using button press SELECT button to process the selected comman...

Page 59: ...ng it plays without waiting status unlike the items of other Play List However the latest recorded file appears close to No 00 Although ALL CLIPS that was recorded in previous times cannot view when i...

Page 60: ...clips Picture 6 15 shows that 134Mbytes are being used 6 9 1 Play Command Press LIST button Play List Menu will pop up Use button to move up and down to choose to play any Play Lists from 00 30 Play...

Page 61: ...B DVR MENU B DVR User s Guide 53 Press PLAY button to play the video...

Page 62: ...ure 6 16 ALL PLAYLISTS PLAY command 6 10 1 Play Command Press LIST button Play List Menu will pop up Use button to move up and down to choose to play ALL PLAYLISTS You can use buttons for play to sele...

Page 63: ...e 6 17 Select Play List EDIT Command 6 11 1 EDIT Command Press LIST button and Play List Menu to show up on the screen Use button to select any numbers from 01 29 Except ALL CLIPS and ALL PLAYLISTS an...

Page 64: ...t to locate to place in designated Clip Each command Explanations are in the followings OK After Editing finished move back to Play List Menu EDIT Selecting or changing the related Clip from the Clip...

Page 65: ...and press SELECT button After checking the Changed Clip select OK to go back to Play List Menu After finishing editing if you want to check the Clips from the Play List go to Play List Menu and use b...

Page 66: ...lay List 6 12 1 NAME Command Press LIST button Play List Menu will appear Use button to select from 01 29 Except ALL CLIPS and ALL PLAYLISTS For example in Picture 6 20 it selected DARIM In order to c...

Page 67: ...the Name If NAME command is executed Play List Menu will appear with selection of characters as shown in Picture 6 21 Use buttons and buttons to select characters or numbers To finish press SELECT bu...

Page 68: ...lip of the Play List Picture 6 22 Deleting Play List Display 6 13 1 CLEAR Command Press LIST button to show Play List Menu Use button from 01 29 except ALL CLIPS and ALL PLAYLISTS Move to the number w...

Page 69: ...ion question will pop up in the Play List Menu as it is shown in Picture 6 23 Use button to select to cancel CLEAR by selecting NO to continue CLEAR select YES Press SELECT button after confirmation I...

Page 70: ...Play List Menu by selecting CLIP In the Clip List Menu there are 4 different commands PLAY Play the selected Clip NAME Name the selected Clip DEL Delete the selected Clip DELALL Delete Every Clips Pi...

Page 71: ...th 2003 and 21Mbytes data are being used 6 15 1 PLAY Command Press LIST button to go to Play List Menu Use button to place CLIP command Press SELECT button to go to Clip List Menu In Clip List Menu us...

Page 72: ...mmand Press SELECT button to go to Clip List Menu In Clip List Menu use button to select the item to give PLAY command from 00 99 For Example in Picture 6 26 FASHIONM10 is selected To select NAME use...

Page 73: ...mand is executed selected characters are displayed in Clip List Menu to choose Refer to Picture 6 27 Use button and button to characters or numbers which you wish to change After finishing press SELEC...

Page 74: ...o back up to PC hard disk using B DVR Desktop program Once it is deleted the clips can never be restored Picture 6 28 Display for deleting from the clip items from the Clip List 6 17 1 DEL Delete DELA...

Page 75: ...tion question will pop up in the Play List Menu as it is shown in Picture 6 29 Use button to select to cancel DEL or DELALL by selecting NO to continue DEL or DELALL select YES Warning All deleted cli...

Page 76: ...B DVR MENU B DVR User s Guide 68...

Page 77: ...over 4GB file supported NTFS format Hard Disk in Windows 2000 or Windows NT Every MPEG 2 file saved into the Hard Disk in B DVR can be copied into PC using B DVR Desktop software and MPEG 2 file save...

Page 78: ...via B DVR Desktop when you finish the installation B DVR Desktop software After switching off power make sure that the Hard Disk s jumper setting in order not to collide with other IDE device as the B...

Page 79: ...HDD Save the selected Clip of B DVR Hard Disk to PC Hard Disk as mpg MPEG 2 file It can be saved by double click the selected Clip Rename Change the name of selected Clip Delete Clip Delete the selec...

Page 80: ...re 7 3 MPEG2 Viewer Mark In Indicate the starting part Mark Out Indicate the ending part Crop Operate Marking Snap Shot Save the selected picture of B DVR Hard Disk to PC Hard Disk as bmp BMP or jpg J...

Page 81: ...re Play List menu which have functions like EDIT NAME CLEAR Picture 7 4 Play List Menu Rename Change the name of Play List Delete Play List Delete Play List Save Clips to Local HDD Save Clips in the s...

Page 82: ...hen you can move to the window for optimization of Hard Disk Press icon to go back to Play List Picture 7 5 Optimization The space of deleted clips may be remained as occupied in the Hard Disk B DVR u...

Page 83: ...oftware Picture 7 6 Settings 7 5 1 B DVR Settings If the user selects the B DVR Settings icon on the left side the following dialogue will be shown In the dialogue the user can set up for the values o...

Page 84: ...B DVR DESKTOP SOFTWARE B DVR User s Guide 76 Picture 7 7 B DVR Settings 7 5 2 Scheduler When Scheduler icon is selected the following dialogue will be shown...

Page 85: ...B DVR DESKTOP SOFTWARE B DVR User s Guide 77 Picture 7 8 Scheduler Picture 7 9 Schedule Setting The user can setup the menus including the Mode Starting Time Ending Time Play list Bitrate...

Page 86: ...cted Deletes the schedule list from the selected one to the last one Clear All Schedule Deletes all schedule list Delete Same as Clear Selected Schedule Menu Save To File Saves the schedule list as a...

Page 87: ...umper setting of Hard Disk must be setup in Master mode among Master Slave modes If it is in Slave mode or jumper setting is not right the message Err 01 is displayed in the VFD of front panel when sw...

Page 88: ...HARD DISK MANAGEMENT AND HOW TO USE B DVR User s Guide 80...

Page 89: ...ay List item in the List menu If the Clip is not inserted in Play List that Play List can be played How to recover the deleted Clip in Play List The Clips in HDD are not deleted really although it is...

Page 90: ...p How to do when less storage space in HDD B DVR saves Clips in order when recording or adding Clips using B DVR Desktop Therefore it can be happened to have less remaining space of HDD than calculate...

Page 91: ...l clips in B DVR HDD to use properly When pressing Menu button Config save error Config read error Cannot read or save Information from HDD Make sure HDD jumper is in MASTER mode and reboot B DVR agai...

Page 92: ...e power Failed to save clip Cannot recording 1 Error in HDD Make sure HDD jumper is in MASTER mode and reboot B DVR again The same symptom is occurred again set up HDD in Low Level Format Needs A S of...

Page 93: ...TROUBLESHOOTING B DVR User s Guide 85 marking...

Page 94: ...im Vision Homepage WWW Site http www darim com http www darim co kr FTP Site ftp ftp darvision com Phone 82 42 601 1311 Fax 82 42 861 2484 Note The technical support staff of Darim Vision will be able...

Page 95: ...TROUBLESHOOTING B DVR User s Guide 87 Note The improvement of design and specification can be changed as upgraded without prior notification...

Reviews: