14
Tutorial video showing how to set up the suspen-
sion on a full-suspension bike.
INITIAL SAG
Suspension settings are a matter of personal prefer-
ence. Some riders prefer a soft setup, others a hard
setup. Depending on the riding style, skills, and con
-
ditions on the route. The suspension on a trail/ en-
duro bike works fine with approximately 20% -30%
initial sag. For the front shock, the value of 20-25%
should be assumed, while for the rear shock the ini
-
tial deflection should be about 25-30% of the total
stroke. Before starting work, set the return damping
to the fully open position.
To measure the SAG, follow the instructions/indica
-
tions below:
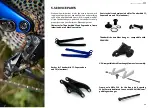
• Move the O-ring on the stanchion so it touches the
fork seal, the same for the rear shock.
• Stand on the pedals with your full body weight
with full equipment: protective armor, helmet,
neck protector, water bottle or water bag, etc. It is
important that the equipment and clothing reflect
the real riding conditions to give the most accurate
results. While standing on the bike, bend the sus-
pension several times, then push the O-ring against
the shock seals again. It is best to have someone
to help, but you can deal with it yourself, for ex-
ample by leaning against the wall of the building.
•
Get off the bike carefully and measure the SAG with
a ruler or tape measure printed on the stanchion,
or ask someone to read the value on the scale
when standing on the bike in a neutral position
(slightly bent knees and hands in elbows). Inflate
or deflate the damper until the desired deflection
of the shock is achieved.
6. SUSPENSION SETTINGS
In the case of an ungraduated rear shock, to determine
the percentage of initial deflection, its total deflection
must first be measured, because it is shorter than those
given in the catalog for the total travel of the rear swing-
arm. To do this, reduce the pressure in the air chamber
so that you can bend the shock to its extreme posi-
tion, then inflate it and measure the distance between
the O-ring and the seal. For example, a bicycle with
160 mm travel has a rear shock with 70.87mm deflection,
assuming a SAG of 30%, its value measured on the shock
absorber piston with correctly set pressure should be
21.26mm (70.87 x 0.3 = 21.26mm).
REBOUND
– return damping
(rebound speed)
In the damper return damping setting, the so-called
„curb test” works best. To proceed with the adjustment,
follow the instructions/indications below:
• Unscrew the Rebound valve to the extreme position, de-
pending on the manufacturer on the casing towards the
„bunny” symbol, „Fast” or minus sign. There is no return
damping in this position.
• Find a less traveled road in your area with a medium
size curb.
• While sitting in the saddle, without using the brakes,
slowly descend from the saddle. The damper piston re-
tracts first, then returns to its original position and be
-
gins to oscillate until it stops.
• To counteract the “rocking” phenomenon, turn Re-
bound two clicks towards the “turtle” symbol (+; “slow”)
and repeat the test by rolling off the curb. By adjusting
in this way, you should observe the moment when the
damper stops oscillating after a rebound.
• The resulting setting is the initial setting from which you
should start. Further adjustments for two clicks back
-
ward or forwards can be made on the trail depending
on riding conditions and preferences.
•
Remember that, as with the SAG, the return suppression
is determined by the weight of the user and all equip-
ment. The greater the weight of the bike user, the great-
er the damping will be needed to absorb the rebound
energy.
It is best to set the front shock return damping as follows:
• Start by unscrewing the damper to the extreme position
as it was in the case of the damper. Stand next to the
bicycle, depress the shock as far as possible, and release
it vigorously. Observe that the front wheel is clear of the
ground. Increase the damping by two clicks by using the
adjuster on the bottom of the right shock leg, turning
towards the „turtle” symbol („+”; „slow”).
•
Repeat this process until the wheel stops springing off
the ground. The basic setting obtained in this way can
be corrected on the trail depending on the driving con-
ditions and individual preferences.
• Finally, get on the bike and on a straight road, vigorously
bending the suspension, check that the front and rear
work evenly. By pressing the suspension in this way,
bend it in the range of 80-90%, if it is difficult, it may turn
out that the shock or damper needs to be adjusted in
terms of the air chamber capacity. To do this, contact an
experienced service provider who will adjust the size of
the chamber with the help of tokens.


