rotating basket
Follow the steps below to use your Rotating Basket.
rotating basket
A
B
14 ∙ rotating basket
rotating basket ∙ 15
1.
Remove any other cooking
trays and place the Drip Tray
at the bottom of the Air Fryer
Oven, beneath the heating
element.
2.
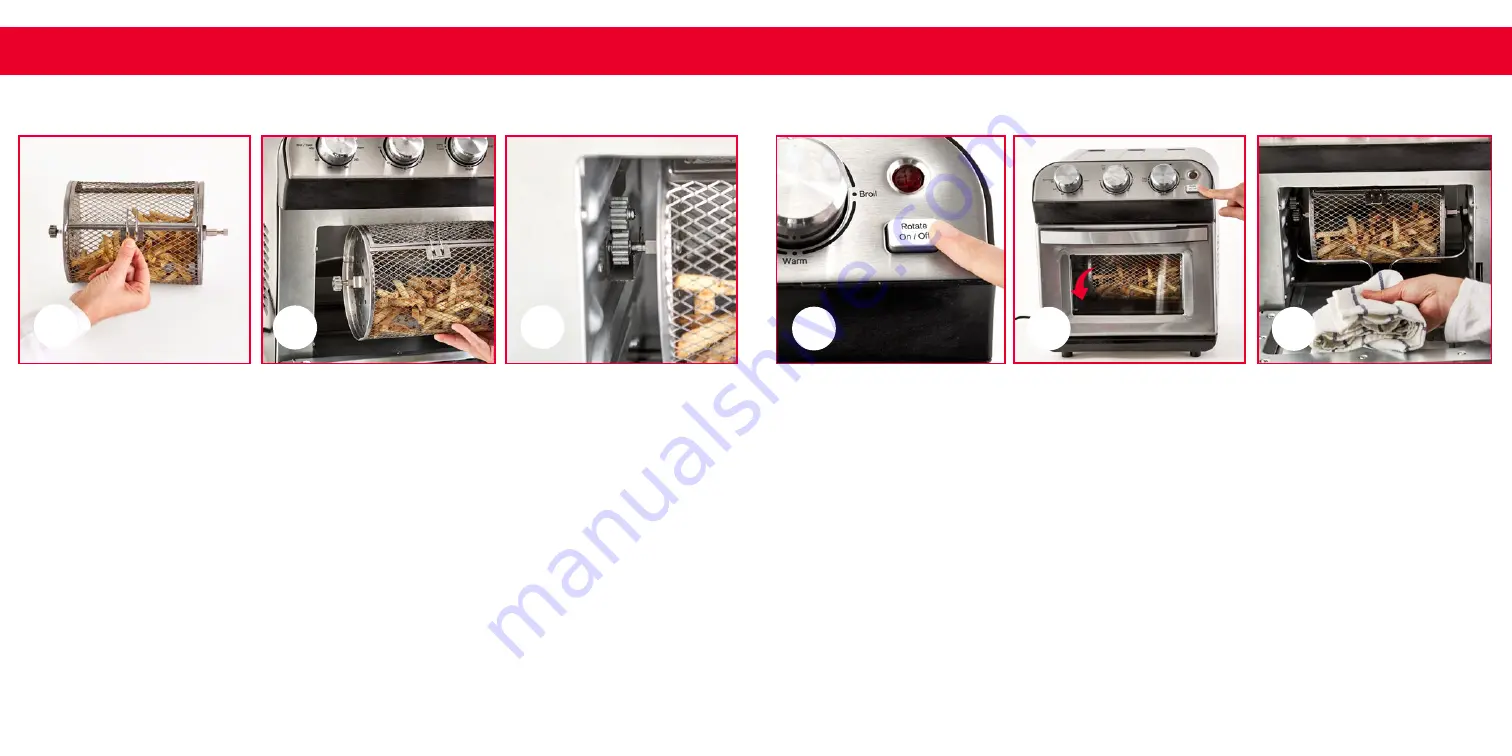
Place the items you wish to
cook in the Rotating Basket
and close the door of the
basket firmly so the Clasp
snaps shut
(photo A)
.
C
D
F
E
3.
Open the Air Fryer Oven and
align the Rotating Basket so
that the Gear on the left side
of the Rotating Basket aligns
with the gear on the interior of
the Air Fryer Oven
(photo B)
.
4.
Place the basket in the hooks
so that the gears mesh
(photo C)
. If the gears are not
properly aligned, the basket
will not rotate.
5.
Close the door of the Air
Fryer Oven and set the
Function Dial to Air Fry.
Set the Temperature Dial to
the correct temperature.
6.
Then, turn the Timer Dial to
the desired cooking time to
turn on the oven and begin
air frying. The Power Light
will illuminate.
7.
Press the Rotate On/Off
Button
(photo D)
.
8.
You will see the basket begin
to rotate
(photo E)
. If the
basket does not rotate, stop
the Air Fryer Oven by turning
the Timer Dial to “Off” and
re-adjust the gear alignment.
Be careful when adjusting the
basket after turning the Air
Fryer Oven on, as the basket
or the heating element may
be hot.
9.
The Timer Dial will ring when
the cycle is complete. To stop
air frying at any time, turn
the Timer Dial to the “Off”
position.
10.
When cooking is finished,
use the Removal Tool to hook
underneath the basket arms
and lift up and out
(photo F)
.
Place the basket on a heat-
resistant surface to cool. Let
the basket sit for a couple
minutes before opening the
basket with oven mitts and
removing cooked food.
NOTE:
ALWAYS use the Removal
Tool and kitchen gloves to remove
the Rotating Basket as both the
basket and heating elements will
be extremely hot and may contain
hot oil.


