background image

5

3.1 

PRODUCT INFORMATION

For latest manual and product updates please visit our 
website at 

www.dashmate.com.au

4.0  INTRODUCTION

Thank you for purchasing a Dashmate Dash Cam. Please 
read through instructions before attempting to install or 
use this product.
This User guide is designed to assist with the day to day 
operation of the DSH-592IR.
Before attempting to use or install your Dashmate  
DSH-592IR, please ensure you have read and understood 
all of the safety notes below.

•  Do not expose your DSH-592IR to liquids, excessive 

dusty conditions or temperatures exceeding 60°C.

•  Only use the included cables to power and charge the 

DSH-592IR. 

•  Please do not attempt to adjust the DSH-592IR 

position or settings whilst you are operating your 
vehicle.

•  Please clean the windshield thoroughly removing all 

dust and dirt particles before fixing the adhesive 
mount.

•  Since the mount sticks onto the windshield using a 

3M adhesive, please ensure that the position of the 
camera is best located to capture the maximum 
viewing area.

•  We suggest you to power-on the dash camera and 

test the playback image on screen first prior to 
removing the 3M tape for installation.

•  Only remove the 3M tape when you are satisfied with 

the dash camera placement and image position are 
delivering the best possible image and view of the 
road ahead.

•  Ensure you are using your DSH-592IR within your 

countries’ road laws. Please make sure you are familiar 
with your local road legislation before use.

Summary of Contents for DSH-592IR

Page 1: ......

Page 2: ......

Page 3: ...SD Card 9 6 2 Removing A Micro SD Card 9 6 3 Installing The DSH 592IR 9 7 0 CONNECTING TO POWER 10 8 0 LED INDICATOR 11 9 0 POWERING THE DSH 592IR ON OFF 11 9 1 Auto Power ON OFF 11 9 2 Manual Power O...

Page 4: ...2 12 0 GPS 20 13 0 VIDEO PHOTO PLAYBACK 21 14 0 SOFTWARE PLAYBACK 22 15 0 INSTALLING APP ON SMART PHONE 22 16 0 WARRANTY TERMS CONDITIONS 23 17 0 NOTES 24...

Page 5: ...on weather and surroundings such as dense cities tunnels or forests GPS satellite signals cannot pass through most solid materials Tinted windows may also affect the GPS signal The values displayed in...

Page 6: ......

Page 7: ...SH 592IR Please do not attempt to adjust the DSH 592IR position or settings whilst you are operating your vehicle Please clean the windshield thoroughly removing all dust and dirt particles before fix...

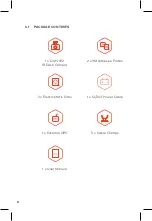
Page 8: ...6 4 1 PACKAGE CONTENTS 1 x DSH 592 IR Dash Camera 2 x 3M Adhesive Plates 2 x Electrostatic films 1 x 12 24V Power Cable 1 x External GPS 5 x Cable Clamps 1 x User Manual...

Page 9: ......

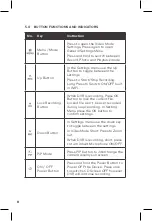
Page 10: ...Button When DVR is recording Press OK Button to lock the current file Locked file won t be over recorded during loop recording In Setting Menu press the OK button to confirm settings Down Button In Se...

Page 11: ......

Page 12: ......

Page 13: ......

Page 14: ......

Page 15: ......

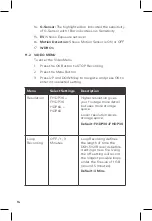
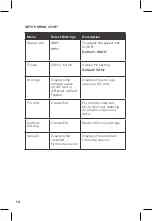
Page 16: ...and DOWN key to navigate and press OK to enter into selected setting Menu Select Settings Description Resolution FHD P30 FHD P30 HDP60 HDP60 Higher resolution gives your footage more detail but uses m...

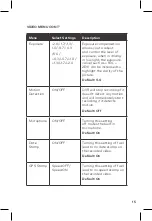
Page 17: ...clarity of the picture Default 0 0 Motion Detection ON OFF DVR will stop recording if it doesn t detect any motion and will immediately start recording if it detects motion Default Off Microphone ON...

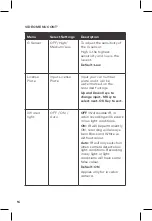
Page 18: ...ed on the recorded footage Up and Down Keys to change input M Key to select next OK Key to exit Infrared light OFF ON Auto OFF Will disable IR in cabin recording will be dark in low light conditions O...

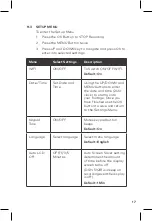
Page 19: ...ime Using the UP DOWN and MENU buttons to enter the date and time 24hr clock to stamp onto your footage Once you have finished use the OK button to save and return to the Settings Menu Keypad Tone ON...

Page 20: ...Default 50 Hz Storage Displays the storage space on SD card in different default folders Displays the storage space on SD card Format Cancel OK Format the inserted Micro SD Card deleting all photos vi...

Page 21: ......

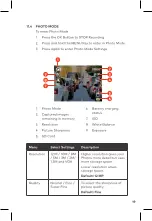
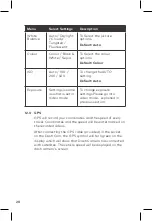
Page 22: ...connected with satellites The vehicle speed will be displayed on the dash camera s screen Menu Select Settings Description White Balance Auto Daylight Cloudy Tungsten Fluorescent To Select the picture...

Page 23: ......

Page 24: ......

Page 25: ...you have used the product in accordance with any recommendations or instructions provided by Directed Electronics This warranty excludes defects resulting from alterations of the product accident misu...

Page 26: ...24 17 0 NOTES...

Page 27: ...25...

Page 28: ......

Reviews: