PSV7000 Ionizer Kit
17 |
P a g e
Chapter 4: Optimizing and Maintenance
On the ionizer itself, you can directly adjust the following:
•
Direction
in which the emitter nozzles blow (loosen screws on ionizer hinge mount, rotate the
ionizer nozzle bar to desired angle/direction, then re-tighten screws)
•
Power
and force in which the ions blow (adjust pressure on air regulator to desired level/MPa)
•
Frequency
at which the ionizer generates ions (rotate the
FREQ SELECT
dial on the ionizer itself)
•
Balance
and polarity of discharged ions (rotate the
ZERO ADJUST
dial)
Knowing when to adjust a particular control up or down is dependent on the environmental conditions
and technical requirements of your specific setting. In general:
•
Establish ESD test locations:
Determine where on the system is ESD elimination absolutely critical
(ex. at programmer sockets, at media output—Tape-Out, Tray-Out, Tube-Out, etc.).
•
Benchmark the default electrostatic field magnitude at test locations:
Use an ESD field meter to
record the Voltage (in Volts) at each test location WITHOUT the ionizer running. This measurement
establishes a baseline for the level of ionizer effectiveness.
•
Measure the operating electrostatic field magnitude at test locations:
Now run the ionizer and use
an ESD field meter to record the Voltage at each test location. This measurement quantifies the level
of ionizer effectiveness (the amount by which electrostatic field voltage is reduced or eliminated).
Check the Ionizer Electrode(s)
Complete the following steps to check/replace an ionizer electrode.
WARNING: Electric Shock Hazard!
To avoid electrical shock, ensure the ionizer is Powered OFF before contacting the
nozzle(s)/electrode(s).
1.
To check, clean, or replace the ionizer electrode(s), shut-off Power and Air from the ionizer.
2.
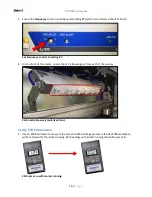
On the ionizer, unlock the desired electrode by rotating it 90° counter-clockwise, then pull it out.
Twist electrode 90° counter-clockwise, then pull it out.


