background image

32 


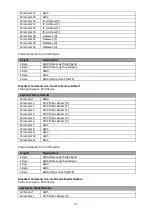
Broadcast Command List 

 Set DHCP Mode 

Command Issue to DVIP device 

Set DHCP Mode 

Command  

0x02 

Parameter 1 

DVIP MAC address [0] 

Parameter 2 

DVIP MAC address [1] 

Parameter 3 

DVIP MAC address [2] 

Parameter 4 

DVIP MAC address [3] 

Parameter 5 

DVIP MAC address [4] 

Parameter 6 

DVIP MAC address [5] 

Parameter 7 

0x53 

Parameter 8 

0x45 

Parameter 9 

0x54 

Parameter 10 

0x5F 

Parameter 11 

0x44 

Parameter 12 

0x48 

Parameter 13 

0x43 

Parameter 14 

0x50 

Parameter 15 

0x4D 

Parameter 16 

0x4F 

Parameter 17 

0x44 

Parameter 18 

0x45 

Parameter 19 

0x00: Disable; 0x01: Enable 

 
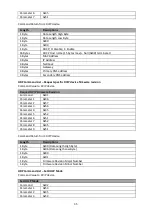
Command Return from DVIP device 

Length 

Descriptions 

1 Byte 

0x00 (Data Length High Byte) 

1 Byte 

0x06 (Data Length Low Byte) 

1 Byte 

0x80 

1 Byte 

0x02 

1 Byte 

0x06 (ACK) or 0x15 (NACK) 


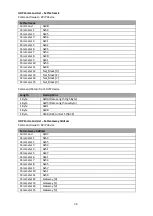
Broadcast Command List 

 Set IP Address 

Command Issue to DVIP device 

Set IP Address 

Command  

0x03 

Parameter 1 

DVIP MAC address [0] 

Parameter 2 

DVIP MAC address [1] 

Parameter 3 

DVIP MAC address [2] 

Parameter 4 

DVIP MAC address [3] 

Parameter 5 

DVIP MAC address [4] 

Parameter 6 

DVIP MAC address [5] 

Parameter 7 

0x53 

Parameter 8 

0x45 

Parameter 9 

0x54 

Parameter 10 

0x5F 

Parameter 11 

0x49 

Parameter 12 

0x50 

Parameter 13 

0x41 

Summary of Contents for PTC-150

Page 1: ...1 ...

Page 2: ...OL FUNCTIONS 9 5 2 ON SCREEN MENU 12 6 INSTRUCTION FOR INSTALLATION 21 6 1 STEP 1 DIP SWITCH SETTING 21 6 2 STEP 2 ONE END OF RETAINING WIRE 21 6 3 STEP 3 CEILING BRACKET B 21 6 4 STEP 4 CEILING BRACKET A AND CAMERA 22 6 5 STEP 5 MOUNT CAMERA TO CEILING 24 6 6 STEP 6 SCREW TO FIX CAMERA 25 6 7 STEP 7 CABLE CONNECTION 25 7 DIP SWITCH SETTINGS 26 7 1 RS 422 26 7 2 IRID 26 8 DVIP CONTROL PROTOCOL 27 ...

Page 3: ...give correct complete and suitable information However Datavideo Technologies cannot exclude that some information in this manual from time to time may not be correct or may be incomplete This manual may contain typing errors omissions or incorrect information Datavideo Technologies always recommend that you double check the information in this document for accuracy before making any purchase deci...

Page 4: ... this unit where the power cord will be walked on rolled over or otherwise stressed 9 If an extension cord must be used with this unit make sure that the total of the ampere ratings on the products plugged into the extension cord do not exceed the extension cord s rating 10 Make sure that the total amperes of all the units that are plugged into a single wall outlet do not exceed 15 amperes 11 Neve...

Page 5: ...State Drive SD Card USB Thumb Drive Lighting Camera module PCIe Card are covered for the first 10000 hours or 1 year whichever comes first Any three year warranty claims must be made to your local Datavideo office or one of its authorized Distributors before the extended warranty expires Disposal For EU Customers only WEEE Marking This symbol on the product or on its packaging indicates that this ...

Page 6: ...camera features a built in IR cut filter in the image path for low light shooting and then returns for daytime shooting Moreover PTC 150 supports real time position report on a per frame basis this will be helpful to virtual studio application The camera supports Sony VISCA protocol for PTZ control using RS 422 interface over the unit s RJ 45 port 2 Features HD Resolution 1 2 8 High Definition 2 1...

Page 7: ...controller receiver Rear of Camera 1 DIP Switch SW2 DIP switch for IRID setting 2 RS422 Communication Port Remote control of camera via RJ 45 interface 3 HD SDI OUT Video signal output 800mV 10 75_ BNC 4 CVBS OUT Video signal output CVBS 1 0Vp p 75_ BNC 5 HDMI OUT Video signal output16 bit YCbCr 4 2 2 6 DVIP Communication Port 7 Power Input DC 12V Input 8 USB Port F W Upgrade Only Bottom of Camera...

Page 8: ...8 4 System Diagram ...

Page 9: ...AMERA SELECT CAM 1 CAM4 buttons corresponding to the numbers set previously to navigate between four cameras No Item Description 4 Position Setting Various combinations of settings position zoom focus gain control and iris control can be saved to presets Adjust Preset Point Adjust position zoom focus gain control and iris of the camera Set up Preset Point Press any of the POSITION buttons 1 50 and...

Page 10: ...button to decrease the brightness of the environment To cancel the function or return to default setup press A GAIN button 8 P T Speed Adjust Pan Tilt Speed Press SPEED button to switch to different speed up down 9 Auto Iris Control Make the subject appear brighter Adjust the iris opening aperture to control the amount of light coming through the lens i e the exposure Press IRIS button to enlarge ...

Page 11: ... to enter sub menu option Adjust Setup Value Press LEFT or RIGHT button to adjust the value 12 Enter Exit Camera Menu Enter or Exit Camera Menu Option 13 Zoom In Out Buttons Zoom Press either T TELE button to zoom in on the subject such that it appears to be close to the camera or W WIDE button to zoom out from the subject such that it appears to be far away from the camera 14 Zoom Speed Button 4 ...

Page 12: ...Display 1 Camera Name Reset P T Z 2 Mirror 2 Group 1 2 Video Mode 2 Remote Source 2 Set Motor 2 Mirror 3 White Balance 3 Group 2 3 CV Mode 3 Set RS 422 3 Tally Light 3 White Balance 4 Focus 4 Group 3 4 Pattern 4 Set DVIP 4 Reset All 4 Focus 5 Iris 5 Group 4 5 Escape 5 Set IR 5 Update Software 5 Iris 6 AGC 6 Group 5 6 PTZ INFO output 6 Escape 6 AGC 7 Escape 7 Group 6 7 Escape 7 Fog Correction 8 Gro...

Page 13: ...2 Mirror H V V H OFF 3 White Balance MODE AWB AUTO AWC ONE PUSH MWB MANUAL 3200K INDOOR 6500K OUTDOOR 4200K FLUO SMART ATW OFF SMART1 2 3 MWB RED COMPONENT 0 128 255 MWB BLUE COMPONENT 0 128 255 ESCAPE 4 Focus FOCUS MODE AUTO MANUAL AF SENSITIVITY LOW NORMAL FOCUS SPEED 1 4 ESCAPE 5 Iris IRIS MODE AUTO IRIS MANUAL MANUAL IRIS LEVEL F1 6 F2 0 F2 4 F2 8 F3 4 F4 F4 8 F5 6 F6 8 F8 F9 6 F11 F14 CLOSE E...

Page 14: ...O 1 50 ITEM ON OFF ON OFF SPEED LIMIT 1 18 WAITING TIME 0 180 NEXT POSITION NEXT TIME RETURN GROUP 1 GROUP 2 GROUP 3 GROUP 4 GROUP 5 GROUP 6 GROUP 7 GROUP 8 ESCAPE 17 ESCAPE 3 Group 2 1 16 PRESET NO 1 50 ITEM ON OFF ON OFF SPEED LIMIT 1 18 WAITING TIME 0 180 NEXT POSITION NEXT TIME RETURN GROUP 1 GROUP 2 GROUP 3 GROUP 4 GROUP 5 GROUP 6 GROUP 7 GROUP 8 ESCAPE 17 ESCAPE 4 Group 3 1 16 PRESET NO 1 50...

Page 15: ...NEXT POSITION NEXT TIME RETURN GROUP 1 GROUP 2 GROUP 3 GROUP 4 GROUP 5 GROUP 6 GROUP 7 GROUP 8 ESCAPE 17 ESCAPE 6 Group 5 1 16 PRESET NO 1 50 ITEM ON OFF ON OFF SPEED LIMIT 1 18 WAITING TIME 0 180 NEXT POSITION NEXT TIME RETURN GROUP 1 GROUP 2 GROUP 3 GROUP 4 GROUP 5 GROUP 6 GROUP 7 GROUP 8 ESCAPE 17 ESCAPE 7 Group 6 1 16 PRESET NO 1 50 ITEM ON OFF ON OFF SPEED LIMIT 1 18 WAITING TIME 0 180 NEXT P...

Page 16: ...ESCAPE 17 ESCAPE 9 Group 8 1 16 PRESET NO 1 50 ITEM ON OFF ON OFF SPEED LIMIT 1 18 WAITING TIME 0 180 NEXT POSITION NEXT TIME RETURN GROUP 1 GROUP 2 GROUP 3 GROUP 4 GROUP 5 GROUP 6 GROUP 7 GROUP 8 ESCAPE 17 ESCAPE 10 Escape 3 Video Output 1 Selection Way BY MENU BY SWITCH 2 Video Mode 1080i60 1080i50 720p60 720p50 1080p30 1080p25 1080p60 1080p50 3 CV Mode 16 9 4 3 4 Pattern OFF COLOR BAR 5 Escape ...

Page 17: ...ing rear DIP switch ONLY CAM1 4 ESCAPE 6 PTZ INFO Output ON OFF 7 Escape 5 System 1 Display P T Z OSD PAN OSD ON OFF TILT OSD ON OFF ZOOM OSD ON OFF ESCAPE DEBUG OSD DEBUG IR OSD ON OFF DEBUG CAM OSD ON OFF DEBUG RS 422 OSD ON OFF DEBUG DVIP OSD ON OFF DEBUG M_CTL OSD ON OFF DEBUG REG OSD ON OFF DEBUG FRAME NO ON OFF PWR ON CAM TEST ON OFF ESCAPE 2 Set Motor PAN torque ADJ LOW 1 5 TILT torque ADJ ...

Page 18: ...NO ESCAPE 6 Escape 6 Camera Set ADVANCE 1 Camera Name NAME DISPLAY SW ON OFF POSITION UPPER LEFT LOWER LEFT UPPER RIGHT LOWER RIGHT ESCAPE 2 Mirror H V V H OFF 3 White Balance MODE AWB AUTO AWC ONE PUSH MWB MANUAL 3200K INDOOR 6500K OUTDOOR 4200K FLUO SMART ATW Enabled in AWB AUTO mode OFF SMART1 3 MWB RED COMPONENT 0 128 255 MWB BLUE COMPONENT 0 128 255 ESCAPE 4 Focus FOCUS MODE AUTO MANUAL AF SE...

Page 19: ...C DAY COLOR AGC AGC MODE ON OFF MANUAL GAIN 0dB GAIN LIMIT GAIN LIMIT 9 dB 12 dB 15 dB 18 dB 21 dB 24 dB 27 dB 30 dB 33 dB 36 dB 39 dB ESCAPE DNR DNR AT AGC ON ON OFF DNR LEVEL 0 1 2 3 4 5 ESCAPE 7 Fog Correction FOG CORRECTION OFF ON ESCAPE 8 Aperture 0 15 9 Vivid Effect 0 14 10 Pedestal Effect 0 14 11 Backlight Correction OFF ON This option is enabled ...

Page 20: ... Shutter SHUTTER SPEED NORMAL 1 100 1 125 1 250 1 500 1 1000 ESCAPE 14 Gamma Mode STANDARD MODE1 WD OFF MODE2 WD OFF MODE3 WD OFF MODE4 WD OFF 15 WD Mode ON OFF This option is enabled after AGC is turned on 16 Escape 7 Reset P T Z Reset P T Z YES NO 8 Escape ...

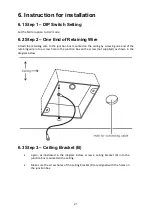
Page 21: ...on the ceiling by screwing one end of the retaining wire into a screw hole in the junction box with a screw not supplied as shown in the diagram below 6 3 Step 3 Ceiling Bracket B Again as illustrated in the diagram below screw a ceiling bracket B into the junction box mounted on the ceiling Make sure the screw holes of the ceiling bracket B are aligned with the holes on the junction box ...

Page 22: ...ws Position the screws as shown in the diagram below Align the screw holes on the bottom of the camera with those in the ceiling bracket Insert the screws into the corresponding screw holes in the numbered order The other end of the retaining wire is screwed into the screw hole 3 Securely tighten all three screws ...

Page 23: ...23 ...

Page 24: ...24 6 5 Step 5 Mount Camera to Ceiling ...

Page 25: ...w to Fix Camera Fix the camera by screwing three screws into the corresponding screw holes as shown in the diagram below 6 7 Step 7 Cable Connection Connect the cables to the connectors located on the rear of the camera ...

Page 26: ...g Resolution 5 6 7 OFF OFF OFF 1920x1080i60 5 6 7 ON OFF OFF 1920x1080i50 5 6 7 OFF ON OFF 1280x720p60 5 6 7 ON ON OFF 1280x720p50 5 6 7 OFF OFF ON 1920x1080p30 5 6 7 ON OFF ON 1920x1080p25 5 6 7 OFF ON ON 1920x1080p60 5 6 7 ON ON ON 1920x1080p50 Setting Remote Source 8 ON OFF ON video mode selected by DIP switch only OFF video mode selected by menu 7 2 IRID Setting Function Descriptions 1 2 OFF O...

Page 27: ...ug in the power cord into the PTC 150 and connect it to a monitor via the HDMI interface 4 Open the main menu by pressing the menu button on the remote control and select option 4 Remote Control MAIN MENU 1 CAMERA SET NORMAL 2 MEMORY 3 VIDEO OUTPUT 4 REMOTE CONTROL 5 SYSTEM 6 CAMERA SET ADVANCE 7 RESET P T Z 8 ESCAPE 5 Select SET DVIP to configure the DVIP port REMOTE CONTROL 1 PAN TILT REVERSE P ...

Page 28: ... should automatically assign an IP to the PTC 150 8 On the PC open the DVIP Configuration Tool by double clicking DVIP_ConfigureTools exe The DVIP Configuration Tool can be obtained from the Datavideo local distributors 9 After the DVIP Configuration Tool is opened select your network interface card as the Interface and click the Search button ...

Page 29: ...ce Name MAC address and IP address of the connected PTC 150 11 After the network setting True Static and DHCP and the host name are configured click the Apply button 12 The user will be prompted if the setup is successful 13 Reboot the PTC 150 to apply the new settings ...

Page 30: ...yte 8 bits Descriptions 0 Packet Length High Byte 1 Packet Length Low Byte 2 Command_Data 0 513 Command_Data 511 Broadcast Packet Byte 8 bits Descriptions 0 Packet Length High Byte 1 Packet Length Low Byte 2 0x80 3 Command 4 Parameter 1 251 Parameter 248 Broadcast Command List Request TCP IP information Command Issue to DVIP device Request TCP IP information include DHCP mode DHCP Host name IP add...

Page 31: ...nd Issue to DVIP device Request DVIP Firmware Revision Command 0x01 Parameter 1 DVIP MAC address 0 Parameter 2 DVIP MAC address 1 Parameter 3 DVIP MAC address 2 Parameter 4 DVIP MAC address 3 Parameter 5 DVIP MAC address 4 Parameter 6 DVIP MAC address 5 Parameter 7 0x46 Parameter 8 0x57 Parameter 9 0x56 Parameter 10 0x45 Parameter 11 0x52 Parameter 12 0x5F Parameter 13 0x52 Parameter 14 0x45 Param...

Page 32: ... 0x4F Parameter 17 0x44 Parameter 18 0x45 Parameter 19 0x00 Disable 0x01 Enable Command Return from DVIP device Length Descriptions 1 Byte 0x00 Data Length High Byte 1 Byte 0x06 Data Length Low Byte 1 Byte 0x80 1 Byte 0x02 1 Byte 0x06 ACK or 0x15 NACK Broadcast Command List Set IP Address Command Issue to DVIP device Set IP Address Command 0x03 Parameter 1 DVIP MAC address 0 Parameter 2 DVIP MAC a...

Page 33: ... Command Issue to DVIP device Reset to Factory Default Command 0x04 Parameter 1 DVIP MAC address 0 Parameter 2 DVIP MAC address 1 Parameter 3 DVIP MAC address 2 Parameter 4 DVIP MAC address 3 Parameter 5 DVIP MAC address 4 Parameter 6 DVIP MAC address 5 Parameter 7 0x52 Parameter 8 0x45 Parameter 9 0x53 Parameter 10 0x45 Parameter 11 0x54 Command Return from DVIP device Length Descriptions 1 Byte ...

Page 34: ...Length Descriptions 1 Byte 0x00 Data Length High Byte 1 Byte 0x06 Data Length Low Byte 1 Byte 0x80 1 Byte 0x04 16 Bytes Device Model Number is 16 Bytes maximum use null padding 0x00 if it is less than 16 bytes UDP Packet Byte 8 bits Descriptions 0 Packet Length High Byte 1 Packet Length Low Byte 2 0x81 3 Command 4 Parameter 1 251 Parameter 248 UDP Command List Request TCP IP information Command Is...

Page 35: ...cific DVIP device firmware revision Command Issue to DVIP device Request DVIP Firmware Revision Command 0x01 Parameter 1 0x46 Parameter 2 0x57 Parameter 3 0x56 Parameter 4 0x45 Parameter 5 0x52 Parameter 6 0x5F Parameter 7 0x52 Parameter 8 0x45 Parameter 9 0x51 Command Return from DVIP device Length Descriptions 1 Byte 0x00 Data Length High Byte 1 Byte 0x06 Data Length Low Byte 1 Byte 0x80 1 Byte ...

Page 36: ...ress Gateway Address Command Issue to DVIP device Set IP Address Command 0x03 Parameter 1 0x53 Parameter 2 0x45 Parameter 3 0x54 Parameter 4 0x5F Parameter 5 0x49 Parameter 6 0x50 Parameter 7 0x41 Parameter 8 0x44 Parameter 9 0x52 Parameter 10 IP_Address 0 Parameter 11 IP_Address 1 Parameter 12 IP_Address 2 Parameter 13 IP_Address 3 Parameter 14 Gateway 0 Parameter 15 Gateway 1 Parameter 16 Gatewa...

Page 37: ... or 0x15 NACK UDP Command List Set DHCP Host Name Command Issue to DVIP device Set DHCP Host Name Command 0x09 Parameter 1 0x53 Parameter 2 0x45 Parameter 3 0x54 Parameter 4 0x5F Parameter 5 0x44 Parameter 6 0x48 Parameter 7 0x43 Parameter 8 0x50 Parameter 9 0x4E Parameter 10 0x41 Parameter 11 0x4D Parameter 12 0x45 Parameter 13 Name ASCII 15 bytes Max Parameter Null 0x00 terminated Command Return...

Page 38: ...Net_Mask 3 Command Return from DVIP device Length Descriptions 1 Byte 0x00 Data Length High Byte 1 Byte 0x05 Data Length Low Byte 1 Byte 0x81 1 Byte 0x0B 1 Byte 0x06 ACK or 0x15 NACK UDP Command List Set Gateway Address Command Issue to DVIP device Set Gateway Address Command 0x0C Parameter 1 0x53 Parameter 2 0x45 Parameter 3 0x54 Parameter 4 0x5F Parameter 5 0x47 Parameter 6 0x41 Parameter 7 0x54...

Page 39: ...arameter 8 0x44 Parameter 9 0x4E Parameter 10 0x53 Parameter 11 Primary_DNS_IP 0 Parameter 12 Primary_DNS_IP 1 Parameter 13 Primary_DNS_IP 2 Parameter 14 Primary_DNS_IP 3 Command Return from DVIP device Length Descriptions 1 Byte 0x00 Data Length High Byte 1 Byte 0x05 Data Length Low Byte 1 Byte 0x81 1 Byte 0x0D 1 Byte 0x06 ACK or 0x15 NACK UDP Command List Set Secondary DNS Address Command Issue ...

Page 40: ...nfiguration Command 0x0F Parameter 1 0x49 Parameter 2 0x4E Parameter 3 0x49 Parameter 4 0x54 Parameter 5 0x5F Parameter 6 0x45 Parameter 7 0x32 Parameter 8 0x50 Parameter 9 DHCP_Mode Parameter 10 DHCP_Host_Name 0 14 ASCII 15 Bytes Max Parameter N Null 0x00 Parameter N 1 MAC_Address 0 3 Parameter N 5 IP_Address 0 3 Parameter N 9 Gateway_IP 0 3 Parameter N 13 Net_Mask 0 3 Parameter N 17 Primary_DNS_...

Page 41: ... such as a PTC 150 is called the peripheral device The PTC 150 serves as a peripheral device in VISCA In VISCA up to seven peripheral devices like the BRC 300 P can be connected to one controller using communication conforming to the RS 232C RS 422 standard The parameters of RS 232C RS 422 are as follows Communication speed 38400 bps Data bits 8 Start bit 1 Stop bit 1 Non parity Flow control using...

Page 42: ...t from the controller Fig 1 VISCA network configuration 9 2 2 VISCA Communication Specifications 9 2 2 1 VISCA Packet Structure The basic unit of VISCA communication is called a packet Fig 2 The first byte of the packet is called the header and comprises the sender s and receiver s addresses For example the header of the packet sent to the PTC 150 assigned address 1 from the controller address 0 i...

Page 43: ...irst Fig 3 Actual waveform for 1 byte 9 2 2 2 Timing Chart As VISCA Command processing can only be carried out one time in a Vertical cycle it takes the maximum 1V cycle time for an ACK Completion to be returned If the Command ACK Completion communication time can be cut shorter than the 1V cycle time then every 1V cycle can receive a Command ...

Page 44: ...ssage is returned for inquiries Completion message Returned by the PTC 150 when execution of commands or inquiries is completed In the case of inquiry commands it will contain reply data for the inquiry after the 3rd byte of the packet If the ACK message is omitted the socket number will contain a 0 Reply Packet Note Ack X0 4Y FF Y socket number Completion Commands X0 5Y FF Y socket number Complet...

Page 45: ...ket Note IF_Clear 8X 01 00 01 FF X0 50 FF IF_Clear broadcast 88 01 00 01 FF 88 01 00 01 FF X 1 to 7 PTC 150 address For inquiry packet X 9 to F PTC 150 address 8 For reply packet 9 2 4 VISCA Command ACK Protocol Command Command Message Reply Message Comments General Command 81 01 04 38 02 FF Example 90 41 FF ACK 90 51 FF Completion 90 42 FF 90 52 FF Returns ACK when a command has been accepted and...

Page 46: ...omments ACK z0 4y FF y Socket No Returned when the command is accepted Completion z0 5y FF y Socket No Returned when the command has been executed z Device address 8 9 2 5 2 Error Messages Command Command Messages Comments Syntax Error z0 60 02 FF Returned when the command format is different or when a command with illegal command parameters is accepted Command Buffer Full z0 60 03 FF Indicates th...

Page 47: ...FF pqrs Focus Position Auto Focus 8x 01 04 38 02 FF AF ON OFF Manual Focus 8x 01 04 38 03 FF One Push Trigger 8x 01 04 18 01 FF One Push AF Trigger CAM_WB Auto 8x 01 04 35 00 FF Normal Auto Indoor 8x 01 04 35 01 FF Indoor Mode Outdoor 8x 01 04 35 02 FF Outdoor Mode One Push WB 8x 01 04 35 03 FF One Push WB Mode Manual 8x 01 04 35 05 FF Manual Control Mode One Push Trigger 8x 01 04 10 05 FF One Pus...

Page 48: ...TZ_Position Reset 8x 01 04 3F 00 0p FF Memory Number p 0 to 50 Set 8x 01 04 3F 01 0p FF Memory Number p 0 to 50 Recall 8x 01 04 3F 02 0p FF Memory Number p 0 to 50 CAM_Menu On 8x 01 06 06 02 FF Menu ON Off 8x 01 06 06 03 FF Menu OFF Pan tilt Drive Up 8x 01 06 01 VV WW 03 01 FF PanSpeed VV 01 Slow to 18h Fast TiltSpeed WW 01 Slow to 18h Fast Down 8x 01 06 01 VV WW 03 02 FF Left 8x 01 06 01 VV WW 01...

Page 49: ...ocus y0 50 03 FF Manual Focus CAM_FocusPosInq 8x 09 04 48 FF y0 50 0p 0q 0r 0s FF pqrs Focus Position CAM_WBModeInq 8x 09 04 35 FF y0 50 00 FF Auto y0 50 01 FF Indoor y0 50 02 FF Outdoor y0 50 03 FF One Push WB y0 50 05 FF Manual CAM_RGainInq 8x 09 04 43 FF y0 50 00 00 0p 0q FF pq R Gain CAM_BGainInq 8x 09 04 44 FF y0 50 00 00 0p 0q FF pq B Gain CAM_AEModeInq 8x 09 04 39 FF y0 50 00 FF Full Auto y...

Page 50: ...ilt_Status 8x 09 06 10 FF y0 50 pq rs FF pqrs PanTilt Status PanTilt_Max_Speed 8x 09 06 11 FF y0 50 pq rs FF pq Pan Max Speed rs Tilt Max Speed PanTilt_Position 8x 09 06 12 FF y0 50 0p 0q 0r 0s 0t 0u 0v 0w 0x FF pqrst Pan Position uvwx Tilt Position Tally 8x 09 7E 01 0A FF y0 50 02 FF On y0 50 03 FF Off PanTilt_Memory_Speed 8x 09 7E 01 0B 0p FF y0 50 0q FF p Preset No 0 50 qq Speed 1 18 h See the ...

Page 51: ...rom CAM 1 4 default is CAM1 3 Main Menu 5 SYSYEM 4 UPDATE SOFTWARE 5 UPDATE ALL YES ENTER 4 Wait for another five minutes until the following lines appear on the screen Updated Mot BD OK Updated FPGA OK Updated MCPU OK The OSD will flash Write OK Power ON Again alternately it takes approximately 5 7 minutes to complete the update 5 Turn off the device by unplugging the power cord and plug the powe...

Page 52: ...52 11 Dimensions Unit mm ...

Page 53: ...1 100 1 250 1 500 1 1000 sec Gamma Control Off Normal Standard Mode 1 4 Iris Control Auto Manual Digital Noise Reductions 0 5 On Screen Display OSD English White Balance AWB MWB One push WB Outdoor Indoor Fluorescent AGC Gain Control Auto Manual 0 to 39 step Max Gain Limit 9 to 39 step Zoom Ratio 30x Optical Zoom Mirror OFF Horizontal Vertical H V Camera Title OSD ON OFF Color Bar On Off Full Bar ...

Page 54: ...e Control RS 422 DVIP by RJ 45 interface Remote Controller RMC 180 F W Update USB 2 0 IR Control One IR controller Others Moving Noise while Tilt 25dB Moving Noise while Pan 25dB Operating Temperature 0 C 50 C Storage Temperature 10 C 60 C Operating Humidity 10 to 80 no condensation Certifications CE FCC Class A Weight 2 76 Kg Camera Device Only Accessories IR Remote Controller Mounting Bracket fo...

Page 55: ...55 13 Service Support ...

Reviews: