background image

7" TFT LCD MONITOR

2

Standard Warranty

• Datavideo equipment is guaranteed against any manufacturing defects for 

one year from the date of purchase. 

• The original purchase invoice or other documentary evidence should be 

supplied at the time of any request for repair under warranty. 

• Damage caused by accident, misuse, unauthorized repairs, sand, grit or 

water is not covered by this warranty. 

• All mail or transportation costs including insurance are at the expense of 

the owner. 

• All other claims of any nature are not covered. 

• Cables & batteries are not covered under warranty. 

• Warranty only valid within the country or region of purchase. 

• Your statutory rights are not affected. 

Two Year Warranty

• All Datavideo products purchased after 01-Oct.-2008 qualify for a free 

one year extension to the standard Warranty, providing the product is 

registered with Datavideo within 30 days of purchase. For information 

on how to register please visit www.datavideo.com or contact your local 

Datavideo office or authorized Distributors

• Certain parts with limited lifetime expectancy such as LCD Panels, DVD 

Drives, Hard Drives are only covered for the first 10,000 hours, or 1 year 

(whichever comes first).

• Any second year warranty claims must be made to your local Datavideo 

office or one of its authorized Distributors before the extended warranty 
expires.

Warranty

Welcome to the TLM-700HD Instruction 

Manual

Thank you for choosing a Datavideo product, please 

visit the support pages on our website for the latest 

version of the instruction manual. 

http://www.datavideo.com/LCD+Monitors/TLM-700HD

Don’t forget to register your product online to qualify for 

an additional free one year extension to the standard 

warranty, and to receive information from Datavideo on 

service & information relevant to your Datavideo product 

including new software updates & drivers

Summary of Contents for TLM-700HD

Page 1: ...TLM 700HD 7 TFT LCD MONITOR Instruction Manual w w w d a t a v i d e o c o m VOL SOURCE POWER PATTERN BLUE MENU ENTER ASPECT ON MAX MIN OFF 7 TFTLCDMONITOR TLM 700HD ...

Page 2: ...product is registered with Datavideo within 30 days of purchase For information on how to register please visit www datavideo com or contact your local Datavideo office or authorized Distributors Certain parts with limited lifetime expectancy such as LCD Panels DVD Drives Hard Drives are only covered for the first 10 000 hours or 1 year whichever comes first Any second year warranty claims must be...

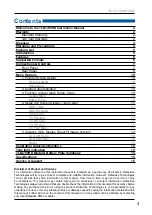
Page 3: ...ed within this manual Further advice on the content of this manual or on the product can be obtained by contacting your local Datavideo Office or dealer Contents Welcome to the TLM 700HD Instruction Manual 2 Warranty 2 Standard Warranty 2 Two Year Warranty 2 Disposal 4 Warnings and Precautions 4 Packing List 5 Introduction 5 Features 6 Supported Formats 6 Connections Controls 7 Front Panel 7 Rear ...

Page 4: ...If you are not sure of the type of power available consult your Datavideo dealer or your local power company 8 Do not allow anything to rest on the power cord Do not locate this unit where the power cord will be walked on rolled over damaged or otherwise stressed 9 If an extension cord must be used with this unit make sure that the total of the ampere ratings on the products plugged into the exten...

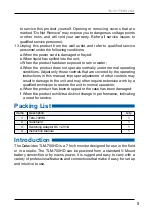
Page 5: ...ontrols that are covered by the operating instructions in this manual improper adjustment of other controls may result in damage to the unit and may often require extensive work by a qualified technician to restore the unit to normal operation e When the product has been dropped or the case has been damaged f When the product exhibits a distinct change in performance indicating a need for service ...

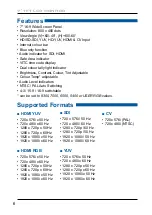
Page 6: ...tching 4 3 15 9 16 9 switchable can be set to 9300 7500 6500 5400 or USER RGB values HDMI YUV 720 x 576i x 50 Hz 720 x 480i x 60 Hz 1280 x 720p x 50 Hz 1280 x 720p x 60 Hz 1920 x 1080i x 50 Hz 1920 x 1080i x 60 Hz HDMI RGB 720 x 576i x 50 Hz 720 x 480i x 60 Hz 1280 x 720p x 50 Hz 1280 x 720p x 60 Hz 1920 x 1080i x 50 Hz 1920 x 1080i x 60 Hz SDI 720 x 576i 50 Hz 720 x 480i 60 Hz 1280 x 720p 60 Hz 1...

Page 7: ...ERN Power Switch Switches the power On Off Stereo Headphone Mini Jack socket The level is adjusted by headphone volume control Listen to embedded audio from HDMI or SDI sources Headphone Volume Control Allows you to adjust the headphone volume Source Button Selects Input include SDI YPbPr CVBS and HDMI Aspect Ratio Button Select 4 3 15 9 or 16 9 PATTERN Generate on colour bars ...

Page 8: ... and phase adjustments with NTSC signals MENU Calls up the on screen adjustment menu See Page10 Menu Options for more details UP DOWN Menu navigation controls ENTER Confirms the new settings or return to the default state TALLY LIGHT Red Live Amber Standby BLUE MENU ENTER ...

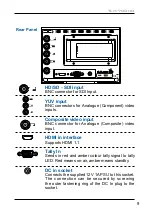
Page 9: ...put HDMI in interface Supports HDMI 1 1 Tally In Sends in red and amber colour tally signal to tally LED Red means on air amber means standby DC in socket Connects the supplied 12V 1A PSU to this socket The connection can be secured by screwing the outer fastening ring of the DC In plug to the socket HD SD SDI Y U P V P CV Rear Panel HDMIIN TALL Y DCIN 1 2V 8W HD SD SDI Y CV U P V P ...

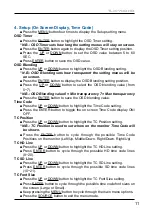
Page 10: ...SER RGB values 2 Audio Audio Indicator Press the MENU button twice to display the Audio setting menu Press the ENTER button to highlight the Indicator setting Press the ENTER button again to toggle the on screen audio indicator ON OFF Keep pressing the MENU button to cycle through the main menu options Press the SOURCE button to exit the menu mode 3 Function Center Mark Safety Zone Press the MENU ...

Page 11: ...nding value Time Code Press the UP or DOWN button to highlight the Time Code setting Press the ENTER button to toggle the on screen Time Code display ON OFF TC Position Press the UP or DOWN button to highlight the TC Position setting N B TC Position is used to set where on the monitor Time Code will be shown Press the ENTER button to cycle through the possible Time Code Positions on the monitor Le...

Page 12: ...ENTER button again the screen image will return to normal view LCD U D Scan Press UP DOWN button to highlight the LCD U D Scan setting N B The LCD U D Scan will reverse the image displayed vertically Press the ENTER button the screen image will be reversed Top to Bottom Press the ENTER button again the screen image will return to normal view Reset Press UP DOWN button to highlight the Reset option...

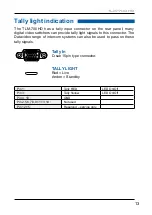
Page 13: ...de tally light signals to this connector The Datavideo range of intercom systems can also be used to pass on these tally signals Pin 1 Tally RED LED On Off Pin 3 Tally Yellow LED On Off Pin 4 10 GND Pin 2 5 6 7 8 9 11 13 14 Not used Pin 12 15 Reserved service only Tally In D sub 15pin type connector TALLY LIGHT Red Live Amber Standby ...

Page 14: ...ith V mount Battery Plate TLM 700HD C with Canon battery mount TLM 700HD P with Panasonic battery mount TLM 700HD S1 S2 with Sony battery mount TLM 700HD A with Anton Bauer battery mount There are several versions of TLM 700HD monitor with different battery connection plates ...

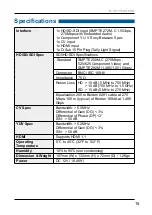
Page 15: ...169 8 Impedance 75 Ω Return Loss HD 15 dB 5 MHz to 750 MHz 10 dB 750 MHz to 1 5 GHz SD 15 dB 5 MHz to 270 MHz Equalization 200 m Belden 8281 cable at 270 Mbps 100 m typical of Belden 1694A at 1 485 Gbps CV Spec Bandwidth 5 0MHz Differential of Gain DG 3 Differential of Phase DP 3 S N 50 dB YUV Spec Bandwidth 5 2MHz Differential of Gain DG 3 S N 50 dB HDMI Supports HDMI 1 1 Operating Temperature 0 ...

Page 16: ...E mail sales datavideo in Tel 91 0120 2427337 A 132 Sec 63 Noida 201307 Uttar Pradesh UP India U S A Datavideo Corporation 7048 Elmer Avenue Whittier CA 90602 Tel 1 562 696 2324 Fax 1 562 698 6930 E mail sales datavideo us Datavideo USA R O C Datavideo Technologies Co Ltd 10F No 176 Jian 1st Rd Chung Ho District New Taipei City 235 Taiwan Tel 886 2 8227 2888 Fax 886 2 8227 2777 E mail service data...

Reviews: