background image

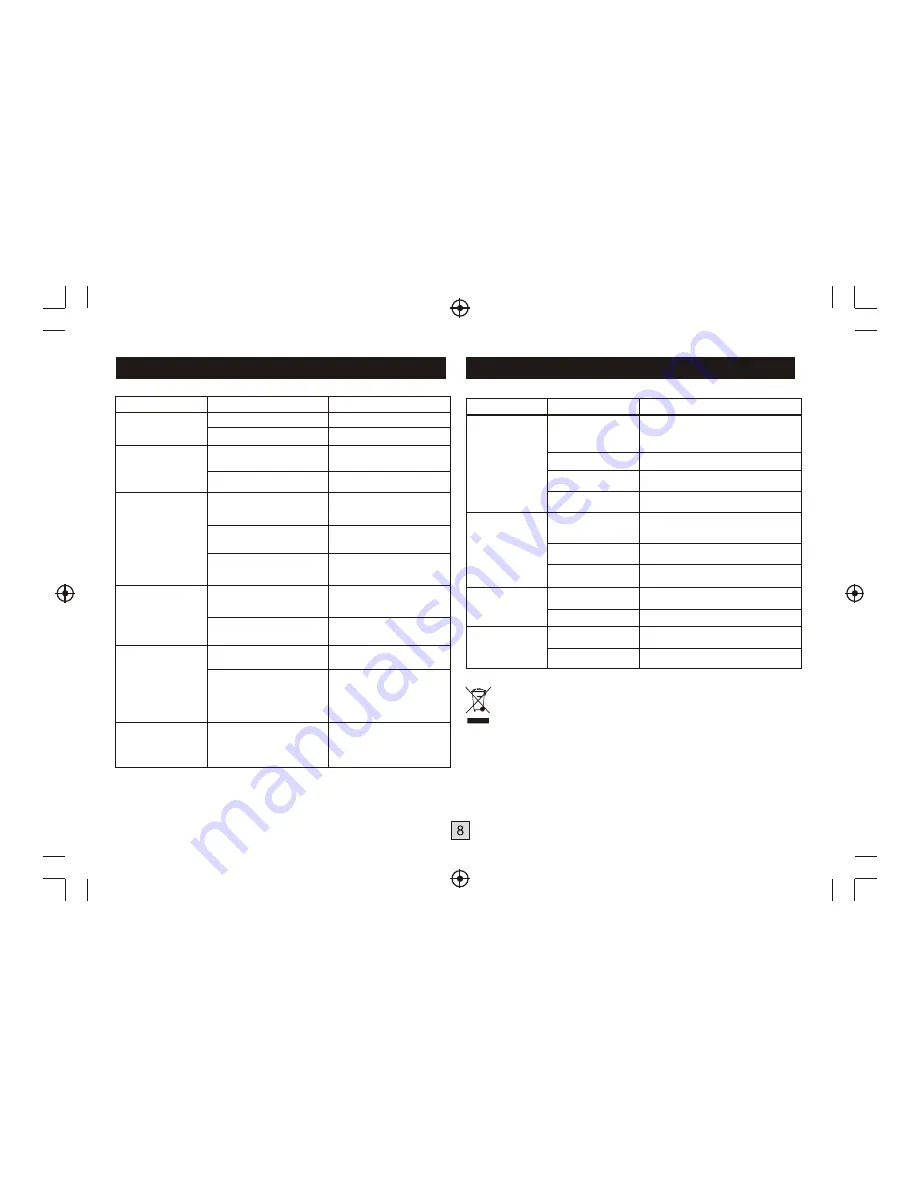
Troubleshooting

Problem

Potential Reasons

What to do

No picture

Screen shows
No  Signal

No sound from 
speaker

Only sound, 
no image on the 
screen

Remote control
unit is not workable

The image stop 
suddenly or mosaic

Power isn't connected

The power switch is not on

Not connect  DVB-T cabl

Incorrect setting

No or incorrect connection 
with audio cable

Mute the sound

Incorrect sound track

No or incorrect connection 
with AV cable

The program is a radio 
program

The battery is exhausted

Remote control unit is not 
in the right opposite of the 
front panel or too far from it

The signal is too weak

Connect the power

Switch on the power

Plug in the DVB-T cable

Set up correct parameter

Connect the audio cable 
correctly

Switch on the correct 
volume control

Try another sound track

Connect the audio cable 
correctly

Press <TV/RADIO> key to 
shift into TV mode

Change new battery

Adjust the way of holding 
remote control unit and 
near from the panel

Strengthen the signal

Technical Specifications

Item

Sub Item

Parameter

Tuner

Video

Audio

Power

Input Frequency

RF Input level

IF Bandwidth

Modulation

Decoder Format

Output Format

Output Port

Decoder Format

Audio output

Voltage

Power

170~230MHz
470~860MHz

-25~-78dBm

7MHz and 8MHz

QPSK,16QAM,64QAM

MPEG4 AVC/H.264 HP@L4
MPEG2 MP@ML.HL

576P , 720P, 1080i, 4:3 and 16:9

HDMI, Dual SCART

MPEG-1 (layer1&2)

Digital audio: S/PDIF

100-240V~  50/60Hz

Max 8W

This marking indicates that this product should not be disposed with 
other household wastes throughout the EU. To prevent possible 
harm to the environment or human health from uncontrolled waste 
disposal, recycle it responsibly to promote the sustainable reuse of 
material resources. To return your used device, please use the return 
and collection systems or contact the retailer where the product was 
purchased. They can take this product for environmental safe 
recycling.

Summary of Contents for Datacom TDT-HD140

Page 1: ...TDT HD140 Manual de Usuario Por favor lea este manual de usuario con atención con el fin de asegurar el uso apropiado de este producto Guarde este manual para el futuro ...

Page 2: ...o momento para su uso previsto 15 No se debe impedir la ventilación cubriendo los orificios de ventilación con objetos como periódicos manteles cortinas etc 16 No se debencolocar fuentes de llamadesnuda como velas encendidas encima del aparato 17 Se debe prestaratención a los aspectosmedioambientales cuando se vayan a desechar pilas 18 Utilice el aparatocon temperaturas moderadas 19 El aparato nod...

Page 3: ...ar loscanales cuando no se useel mando a distancia 3 VENTANA LEDDE INDICACIÓN DE CANAL Utilizada para indicar elcanal en pantalla Entrada de datos desdedispositivos de almacenamiento USB 1 RF IN ENTRADADE RF Este conector conecta elaparato a su antenaexterna 2 RF LOOPTHROUGH SALIDA DIRECTA RF Este conector derivará laseñal RF a suTV o a otrosistema de vídeo 3 COAXIAL Este conector conecta elaparat...

Page 4: ...acia la parte delantera del Descodificador Digital El mando a distancia tiene un alcance de hasta 7 metros desde el DescodificadorDigital a un ángulode hasta 60 grados El mando a distancia no funcionará si hay alguna obstrucción en la trayectoria hasta el sensor La luz del solo una luz muy brillante reducirá lasensibilidad del mando a distancia 1 Abra la tapa 2 Instale las pilas 3 Cierre la tapa 1...

Page 5: ...l receptor Si está utilizando el receptor por primera vez o lo está restableciendo a la configuración predeterminada de fábrica aparecerá el Menú Principal en la pantalla 1 Seleccione OSD Language Idioma de presentación enpantalla y pulse la tecla DERECHA IZQUIERDA para seleccionar un idioma 2 Seleccione Country País y pulse la tecla DERECHA IZQUIERDA para seleccionar su país de residencia 3 Selec...

Page 6: ... salir del Menú pulse la tecla EXIT SALIR Inhabilitar un salto de programa de TVo Radio Pulse el botón VERDE sobre programa con el símbolo de salto Mover un programa deTV o de Radio 1 Seleccione el programapreferido y a continuaciónpulse el botón ROJO Aparecerá un símbolo demovimiento 2 Pulse ARRIBA ABAJO para mover el programa 3 Pulse OK para confirmar 4 Repita los pasos anteriores para mover más...

Page 7: ...istema PAL CVBS Salida de CVBS RGB Salida de RGB 7 Búsqueda de canales Para acceder al menú pulse MENU y seleccione Search Channel Buscar canal El Menú ofrece opciones para ajustar los parámetros de Búsqueda de canal Seleccione una opción y pulse DERECHA IZQUIERDA para ajustar los parámetros Pulse EXIT SALIR para salir del menú 1 Búsqueda automática Busca e instala todos los canales automáticament...

Page 8: ...one auto o manual para ajustes de compensación horaria GMT 3 Zona horaria Seleccione la Compensación de la zona horaria Time Offset esté en Manual 9 Opción 1 OSD Language Idioma de presentación en pantalla 2 Audio Language Idioma de audio 3 Subtitle Language Idiomade subtítulos Para acceder al menú pulse MENU y seleccione System Sistema El menú ofrece opciones para ajustar los parámetros del siste...

Page 9: ... Pulse el botón REC en el mando para iniciar la grabación puede pulsar repetidas veces el botón REC para establecer la duración determinada de lagrabación en intervalos de30 minutos para detenerla presione el botónSTOP Se creará un fichero con el nombre del canal sintonizado hora y fecha inicial de la grabación Puede renombrar el archivo oprimiendo el botón VERDE Para reproducir sus grabaciones pr...

Page 10: ... no asumimos ninguna responsabilidad por cualquier pérdida de datos que pueda producirse cuando éstos se conecten a esta unidad Con grandes cantidades de datos puede que el sistema tarde más tiempo en leer loscontenidos de un dispositivoUSB Puede que algunos dispositivos USB no se reconozcan adecuadamente incluso cuando estén en un formato soportado puede que algunos archivos no se reproduzcan o p...

Page 11: ... la tecla TV RADIO para cambiar al modode TV Cámbielas por otras nuevas Ajuste la forma deorientar el mando a distancia yla cercanía al panel Ponga la señal másfuerte La alimentación no está conectada Especificaciones técnicas Elemento Subelemento Parámetro Sintonizador Vídeo Audio Alimentación Frecuencia de entrada Nivel de entrada de RF Ancho de banda IF Modulación Formato del decodificador Form...

Page 12: ...TDT HD140 Manual do Utilizador Antes de utilizar este produto leia cuidadosamente a documentaçao fornecida ...

Page 13: ...alimentação constitui o principal elemento para desligar o aparelho logo deve manter se prontamente acessível 15 Aventilação não deve ser obstruída ao tapar as aberturas de ventilação com objectos comojornais toalhas cortinas etc 16 Não devem sercolocadas quaisquer fontes dechamas desprotegidas como velas acesas sobre o aparelho 17 Deve ser dada a devida atenção aos aspectos ecológicos da eliminaç...

Page 14: ...o à distância 5 USB 6 CANAL SEGUINTE ANTERIOR Utilizado para mudar decanal sem utilizar o comando à distância JANELA DE INFORMAÇÕES Utilizada para indicar onúmero do canal Entrada de dados apartir de dispositivos dearmazenamento USB 1 RF IN Esta entrada destina se à ligação da sua antena externa 2 RF LOOPTHROUGH Esta saída irá derivar o sinal RF para o seu televisor ou outro sistema de vídeo 3 COA...

Page 15: ... lista de canais 8 RIGHT LEFT Navega entre menus Aumenta diminui o som 9 TV RADIO Alterna entre asfunções de TVe Rádio 10 RECALL Usada para alternar entreos dois últimos canais vistos 11 GO TO Selecciona o tempo dereprodução de media 12 PREV Salta para a faixaanterior durante a reprodução 13 NEXT Salta para a faixaseguinte durante a reprodução 14 REPEAT Selecciona repetir ou desligao modo de repet...

Page 16: ...para ligar o receptor Se estiver a utilizar o receptor pela primeira vez ou tiver reposto as predefinições de fábrica o menu principal irá aparecer no ecrã do seu televisor 1 Escolha OSD Language idioma do texto no ecrã e prima a tecla DIREITA ESQUERDApara escolher um idioma 2 Escolha Country país e prima a tecla DIREITA ESQUERDA para escolher o seu país de residência 3 Escolha Channel Search proc...

Page 17: ... saltar 2 Repita o passoanterior para escolher maisprogramas 3 Para confirmar e sair do menu prima a tecla EXIT Desactivar o salto de Mover um programa deTV ou rádio 1 Escolha o programapretendido e depois primao botão VERMELHO Um símbolo de movimentação será apresentado 2 Prima CIMA BAIXO para mover o programa 3 Prima OK para confirmar 4 Repita os passosacima para mover maiscanais Bloquear um pro...

Page 18: ...er à definiçãomais comum para televisoresno seu país NTSC para o sistema de televisão NTSC PAL parao sistema de televisão PAL CVBS saída CVBS RGB saída RGB 7 Procura de canais e m de de definições para sair m Para aceder ao menu prima MENU escolha Search Channel procura de canais O enu fornece lhe opções para acertar as definições procura canais Escolha uma opção e prima DIREITA ESQUERDA para acer...

Page 19: ...usoGMT 3 Time Zone fuso horário Escolha a diferença do fuso horário quando Time Offset estiver definido para Manual 9 Opções m e idioma do texto no ecrã o idioma das legendas e o idioma de áudio DIREITA ESQUERDA para sair m 1 OSD Language idioma do texto no ecrã 2 Audio Language idioma de áudio 3 Subtitle Language idiomadas legendas Para aceder ao enu prima MENU escolha System sistema O menu forne...

Page 20: ... e mantém a gravação até aofinal do programa Suspendecom tecla Stop Premindo a tecla EXITa função TimeShiftestará desactivada B Configuragáo de fotografías Tempo devisualizagáo regule o tempode transigáo entre 1e 8 segundos Modo de visualizagáo regule o efeito de transigao entre os modos 0 59 ou aleatorio Relagáo de aspecto Keep manter apresenta a fotografía no seu aspecto original Discard ignorar...

Page 21: ...cia dosinal A alimentação não está ligada Especificações técnicas Elemento Elemento subordinado Parâmetro Sintonizador Vídeo Áudio Energia Frequência de entrada Nível de entrada de RF Largura de banda deIF Modulação Formato de descodificação Formato de apresentação Porta de saída Formato de descodificação Saída de áudio Tensão eléctrica Potência 170 a 230 MHz 470 a 860 Mhz 25 a 78 dBm 7 MHz e 8 Mh...

Page 22: ...TDT HD140 ...

Page 23: ...disconnect device shall remain readily operable 15 The ventilation should not be impeded by covering the ventilation openings with items suchas newspapers table cloth curtains etc 16 No naked flame sources such as lighted candles should be placed on the apparatus 17 Attention should be drawn to the environmental aspects of battery disposal 18 The useof apparatus in moderate climate 19 The apparatu...

Page 24: ...5 USB 6 CHANNEL UP DOWN Used to change channelswithout using the remote control LED DISPLAYWINDOW Used to display channelnumber Data input from USBstorage devices 2 Rear panel 1 RF IN This socket connects to your external aerial 2 RF LOOP THROUGH This socket will bypass the RF signal to either your TV oranother video system 3 COAXIAL This socket connects to a coaxial socket on your surround sound ...

Page 25: ... correct way to install the batteries 1 Open the cover 2 Install batteries 3 Close the cover Using the Remote Control To use the Remote Control point it towards the front of the Digital Set Top Box The Remote Control has a range of up to 7 metres from the Set Top Box at an angleof up to 60degrees The Remote Control will not operate if its path is blocked Sunlight or very brightlight will decrease ...

Page 26: ...connected to the Main Power Press Power button to switch receiver on If you are using the receiver for the first time or restored to Factory Default the Main Menu will appear on your TV screen 1 Select OSD Language and press RIGHT LEFT key to select an language 2 Select Country and press RIGHT LEFT key to select your country of residence 3 Select Channel Search and press RIGHT or OK key to begin A...

Page 27: ...rograms 3 To confirm and exit the menu press EXIT key Disable a skip TV or Radio program Press the GREEN button on the skip program with the skip symbol Move a TV or Radio Program 1 Select the preferred program then press the RED button A move symbol will appear 2 Press UP DOWN to move the program 3 Press OK to confirm 4 Repeat the above steps to move more channels Lock Program You canlock selecte...

Page 28: ... NTSC orPAL systemTV If the video doesnot appear correctly you need tochange the settings This should match themost common setting for TVs inyour country NTSC for NTSC systemTV PAL forPAL systemTV CVBS CVBS output RGB RGB output 7 Channel Search and M S C s to exit M To access the menu press MENU select Search Channel The enu provides options to adjustthe earch hannel settings Select an option and...

Page 29: ...g is 3 hours Press STANDBYbutton to exit sleep auto offmode 9 Option To access the Menu press MENU and select Option Themenu provides options to adjust the OSD Language Subtitle Language and Audio Language Select an option andpress RIGHT LEFT toadjust the setting PressEXIT to exit the Menu 1 OSD Language 2 Audio Language 3 Subtitle Language To access the enu press MENU select System The menu provi...

Page 30: ... programs press LIST in the remote control and select the file with up down buttons then press OKto play it Time Shift If a USBdevice is connected youcan pause live broadcasts Press the PAUSE key during live broadcastto start TimeShift Aprogress banner will appear displaying the length of time the program has been time shifted The progress bar will disappear after5 seconds When you wish to re star...

Page 31: ...RADIO key to shift into TVmode Change new battery Adjust the way of holding remote control unit and near from the panel Strengthen the signal Technical Specifications Item Sub Item Parameter Tuner Video Audio Power Input Frequency RF Input level IF Bandwidth Modulation Decoder Format Output Format Output Port Decoder Format Audio output Voltage Power 170 230MHz 470 860MHz 25 78dBm 7MHz and 8MHz QP...

Reviews: