background image

CBX800 INSTALLATION MANUAL 

26  


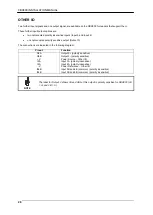
OTHER I/O 

 
Two further input signals and one output signal, are available on the CBX800 for readers that support them. 
 
These further input/output options are: 


two optocoupled polarity insensitive inputs (Input 3 and Input 4) 


one optocoupled polarity sensitive output (Output 3) 

 
The connections are indicated in the following diagram: 
 

Pinout


Function


O3A 

Output 3+ (polarity sensitive) 

O3B 

Output 3- (polarity sensitive) 

+V 

Power Source 

– Other I/O 

I3A 

Input 3A  (polarity insensitive) 

I4A 

Input 4A  (polarity insensitive) 

-V 

Power Reference 

– Other I/O 

I34B 

Input 3B and 4B (common)  (polarity insensitive) 

I34B 

Input 3B and 4B (common)  (polarity insensitive) 


NOTE


The label for Output 3 shows 3A and 3B but this output is polarity sensitive for CBX800 (3A 
= 3+ and 3B = 3-). 


Summary of Contents for BA100

Page 1: ...RAIL MOUNTING ADAPTER KIT INSTRUCTION MANUAL 1 Attach the DIN Rail adapters to the back of the CBX or SC paying attention to the Left L and Right R markings 2 Insert and tighten the screws 3 Snap the assembly onto the DIN Rails ...

Page 2: ...ise 90 so that they lock into place 4 Install the two small diameter flat washers and fasten the two self locking nuts until tight For 80 20 Frames CBX Connection Boxes or SC Controllers 1 Insert the screws locking washers and small flat washers through the connection box as shown in the figure and thread them loosely into the Drop In T nuts 2 Insert the entire assembly onto the 80 20 profile so t...

Page 3: ...als from the previous device in the network power In 821001631 Rev A INSTALLATION CAUTION Power must be off during this operation The BAxxx Panel Connectors can easily be installed into the CBX series or SC4000 by substituting any one of the compression connectors and mounting the M12 Connector in its place 1 Remove the compression connector with its retaining nut 2 Insert the retaining nut of the...

Page 4: ...onductive metal brackets or frames or through the CBX or SC4000 or through the QL bushing In the case of grounding through the CBX or SC4000 connect the Earth signal to a good earth ground and set the internal Chassis jumper to Earth In the case of grounding through the QL bushing connect a flying lead from the mounting bushing to an Earth ground The mounting bushing is internally connected to the...

Page 5: ...CBX500 INSTALLATION MANUAL Figure A 821001384 Rev D 5 1 2 4 3 1 2 3 4 5 Indicator LEDs Cover Screws 4 Host Interface Module Panel Compression Connectors 5 25 pin Device Connector ...

Page 6: ...sion Module Connector Backup Module Connector Indicator LEDs RS485 Termination Resistance Switch ID NET Termination Resistance Switch Auxiliary Port Connector IP65 Host Interface Module Connector 2 3 4 5 6 7 8 9 10 Standard Host Interface Module Connector Spring Clamp Terminal Blocks Shield to Protection Earth Selector Power Source Selector 11 12 13 14 ...

Page 7: ...everal Datalogic family reading devices System cabling is made through spring clamp terminal blocks inside the CBX500 while the reading device is connected to the CBX500 through a 25 pin connector on the housing A 9 pin connector placed inside the CBX500 facilitates connection between an external PC and the auxiliary serial interface of the reading device for configuration or data monitoring CBX50...

Page 8: ...55 BA700 M12 5PM ID NET In Connector 93ACC1856 BA900 Two Cable Compression Conn Panel 93ACC1847 ADP MM1 Gender Changer 25P M M 5 pcs 93ACC1828 NOTE Not all readers support all CBX accessories Compatibility between the accessories marked with an asterisk and your reader depends on the reading device application software See the Accessories paragraph in your reading device Reference Manual for the l...

Page 9: ...ries paragraph in your reading device Reference Manual for the list of supported CBX Series accessories NOTE CBX500 is backward compatible with DS2100N DS2400N black body model reading devices using the ADP MM1 25 pin gender changer See the Gender Changer documentation for the relative CBX pinout A scanner software upgrade may be required to manage CBX500 accessories HARDWARE COMPATIBILITY ONLY PA...

Page 10: ...kage Mounting to other surfaces such as concrete walls or metallic panels requires user supplied parts screws screw anchors nuts etc A mounting template is included in the package to facilitate hole drilling alignment CBX500 can also be mounted to a DIN rail using the BA100 93ACC1821 mounting accessory or to a Bosch Frame or 80 20 Frame using the BA200 93ACC1822 mounting accessory The diagram belo...

Page 11: ...e utility program see the reading device Installation Manual for more details The reading device auxiliary interface signals are also available on the internal spring clamp connectors After making system cabling and switch settings connect the reading device to the 25 pin connector on the CBX500 housing Switch ON the CBX500 power switch see Figure 3 The Power LED turns on blue when the power conne...

Page 12: ... external trigger encoder etc are live and are not protected from polarity inversion Disconnect the power supply when working inside the CBX500 OFF ON Figure 3 Power Switch ON OFF Positions CBX500 POWER SUPPLY GND GND Vdc V 10 30 Vdc Earth Earth Ground Figure 4 Power Supply Connections NOTE Vdc is electrically connected to V just as GND is electrically connected to V This is useful for supplying e...

Page 13: ... stripping the insulation back approximately 1 cm Using a device such as a screwdriver push down on the lever directly next to the clamp see Figure 5 Insert the wire into the clamp and release the lever The wire will now be held in the spring clamp 5 Tighten the compression connector nuts so that the internal glands seal around the cables Figure 5 System Cable Connections Flexible stranded wire sh...

Page 14: ... V Power Source Other I O I3A Input 3A 3 pass through I4A Input 4A 4 pass through V Power Reference Other I O I34B Input 3B 3 common pass through I34B Input 4B 4 common pass through Auxiliary Interface TX Auxiliary Interface TX RX Auxiliary Interface RX SGND Auxiliary Interface Reference ID NET REF Network Reference ID ID NET network ID ID NET network Network Shield Network Cable Shield RS232 RS48...

Page 15: ...chass ure 8 Cable Shield see Figure 7 ect to the M es Fieldbus SETTING vided throug om the conn to pass po X8200A VA tive reading vice the pow in Figure 6 wer Source Ju ARTH J onnected to t open the n Protection Ea floatin ower from device C erference Earth to a g is to earth d Shield to 7 Main Interfa s or non Fie GS gh the dedic nected read ower to co AC models device Ref wer source umper Settin...

Page 16: ... GND All Reading Devices except 6K 8K to Earth default to GND floating 6K 8K Family Scanners The scanner chassis is internally connected to GND to Earth default Figure 8 Chassis Grounding 9 PIN READING DEVICE AUXILIARY SERIAL INTERFACE The reading device auxiliary serial interface available on the internal CBX500 9 pin connector can be used either for configuration or for data monitoring Connectio...

Page 17: ...n the last device of the chain the farthest away from the Multiplexer assuming the Multiplexer is the first device of the chain On all the other devices this resistor MUST be OFF disabled This switch must also be OFF disabled when Fieldbus Modules are used INDICATOR LEDS There are five Indicator LEDs which signal power and I O activity and are visible from the CBX500 outside cover The Power LED is...

Page 18: ...t about 780 g 27 5 oz ENVIRONMENTAL FEATURES Operating Temperature 0 to 50 C 32 to 122 F Storage Temperature 20 to 70 C 4 to 158 F Humidity max 90 non condensing Vibration Resistance 14 mm 2 to 10 Hz EN 60068 2 6 2 hours on each axis 1 5 mm 13 to 55 Hz 2 g 70 to 200 Hz Shock Resistance 30 g 11 ms EN 60068 2 27 3 shocks on each axis Protection Class EN 60529 IP65 The features given are typical at a...

Page 19: ...This is a Class A product In a domestic environment this product may cause radio interference in which case the user may be required to take adequate measures FCC COMPLIANCE Modifications or changes to this equipment without the expressed written approval of Datalogic could void the authority to use the equipment This device complies with PART 15 of the FCC Rules Operation is subject to the follow...

Page 20: ...thout the express written permission of Datalogic S p A and or its affiliates Datalogic and the Datalogic logo are registered trademarks of Datalogic S p A in many countries including the U S A and the E U ID NET is a trademark of Datalogic S p A and or its affiliates All other trademarks and brands are property of their respective owners Datalogic shall not be liable for technical or editorial er...

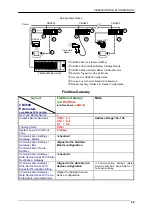
Page 21: ...pin Device Connector 5 Host Interface Module Panel 3 NOTE For a complete Gateway configuration using the Genius configuration program refer to the CBX800 Help On Line available on the downloadable Genius CD zip file This manual is also downloadable from the Web at www datalogic com 13 07 17 5 1 2 4 3 ...

Page 22: ...rce Selector Mounting Holes 2 6 Data Source Port Connector Indicator LEDs 7 Auxiliary Port Connector 8 IP65 Host Interface Module Connector 9 Standard Host Interface Module Connector 11 Spring Clamp Terminal Blocks 12 RS485 Termination Resistance Switch 13 ID NET Host Shield Selector 14 ID NET Termination Resistance Switch 15 Network Selection Rotary Switches 16 Reset Button 10 ...

Page 23: ...LEGAL NOTICES 2009 2017 Datalogic S p A and or its affiliates ALL RIGHTS RESERVED Without limiting the rights under copyright no part of this documentation may be reproduced stored in or introduced into a retrieval system or transmitted in any form or by any means or for any purpose without the express written permission of Datalogic S p A and or its affiliates Datalogic and the Datalogic logo are...

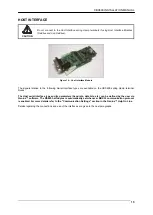
Page 24: ...nnectors placed inside the CBX800 facilitate connection to an external PC for data monitoring or for configuring the CBX800 and the reading device Four embedded rotary switches allow easy manual Network Type and Addressing Baud Rate selection CBX800 can also house several accessories which make the system highly flexible These include One of several Host Interface Modules to interface the reader w...

Page 25: ... Panel ID NET In 93ACC1856 BA900 Two Cable Glands Panel 93ACC1847 ADP MM1 Gender Changer 25P M M 5 pcs 93ACC1828 SUPPORTED READING DEVICES The CBX800 can be directly connected to all of the following readers through the 25 pin connector illustrated in Figure A Linear Scanners 2D Readers DS2100N DS2400N DS4800 DS5100 All Matrix x10 family DS6x00 DX6400 DS8100A DX8200A All Matrix x10N family NOTE CB...

Page 26: ... operation ACCESS TO INTERNAL PARTS To make installation and replacement easier the CBX800 is made up of three parts 1 the body of the device containing all electronic components and optional boards 2 the transparent removable cover for inspection and for easy access to spring clamps and internal modules 3 the removable front connector panel providing easy access to the optional interface modules ...

Page 27: ...1821 BA200 93ACC1822 The diagram below gives the overall dimensions of the CBX800 and shows the two mounting through holes Figure 3 Overall Dimensions POWER SUPPLY The power switch see Figure 4 switches the power supply ON or OFF for both the CBX800 and the connected reading device CAUTION The power switch does not control power to the Vdc GND V V spring clamps therefore any devices connected to t...

Page 28: ...he system cables through them into the CBX800 housing 4 To connect the power and input output signals Prepare the individual wires of the system cables by stripping the insulation back approximately 1 cm Using a device such as a screwdriver push down on the lever directly next to the clamp see Figure 5 Insert the wire into the clamp and release the lever The wire will now be held in the spring cla...

Page 29: ...ity insensitive I34B Input 3B and 4B common polarity insensitive Auxiliary Interface 1 TX Auxiliary Interface TX RX Auxiliary Interface RX SGND Auxiliary Interface Reference ID NET REF Network Reference ID ID NET network ID ID NET network Network Shield Network Cable Shield Data Source Auxiliary Interface 2 TX Data Source Aux TX RX Data Source Aux RX SGND Data Source Aux Reference Data Source Inte...

Page 30: ... SETTINGS For most applications input power is provided through the dedicated spring clamp connectors inside the CBX800 However CBX800 may accept power from the connected reading device through the 25 pin connector This is useful for example to pass power to connected accessories such as Encoder and Presence Sensor from DX8200A VAC models or 6K 8K scanners powered directly through the network See ...

Page 31: ...rs The scanner chassis is internally connected to GND to Earth default Figure 8 Chassis Grounding ID NET HOST SHIELD JUMPER SETTINGS The Network shield Shield can be connected to Earth Ground Earth either directly or through a filter circuit If the jumper is left open the network cable shield Shield is floating Filtered Earth default Earth floating Equivalent Filter Circuit Figure 9 ID NET Host Sh...

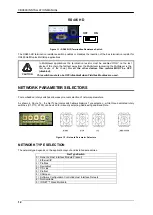
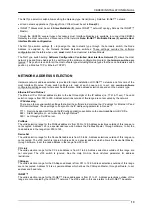
Page 32: ...s switch must also be OFF disabled when Fieldbus Modules are used NETWORK PARAMETER SELECTORS Four embedded rotary switches allow easy manual selection of network parameters As shown in Figure 12 the Net Type rotary switch allows Network Type selection while three dedicated rotary switches X1 X10 X100 can be used for manually selecting Addressing and Baud Rate Figure 12 Network Parameter Selectors...

Page 33: ... digits of the IP address i e 172 16 11 xxx The valid selection range is from 000 to 255 Address selections outside of this range are not accepted by the network IP Addressing There are a few special switch settings that allow the software to determine the IP address for Ethernet IP and Profinet interfaces These settings correspond to the IP Addressing parameter in Genius 777 Remote Assignment thr...

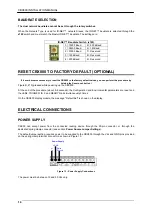
Page 34: ...et push button Figure B 10 pressed while powering up the CBX800 At the end of the procedure about 5 6 seconds the Configuration and Environmental parameters are reset and the LEDs TRIGGER IN 2 and READY blink simultaneously 3 times On the CBX800 display module the message Default Set is shown on the display ELECTRICAL CONNECTIONS POWER SUPPLY CBX00 can accept power from the connected reading devic...

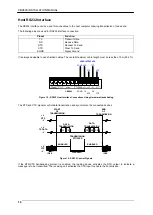
Page 35: ...e types are available on the CBX800 spring clamp terminal blocks The Host serial interface type and its parameters baud rate data bits etc can be defined by the user via Genius software The RS485 half duplex is automatically set whenever MUX32 communication protocol is enabled For more details refer to the Communication Settings section in the Genius Help On Line Details regarding the connections ...

Page 36: ...SGND RXD TXD CTS RTS USER INTERFACE SGND TX RX RTS CTS CBX800 Figure 15 RS232 Host Interface Connections Using Hardware Handshaking The RTS and CTS signals control data transmission and synchronize the connected devices START OF TRANSMISSION END OF TRANSMISSION V RTS V V TX DATA V V CTS V DATA TRANSMISSION DATA TRANSMISSION C1 C2 C4 C3 C5 TRANSMISSION STOPPED ENABLED DISABLED ENABLED IDLE IDLE Fig...

Page 37: ...ronments The CBX800 pinout follows Pinout Function TX RS485 Transmit Data RX RS485 Receive Data TX RS485 Transmit Data RX RS485 Receive Data SGND Signal Ground RX485 TX485 SGND RX485 TX485 USER INTERFACE SGND TX RX TX RX CBX800 Figure 17 RS485 Full duplex Connections NOTE For applications that do not use RX485 signals do not leave these lines floating but connect them to SGND as shown below RX485 ...

Page 38: ...on RTX RS485 Receive Transmit Data RTX RS485 Receive Transmit Data SGND Signal Ground RTX485 SGND RTX485 USER INTERFACE SGND RTX RTX CBX800 Figure 19 RS485 Half duplex Connections This interface is forced by software when the protocol selected is MUX32 protocol In a Multiplexer layout the Multidrop address must also be set via serial channel by the Genius utility or by the Host Programming Mode ID...

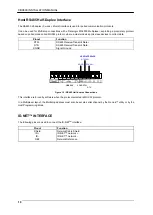
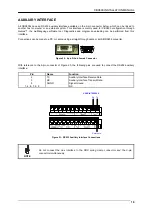
Page 39: ...ections can be made to a PC or Laptop using a straight through cable or a USB RS232 converter 5 1 6 9 Figure 20 9 pin D Sub Female Connector With reference to the 9 pin connector of Figure 20 the following pins are used to connect the RS232 auxiliary interface Pin Name Function 2 TX Auxiliary Interface Receive Data 3 RX Auxiliary Interface Transmit Data 5 SGND Signal Ground 1 4 6 7 8 9 N C RX TX R...

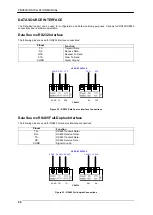
Page 40: ...eceive Data RTS Request To Send CTS Clear To Send SGND Signal Ground SGND RXD CTS TXD RTS USER INTERFACE SGND TX RTS RX CTS CBX800 Figure 22 RS232 Data Source Interface Connections Data Source RS485 Full Duplex Interface The following pins are used for RS485 Full duplex interface connections Pinout Function TX RS485 Transmit Data RX RS485 Receive Data TX RS485 Transmit Data RX RS485 Receive Data S...

Page 41: ...iliary Interface available on the 9 pin connector below is used for configuring the external reading device parameters 5 1 6 9 Figure 25 9 pin D Sub Female Connector With reference to the 9 pin connector of Figure 25 the following pins are used to connect the Data Source Auxiliary Interface Pin Name Function 2 TX Data Source Aux Interface Receive Data 3 RX Data Source Aux Interface Transmit Data 5...

Page 42: ...d External Trigger Input Input 1 The connections are indicated in the following diagram Pinout Function V Power Source External Trigger I1A External Trigger A polarity insensitive I1B External Trigger B polarity insensitive V Power Reference External Trigger EXTERNAL TRIGGER INPUT CONNECTIONS USING CBX800 POWER CAUTION Power is available directly to the Input Device independently from the Power Su...

Page 43: ...hotocell Figure 30 NPN External Trigger Using External Power Generic Input Input 2 Pinout Function V Power Source Inputs I2A Input 2 A polarity insensitive I2B Input 2 B polarity insensitive V Power Reference Inputs INPUT 2 CONNECTIONS USING CBX800 POWER CAUTION Power is available directly to the Input Device independently from the Power Supply Switch inside the CBX800 Power to Input Device Input ...

Page 44: ...al Input Device Figure 32 NPN Input 2 Using External Power OUTPUTS The two optocoupled general purpose outputs available on the CBX800 spring clamp terminal blocks are managed by the reader connected to the 25 pin connector The meaning of the two outputs Output 1 and Output 2 can be defined by the user They are typically used either to signal the data collection result or for 2D readers to control...

Page 45: ...igure 33 Open Emitter Output Using CBX800 Power Power to Output device Output device Reference Output Device Output Signal Figure 34 Open Collector Output Using CBX800 Power OUTPUT CONNECTIONS USING EXTERNAL POWER Pulled up to External Output Device Power Output Signal Output Device Figure 35 Output Open Emitter Using External Power Pulled down to External Output Device Reference Output Signal Out...

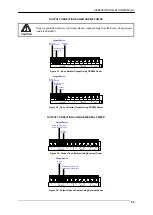
Page 46: ...tive output Output 3 The connections are indicated in the following diagram Pinout Function O3A Output 3 polarity sensitive O3B Output 3 polarity sensitive V Power Source Other I O I3A Input 3A polarity insensitive I4A Input 4A polarity insensitive V Power Reference Other I O I34B Input 3B and 4B common polarity insensitive I34B Input 3B and 4B common polarity insensitive NOTE The label for Output...

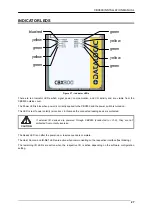
Page 47: ...power switch is turned on This LED is red if power polarity is incorrect In this case the connected reading device is protected CAUTION If external I O devices are powered through CBX800 connected to V V they are not protected from polarity inversion The Ready LED is on after the power up or reset sequence is complete The Host Source and ID NET LEDs are active when communicating on the respective ...

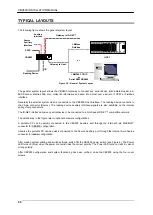
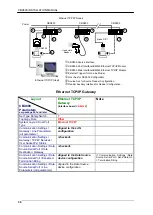
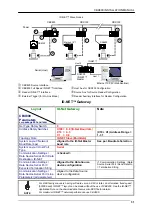
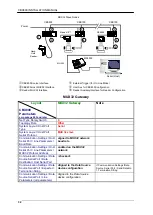
Page 48: ...patible network The dotted lines in the figure refer to optional hardware configurations A portable PC can be quickly connected to the CBX800 Auxiliary port through the internal 9 pin MUX GWY connector for CBX800 configuration Likewise the portable PC can be quickly connected to the Source Auxiliary port through the internal 9 pin Source connector for reader configuration After making system cabli...

Page 49: ...d Communication Settings Data Source Serial Port Expected Termination String Aligned to the Data Source device configuration if Communication Settings Data Source Serial Port Send Data On Termination String Communication Settings Data Source Serial Port Line Parameters all parameters Aligned to the Data Source device configuration Fieldbus Slave Nodes Fieldbus Master Host CBX800 Source Interface R...

Page 50: ...Data Source Serial Port Expected Termination String Aligned to the Data Source device configuration if Communication Settings Data Source Serial Port Send Data On Termination String Communication Settings Data Source Serial Port Line Parameters all parameters Aligned to the Data Source device configuration Ethernet TCP IP Nodes Ethernet TCP IP Host CBX800 Source Interface CBX800 Host Interface BM2...

Page 51: ... Data On Termination String Communication Settings Data Source Serial Port Line Parameters all parameters Aligned to the Data Source device configuration NOTE For 6 8K family scanners having software version 6 80 or later an alternative fixed speed 57600 baud ID NET layout can be made without the use of CBX800 See the ID NET Application Note on the downloadable Genius mini DVD file for details For...

Page 52: ...al Port Data Destination Host Serial Port checked Communication Settings Data Source Serial Port Expected Termination String Aligned to the Data Source device configuration if Communication Settings Data Source Serial Port Send Data On Termination String Communication Settings Data Source Serial Port Line Parameters all parameters Aligned to the Data Source device configuration MUX32 Slave Nodes 1...

Page 53: ...odes Genius utility program Genius based Host Mode Programming PHYSICAL FEATURES Mechanical Dimensions 193 x 180 x 71 mm 7 6 x 7 1 x 2 8 in Weight 830 g 29 28 oz ENVIRONMENTAL FEATURES Operating Temperature 0 to 50 C 32 to 122 F Storage Temperature 20 to 70 C 4 to 158 F Humidity max 90 non condensing Vibration Resistance 14 mm 2 to 10 Hz 1 5 mm 13 to 55 Hz EN 60068 2 6 2 g 70 to 200 Hz 2 hours on ...

Page 54: ...ration purposes into more complex systems For this reason it is under the responsibility of the system integrator to do a new risk assessment regarding the final installation Warning This is a Class A product In a domestic environment this product may cause radio interference in which case the user may be required to take adequate measures FCC COMPLIANCE Modifications or changes to this equipment ...

Reviews: