Datalogic Applications
106
DL-Axist™
Doing this will not undo settings changes already made, but it will
prevent DXU from getting the device’s settings and will prevent DXU
from changing any settings on the device.
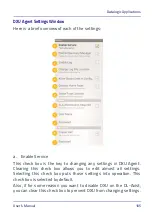
b. Enable Discovery Manager
This check box controls the DL-Axist’s broadcast of its name and
device type over USB or over a network to the DXU desktop
application. When selected, DXU will automatically see when the
device connects to USB or over a network. When cleared, DXU will not
display when the device connects to USB or over the network. This
check box is selected by default.
c.
Enable Log
This check box enables DXU Agent’s logging capability. When
enabled, logs are written to the log file location. Logging can be
helpful when diagnosing problems, but at a slight cost of slowing
DXU and consuming slightly more power. This check box is not
selected by default.
d. Change Log File Location
This field allows you to specify where DXU Agent’s log file is kept on
your device. The default location on Android OS devices is
/storage/sdcard0, which is located in the device’s on-board flash
memory. This location is a persistent location, so log files stored here
are safe if the device reboots. If a MicroSD card is used, you may wish
to specify that logs be kept on the card if the card has greater
capacity than on-board flash. MicroSD cards are also persistent.
e. Allow Binary Data in Configuration
This check box allows a few types of binary data to be transmitted
from the DL-Axist to DXU, and from DXU to the DL-Axist. The desktop
wallpaper file is an example of binary data that can be controlled by
DXU. Selecting this check box allows binary data to be sent to or from
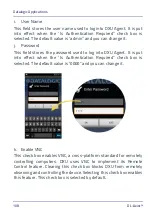
the binary computer in the configuration file. Clearing this check box
Summary of Contents for DL-Axist
Page 1: ...Personal Digital Assistant PDA User s Manual ...
Page 8: ...vi DL Axist NOTES ...
Page 21: ...Battery User s Manual 13 NOTE Use only a Datalogic approved power supply ...
Page 34: ...SD Card SIM Card 26 DL Axist NOTES ...
Page 41: ...Getting Started User s Manual 33 Tap IP to set the IP address and the port number ...
Page 54: ...Getting Started 46 DL Axist NOTES ...
Page 70: ...Settings 62 DL Axist ...
Page 77: ...Settings User s Manual 69 4 Tap Save ...
Page 79: ...Settings User s Manual 71 ...
Page 82: ...Settings 74 DL Axist ...
Page 84: ...Settings 76 DL Axist ...
Page 86: ...Settings 78 DL Axist ...
Page 106: ...Settings 98 DL Axist NOTES ...
Page 112: ...Datalogic Applications 104 DL Axist ...
Page 168: ...Datalogic Applications 160 DL Axist The menu allows to access more features and options ...
Page 172: ...Datalogic Applications 164 DL Axist ...
Page 175: ...Datalogic Applications User s Manual 167 ...
Page 178: ...Datalogic Applications 170 DL Axist NOTES ...
Page 204: ...Connections 196 DL Axist NOTES ...
Page 212: ...Test Codes 204 DL Axist High Density Codes continued 0 25 mm 10 mils 80 EAN 13 80 EAN 8 ...
Page 214: ...Test Codes 206 DL Axist Medium Density Codes continued 0 38 mm 15 mils 100 EAN 13 100 EAN 8 ...
Page 216: ...Test Codes 208 DL Axist Low Density Codes continued 0 50 mm 20 mils 120 EAN 13 120 EAN 8 ...
Page 218: ...Test Codes 210 DL Axist NOTES ...
Page 248: ...Reference Documentation 240 DL Axist NOTES ...
Page 260: ...Glossary 252 DL Axist NOTES ...
Page 264: ...NOTES ...

