Battery
20
DL-Axist™
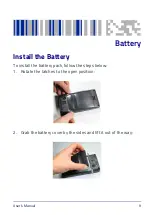
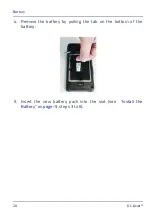
4. Remove the battery by pulling the tab on the bottom of the
battery:
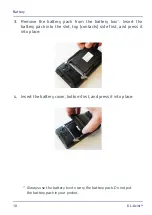
5. Insert the new battery pack into the slot (see
, steps 3 to 6).
Summary of Contents for DL-Axist
Page 1: ...Personal Digital Assistant PDA User s Manual ...
Page 8: ...vi DL Axist NOTES ...
Page 21: ...Battery User s Manual 13 NOTE Use only a Datalogic approved power supply ...
Page 34: ...SD Card SIM Card 26 DL Axist NOTES ...
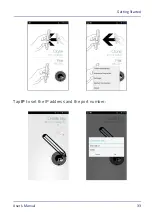
Page 41: ...Getting Started User s Manual 33 Tap IP to set the IP address and the port number ...
Page 54: ...Getting Started 46 DL Axist NOTES ...
Page 70: ...Settings 62 DL Axist ...
Page 77: ...Settings User s Manual 69 4 Tap Save ...
Page 79: ...Settings User s Manual 71 ...
Page 82: ...Settings 74 DL Axist ...
Page 84: ...Settings 76 DL Axist ...
Page 86: ...Settings 78 DL Axist ...
Page 106: ...Settings 98 DL Axist NOTES ...
Page 112: ...Datalogic Applications 104 DL Axist ...
Page 168: ...Datalogic Applications 160 DL Axist The menu allows to access more features and options ...
Page 172: ...Datalogic Applications 164 DL Axist ...
Page 175: ...Datalogic Applications User s Manual 167 ...
Page 178: ...Datalogic Applications 170 DL Axist NOTES ...
Page 204: ...Connections 196 DL Axist NOTES ...
Page 212: ...Test Codes 204 DL Axist High Density Codes continued 0 25 mm 10 mils 80 EAN 13 80 EAN 8 ...
Page 214: ...Test Codes 206 DL Axist Medium Density Codes continued 0 38 mm 15 mils 100 EAN 13 100 EAN 8 ...
Page 216: ...Test Codes 208 DL Axist Low Density Codes continued 0 50 mm 20 mils 120 EAN 13 120 EAN 8 ...
Page 218: ...Test Codes 210 DL Axist NOTES ...
Page 248: ...Reference Documentation 240 DL Axist NOTES ...
Page 260: ...Glossary 252 DL Axist NOTES ...
Page 264: ...NOTES ...

