RAPID CONFIGURATION
17
1
STEP 6
– TEST MODE
NOTE:
When entering the X-PRESS interface on the DS5100-XX2X the
Oscillating Mirror remains in the default
fixed position
(0°) in order to make
barcode reading easier while performing the X-PRESS functions.
Use a code suitable to your application to test the system. Alternatively, you can use the
Datalogic Test Chart (Code 128).
1. Enter the
Test mode
function by holding the X-PRESS push button pressed until the
TEST LED is on.
2. Release the button to enter the
Test mode
function.
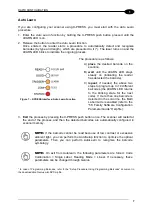
Once entered, the Bar-Graph on the five LEDs is activated and if the scanner starts
reading barcodes the Bar-Graph shows the Good Read Rate. In case of no read
condition, only the STATUS LED is on and blinks.
Figure 12
– X-PRESS Interface: Test Mode Function
3. To exit the Test Mode, press the X-PRESS push button once.
NOTE:
By default, the Test Mode exits automatically after two minutes.
Summary of Contents for DS5100
Page 1: ......
Page 30: ...DS5100 REFERENCE MANUAL 14 1 b Digital Outputs configuration c Hardware interface selection...
Page 62: ...DS5100 REFERENCE MANUAL 46 3 Figure 18 DS5100 OM Serial Model Overall Dimensions...
Page 78: ...DS5100 REFERENCE MANUAL 62 4 Figure 38 ID NET Network Connections with isolated power blocks...
Page 97: ...TYPICAL LAYOUTS 81 5 7 Double click on the DS5100 scanner to configure it...
Page 163: ...147 X X PRESS Human Machine Interface 23...
Page 164: ......


