background image

DX8200

24

2

2.4.6 Outputs

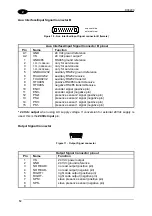
The relative signals are available on the 

Output Signal connector

 (Figure B, 3) and on the

25-pin I/O connector

 (Figure B, 5).

Connector

Name

Function

25-pin

9-Pin

13

1

VS

power for external devices (positive pin)

1

2

GND

power for external devices (negative pin)

11

3

NO READ+

no read 

3

4

NO READ-

no read output -

23

5

RIGHT+

right code 

16

6

RIGHT-

right code output -

7

SPS+

slave presence

8

SPS-

slave presence sensor -

A 24 Vdc output voltage, is present between VS and GND. This may be used to power external
devices: electrical isolation between the scanner and external devices is lost in this case.

The 

No Read 

output activates when a code signaled by the presence sensor is not decoded.

The 

Right

 output is used to signal the presence of a right code, thus a good decode

condition.

All outputs are level or pulse programmable: a 50 ms pulse is generated in the second case.
Further programming information is supplied in the WinHost Help File.

These outputs are created using optoisolated Darlington drivers and supply both the collector
and emitter in output, allowing both loads referenced to ground and to the power supply to be
driven.

The electrical features are given below:

Collector-emitter voltage

30 V Max.

Collector current

130 mA Max (pulsed).

Saturation voltage (VCE)

1 V at 10 mA Max.

Maximum power dissipation

90 mW at 50 °C (Ambient temperature).

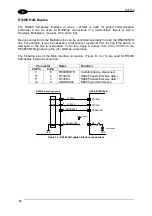
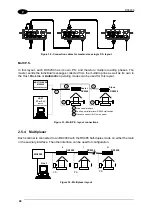
DX8200 9-pin Connector

USER INTERFACE

NO READ+

RIGHT+

Vext

30 Vdc max

NO READ-

RIGHT-

3/5

4/6

Figure 28 - Output interface

When the load is powered by an external power supply, the voltage must be less than 30 V.
The limit requested by the maximum power dissipation is more important than that of the
maximum collector current: if one of these outputs is continuously driven, the maximum
current must not be more than 40 mA although 130 mA may be reached in pulse conditions.

Summary of Contents for DX8200

Page 1: ...DX8200 Installation Manual ...

Page 2: ......

Page 3: ...DX8200 INSTALLATION MANUAL ...

Page 4: ...t prior notification Datalogic shall not be liable for technical or editorial errors or omissions contained herein nor for incidental or consequential damages resulting from the use of this material Product names mentioned herein are for identification purposes only and may be trademarks and or registered trademarks of their respective companies Datalogic S p A 2000 2002 821000432 Rev B ...

Page 5: ... Selection 8 2 2 3 Conversion to External 24 Vdc Supply Optional 9 2 3 Mechanical Installation 10 2 4 Electrical Connections 11 2 4 1 DX8200 Connectors 11 2 4 2 Power Supply 15 2 4 3 Main Serial Interface 15 RS232 16 RS485 Full Duplex 17 RS485 Half Duplex 18 20 mA Current Loop 20 2 4 4 Auxiliary Interface 21 2 4 5 Inputs 22 2 4 6 Outputs 24 2 5 Typical Layouts 25 2 5 1 Standard Point to Point 25 2...

Page 6: ... Advanced Code Reconstruction 35 4 2 PackTrack 36 4 3 Performance 37 4 3 1 Reading Conditions 37 4 4 Reading Diagrams 39 5 MAINTENANCE 51 5 1 Cleaning 51 5 2 Replacing the Protection Fuses for AC Models 51 6 TECHNICAL FEATURES 52 ...

Page 7: ...lp On Line Host Mode programming procedure by ESC sequences via the serial interface For more details refer to the hDX8200 file in the DX8200 directory NOTE Fine tuning of the scanner position for barcode reading can be accomplished using the Test Mode as described in WinHost The installation is now complete BUS INTERFACE MODELS The following can be used as a checklist to verify all the necessary ...

Page 8: ...vi GENERAL VIEW DX8200 Figure A DX8200 General View Control Panel see Figure B or C Product Label Laser Output Windows Mounting Rails Laser Warning Label 1 2 3 4 5 2 1 3 5 4 4 ...

Page 9: ...erved Connector Aux Interface Input Signal Connector A Output Signal Connector Main Interface Connector Laser Beam and Motor Power Switch Aux Interface Input Signal Connector B Power ON LED Presence Sensor LED Encoder LED Good Read LED TX Data LED Not used 1 15 14 13 12 11 10 9 16 4 5 6 7 8 2 3 2 11 12 13 14 15 16 3 4 8 9 10 5 6 7 1 ...

Page 10: ...ector Reserved Connector Lonworks Input Connector RS232 Debug Connector Laser Beam and Motor Power Switch Lonworks Output Connector Power ON LED Presence Sensor LED Encoder LED Good Read LED TX Data LED Network LED 1 5 6 7 8 9 10 11 12 2 3 4 7 8 9 10 11 12 1 5 6 2 3 4 ...

Page 11: ...n is provided to comply with the rules imposed by international authorities and refers to the correct use of the DX8200 scanner Standard Regulations This scanner utilizes up to 3 low power laser diodes Although staring directly at the laser beam momentarily causes no known biological damage avoid staring at the beam as one would with any very strong light source such as the sun Avoid that the lase...

Page 12: ...EC 825 1 regulations and as Class IIIb laser products according to CDRH regulations As it is not possible to apply a classification label on the laser diodes used in this device the following label is reproduced here Laser diode class label Any violation of the optic parts in particular can cause radiation up to the maximum level of the laser diode 35 mW at 630 680 nm DATALOGIC S p A Via Candini 2...

Page 13: ...asures the code distance from the scanner PACKTRACK PackTrack is a Datalogic patented parcel tracking system which improves the reading features in omnidirectional stations In particular PackTrack manages 6 sided reading systems when it is impossible to detect the real position of the code on the parcel thus overcoming the need for external accessories essential in traditional tracking systems See...

Page 14: ...nversion for external 24 Vdc power Bus interface models operate at 24 Vdc 2 serial communication interfaces test mode to verify the reading features and exact positioning of the scanner without the need for external tools programmable in 5 different operating modes to suit the most various barcode reading system requirements light source solid state laser diodes the light emitted has a wave length...

Page 15: ... is present in the reading zone Figure B 14 or Figure C 10 TX Data green Indicates data transmission both on the main and on the auxiliary interface Figure B 15 or Figure C 11 Network red Indicates data transmission on the Lonworks network Figure C 12 Not used for serial interface models 1 3 AVAILABLE MODELS The DX8200 scanner is available in the following versions that differ depending on laser n...

Page 16: ...st Connection cable 1 5 APPLICATIONS The DX8200 barcode reader is specifically designed for industrial applications and for all cases requiring high reading performance such as code reconstruction reading of codes covered by plastic film reading of codes with a wide depth of field reading of high resolution codes positioned at long distances from the reader code reading on fast moving objects DX82...

Page 17: ... Verify that the DX8200 reader and all the parts supplied with the equipment are present and intact when opening the packaging the list of parts includes DX8200 reader Installation Manual barcode test chart DX8200 configuration disk Accessories power connector jumper optional 24 Vdc operation Figure 1 ...

Page 18: ...NG Before unscrewing the panel of the DX8200 make sure the power supply cable is disconnected to avoid shock or harm to the operator The following operation should be performed by qualified personnel only Refer to the following instructions when opening the reader 1 The part of the device to be opened for Main Interface and Multidrop Address selection is the upper panel 2 Unscrew the screws to ope...

Page 19: ...plex RS485 Full duplex 20 mA Current Loop The RS232 interface is factory set To select the interface type 1 Remove the panel as described in par 2 2 2 Position the jumper onto the correct connector as indicated in Figure 3 RS232 20 mA C L RS485 half duplex RS485 full duplex JUMPER Can be aligned at either edge J1 J2 J3 J3 Figure 3 DX8200 main interface selection J3 J2 J1 ...

Page 20: ...ing table shows the Multidrop Address settings where 1 ON 0 OFF Position Address Position Address 5 4 3 2 1 5 4 3 2 1 1 1 1 1 1 31 0 1 1 1 1 15 1 1 1 1 0 30 0 1 1 1 0 14 1 1 1 0 1 29 0 1 1 0 1 13 1 1 1 0 0 28 0 1 1 0 0 12 1 1 0 1 1 27 0 1 0 1 1 11 1 1 0 1 0 26 0 1 0 1 0 10 1 1 0 0 1 25 0 1 0 0 1 9 1 1 0 0 0 24 0 1 0 0 0 8 1 0 1 1 1 23 0 0 1 1 1 7 1 0 1 1 0 22 0 0 1 1 0 6 1 0 1 0 1 21 0 0 1 0 1 5 1...

Page 21: ...l as described in par 2 2 2 Disconnect the internal 24 Vdc power connector referring to Figure 5 Figure 5 Disconnecting the 24 Vdc internal power supply connector 3 Connect the external 24 Vdc jumper onto the power connector referring to Figure 6 Figure 6 Connecting the power supply jumper for external 24 Vdc operation You must supply 24 Vdc power through the 17 pin connector A or B Figure B 6 10 ...

Page 22: ...lation The diagram below gives all the information required for installation refer to par 4 4 for correct positioning of the scanner POWER ON EXT TRIG EN CODER GOOD READ T X DATA RESERVED 576 22 7 470 18 5 53 2 1 170 6 7 170 6 7 118 4 6 9 0 4 40 1 6 10 0 4 64 2 5 385 15 16 513 20 2 150 5 9 94 3 7 mm inch Figure 7 DX8200 overall dimensions ...

Page 23: ...side external view Figure 9 Aux Interface Input Signal connector A male Aux Interface Input Signal Connector A pinout Pin Name Function A1 GND 24 Vdc ground reference A2 VS 24 Vdc power output 1 GND485 RS485 ground reference 2 7 NC not connected 8 RTX485 RS485 transmit receive positive pin 9 RTX485 RS485 transmit receive negative pin 10 ENC encoder signal positive pin 11 ENC encoder signal negativ...

Page 24: ...nsmit receive 10 ENC encoder signal positive pin 11 ENC encoder signal negative pin 12 PS2 presence sensor 2 signal positive pin 13 PS2 presence sensor 2 signal negative pin 14 PS1 presence sensor 1 signal positive pin 15 PS1 presence sensor 1 signal negative pin 24 Vdc output when using AC supply voltage If conversion for external 24Vdc supply is used this is the 24Vdc input pin Output Signal Con...

Page 25: ...6 9 Figure 12 Main Interface connector Main Interface Connector pinout Pin RS232 RS485 full duplex RS485 half duplex 20 mA C L 1 DRVREF 2 TXD TX485 RTX485 CLOUT 3 RXD TX485 RTX485 CLOUT 4 DRVIN 5 GND GNDRS485 GNDRS485 6 RS485CNTR 7 CTS RX485 CLIN 8 RTS RX485 CLIN 9 DRVOUT ...

Page 26: ...e pin 23 RIGHT right code output positive pin 16 RIGHT right code output negative pin 24 ENC encoder signal positive pin 15 ENC encoder signal negative pin 25 PS2 presence sensor 2 signal positive pin 14 PS2 presence sensor 2 signal negative pin 12 PS1 presence sensor 1 signal positive pin 2 PS1 presence sensor 1 signal negative pin Pin RS232 RS485 full duplex RS485 half duplex 20 mA C L 21 DRVREF...

Page 27: ...turns off power to both the motor and the laser beams 2 4 3 Main Serial Interface The main serial interface of the DX8200 is compatible with the following electrical standards RS232 RS485 Full Duplex RS485 Half Duplex 20 mA Current Loop The configuration parameters of the selected interface can be defined using one of the programming methods available For this procedure refer to the WinHost Help O...

Page 28: ... receive data 19 5 GND Ground 18 7 CTS clear to send 6 8 RTS request to send It is always advisable to use shielded cables The overall maximum cable length must be less than 15 m 49 2 ft DX8200 9 pin Connector USER INTERFACE TXD RXD CTS RTS GND RXD TXD GND 2 3 7 8 5 Earth Ground Figure 14 RS232 connections The RTS and CTS signals control data transmission and synchronize the connected devices If t...

Page 29: ...noisy environments The following pins of the Main Interface connectors Figure B 4 or 5 are used for RS485 Full duplex interface connection Connector Name Function 25 Pin 9 Pin 17 2 TX485 RS485 transmit data 5 3 TX485 RS485 transmit data 19 5 GNDRS485 RS485 ground reference 18 7 RX485 RS485 receive data 6 8 RX485 RS485 receive data DX8200 9 pin Connector 5 GNDRS485 TX485 2 TX485 3 RX485 7 RX485 8 R...

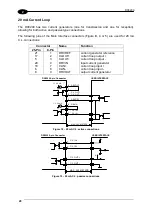
Page 30: ...or the line is overloaded To do this apply a voltage from 20 to 30 Vdc to the RS485CNTR signal using the A1 GND as a reference The following pins of the Main Interface connectors Figure B 4 or 5 are used for RS485 half duplex interface connection Connector Name Function 25 Pin 9 Pin 7 6 RS485CNTR multidrop device disconnect 17 2 RTX485 RS485 transmit receive data 5 3 RTX485 RS485 transmit receive ...

Page 31: ...f a multidrop configuration between a Multiplexer and DX8200 scanners 120 Ohm max 1200 m DX8200 x up to 31 Multiplexer RTX485 RTX485 shield 1 DX8200 120 Ohm max 2 m 5 3 2 RTX485 RTX485 GNDRS485 0 DX8200 RS485REF 5 3 2 5 3 2 Figure 17 DX8200 Multidrop connection to a Multiplexer ...

Page 32: ...current generator reference 17 2 CLOUT current loop output 5 3 CLOUT current loop output 20 4 DRVIN input current generator 18 7 CLIN current loop input 6 8 CLIN current loop input 8 9 DRVOUT output current generator DX8200 9 pin Connector USER INTERFACE MAX 300 METERS C L IN C L IN C L OUT C L OUT DRVREF DRVIN 8 7 3 2 1 4 9 DRVOUT I 20 mA I 20 mA Figure 18 20 mA C L active connections DX8200 9 pi...

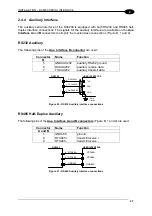
Page 33: ...tor are used Connector Name Function B 5 GNDAUX232 auxiliary RS232 ground 6 RXAUX232 auxiliary receive data 7 TXAUX232 auxiliary transmit data TXD RXAUX232 RXD TXAUX232 7 5 GNDAUX232 GND DX8200 USER INTERFACE 6 Earth Ground Figure 20 RS232 Auxiliary interface connections RS485 Half Duplex Auxiliary The following pins of the Aux Interface A and B connectors Figure B 1 and 2 are used Connector Name ...

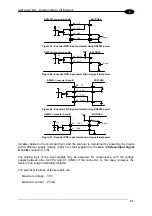
Page 34: ...nt generator the command signal is filtered through an anti disturbance circuit which generates a delay of about 5 ms for PS1 and PS2 and 500 µs for ENC Connector Name Function 25 Pin A and B 25 12 PS2 presence sensor 2 signal positive pin 14 13 PS2 presence sensor 2 signal negative pin 12 14 PS1 presence sensor 1 signal positive pin 2 15 PS1 presence sensor 1 signal negative pin 24 10 ENC encoder...

Page 35: ...NCODER Signal DX8200 Connector A and B ENC ENC 10 11 5V V Vext Figure 27 Encoder PNP input command using external power Isolation between the command logic and the scanner is maintained by powering the inputs with a different supply voltage Vext from that supplied on the Aux Interface Input Signal A and B connectors VS The driving logic of the input signals may be powered for convenience with the ...

Page 36: ...ts are level or pulse programmable a 50 ms pulse is generated in the second case Further programming information is supplied in the WinHost Help File These outputs are created using optoisolated Darlington drivers and supply both the collector and emitter in output allowing both loads referenced to ground and to the power supply to be driven The electrical features are given below Collector emitte...

Page 37: ... OR 9 pin main connector 17 pin Aux Input connector B for presence sensor and auxiliary interface 25 pin main connector with I O Figure 29 Standard point to point layout When On Line Operating mode is used the scanner is activated by a presence sensor when the object enters its reading zone The data is also transmitted on the Auxiliary interface if configured for Standard communication mode as wel...

Page 38: ...assed through this chain to the host The reading phase of each scanner is independent from the others in a Pass Through chain When On Line Operating mode is used the scanner is activated by an External Trigger presence sensor when the object enters its reading zone Applications can be implemented to connect a device such as a hand held reader to the Auxiliary port for manual code reading capabilit...

Page 39: ...he DIP switch The addresses must be consecutive and not include zero for hardware configuration or be selected in software in this case the DIP switch address must be zero for each Slave See par 2 2 2 NOTE The main serial port of the Slave scanners can be used for configuration The termination resistors of the RS485 bus must not be installed Single P S The P S signal is unique to the system there ...

Page 40: ...ell as its own to the Host On Line or Automatic operating modes can be used for this layout Main serial interface Auxiliary serial interface RS485 Half duplex Presence sensor for On Line mode 3 3 2 1 Master Slave 3 2 2 1 HOST PC or PLC RS232 RS485 Full duplex MULTIPLEXER MX4000 RS485 Half duplex DX8200 DX8200 Figure 33 Multi P S layout connections 2 5 4 Multiplexer Each scanner is connected to an ...

Page 41: ...X8200 BUS INTERFACE 3 1 PACKAGE CONTENTS Verify that the DX8200 reader and all the parts supplied with the equipment are present and intact when opening the packaging the list of parts includes DX8200 reader Installation Manual barcode test chart Figure 35 ...

Page 42: ...m below gives all the information required for installation refer to par 4 4 for correct positioning of the scanner with respect to the code passage zone POWER ON EXT T RIG ENCODER GOOD READ T X DAT A NETWORK 5 9 150 3 7 94 22 7 576 18 5 470 2 1 53 385 15 16 20 2 513 40 1 6 10 0 4 170 6 7 9 0 4 170 6 7 118 4 6 64 2 5 mm inch Figure 36 DX8200 Bus Interface overall dimensions ...

Page 43: ...only female 9 pins 4 Input signal connector female 25 pins Lonworks INPUT OUTPUT connector A1 A2 1 15 scanner side external view A1 A2 1 15 OUTPUT INPUT Figure 38 Lonworks INPUT OUTPUT connectors The following pinout is valid for the INPUT connector as well as for the OUTPUT connector Lonworks INPUT OUTPUT pinout Pin Name Function A1 GND supply voltage negative pin A2 VS supply voltage 20 to 30 Vd...

Page 44: ...sor 3 3 1 Power Supply The input power is supplied to the Lonworks INPUT OUTPUT connectors Figure B 1 2 The supply voltage for correct operation of the scanner must be between 20 and 30 VDC The max power consumption is 30 W The power block optional supplies the power necessary for the DX8200 and allows main power to be used A security system allows the laser to activate only once the motor has rea...

Page 45: ...PS and PSAux and 500 µs for ENC REFER DX8200 Lonworks Input Output Connectors SC8000 Vext 20 30 Vdc PS 12 Vext 20 30 Vdc PSAux 14 Vext 20 30 Vdc ENC 13 15 Figure 41 DX8200 Bus Interface inputs 3 4 LAYOUTS DX8200 Bus Interface models are connected to an SC8000 Logic Unit the core of the reading system whose duty is to interpret data from each scanner and to perform the correct barcode assignment to...

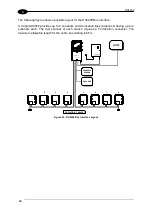
Page 46: ...ion lines branches having up to 4 scanners each The last scanner of each branch requires a Termination connector The maximum allowable length for the entire bus cabling is 65 m DATALOGIC CABLES ENCODER PWR XXX Va cI np ut L N E POWERSUPPL YUNI T SC8000 LOGI C UNI T HOST 1 2 3 4 5 6 7 8 PRESENCE SENSOR Figure 42 DX8200 Bus Interface Layout ...

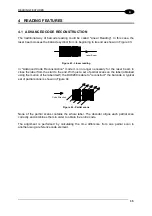
Page 47: ...aser beam to cross the label from the start to the end With just a set of partial scans on the label obtained using the motion of the label itself the DX8200 is able to reconstruct the barcode A typical set of partial scans is shown in Figure 44 Code Direction Figure 44 Partial scans None of the partial scans contains the whole label The decoder aligns each partial scan correctly and combines them...

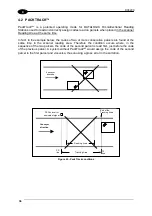
Page 48: ... same time in the scanner reading area Therefore the condition occurs where in the sequence of the two parcels the code of the second parcel is read first just before the code of the previous parcel A system without PackTrack would assign the code of the second parcel to the first parcel and viceversa thus causing a gross error in the sortation Conveyor direction Conveyor direction Tracking Area T...

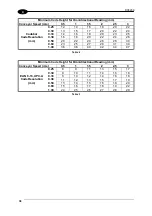
Page 49: ...ctional Reading mm Conveyor Speed m s 0 5 1 1 5 2 2 5 3 0 25 10 12 14 17 19 21 0 30 12 14 16 18 20 22 0 33 13 14 17 19 21 23 0 38 14 16 18 20 22 24 0 50 18 19 21 23 25 27 0 60 21 22 24 26 28 30 2 5 Interleaved Code Resolution mm 1 00 34 35 36 37 39 41 Table 1 Minimum Code Height for Omnidirectional Reading mm Conveyor Speed m s 0 5 1 1 5 2 2 5 3 0 25 9 10 12 15 17 19 0 30 10 11 13 16 18 20 0 33 11...

Page 50: ...6 0 50 20 22 24 26 28 30 0 60 23 25 27 29 31 34 Codabar Code Resolution mm 1 00 36 38 40 42 44 47 Table 4 Minimum Code Height for Omnidirectional Reading mm Conveyor Speed m s 0 5 1 1 5 2 2 5 3 0 25 8 9 11 13 15 17 0 30 9 10 11 14 16 18 0 33 9 10 12 14 16 18 0 38 11 12 13 15 17 19 0 50 13 14 15 16 18 20 0 60 15 16 17 18 19 22 EAN 8 13 UPC A Code Resolution mm 1 00 24 25 26 27 28 29 Table 5 ...

Page 51: ...Single Configuration DX8200 2X10 0 25 mm codes DX8200 2X10 Code Resolution 0 25 mm 620 385 1100 Dimensions given in mm CONVEYOR PLANE Reading Area DOF 400 CONVEYOR EDGE 120 500 FW Figure 46 Reading diagram for double diode high resolution model ...

Page 52: ...DX8200 2X00 0 30 mm codes DX8200 2X00 Code Resolution 0 30 mm Dimensions given in mm CONVEYOR PLANE DOF 500 600 720 385 1300 FW 700 600 Reading Area CONVEYOR EDGE 20 Figure 47 Reading diagram for double diode standard resolution model ...

Page 53: ...ion DX8200 2X00 0 50 mm codes 3 DX8200 2X00 Code Resolution 0 50 mm Dimensions given in mm 800 CONVEYOR PLANE Reading Area DOF 700 600 900 FW 820 385 20 CONVEYOR EDGE 1500 Figure 48 Reading diagram for double diode standard resolution model ...

Page 54: ...ation DX8200 3X10 0 25 mm codes DX8200 3X10 Code Resolution 0 25 mm CONVEYOR PLANE 620 385 Reading Area DOF 600 FW 500 CONVEYOR EDGE Dimensions given in mm 1100 120 Figure 49 Reading diagram for triple diode high resolution model ...

Page 55: ...on DX8200 3X00 0 30 mm codes DX8200 3X00 Code Resolution 0 30 mm Reading Area Dimensions given in mm 720 385 1400 CONVEYOR PLANE 700 500 FW 100 DOF 600 800 20 CONVEYOR EDGE Figure 50 Reading diagram for triple diode standard resolution model ...

Page 56: ...200 3X00 0 50 mm codes Dimensions given in mm DX8200 3X00 Code Resolution 0 50 mm 820 385 1500 CONVEYOR PLANE DOF 1000 900 FW Reading Area 700 500 300 CONVEYOR EDGE 100 Figure 51 Reading diagram for triple diode standard resolution model ...

Page 57: ...CONVEYOR PLANE DOF 400 Reading Area CONVEYOR EDGE FW Dimensions given in mm 120 Figure 52 Reading diagram for side by side double diode high resolution model Side by side configurations are shown with the minimum overlap You should adapt the distance between the scanners and therefore the field width according to your application ...

Page 58: ...5 1300 CONVEYOR PLANE 1200 FW DOF 600 Reading Area 1240 20 CONVEYOR EDGE Figure 53 Reading diagram for side by side double diode standard resolution model Side by side configurations are shown with the minimum overlap You should adapt the distance between the scanners and therefore the field width according to your application ...

Page 59: ...1500 CONVEYOR PLANE DOF 900 Reading Area 1240 1200 FW 20 CONVEYOR EDGE 700 100 1000 Figure 54 Reading diagram for side by side double diode standard resolution model Side by side configurations are shown with the minimum overlap You should adapt the distance between the scanners and therefore the field width according to your application ...

Page 60: ... mm 1100 1140 CONVEYOR PLANE DOF 600 FW 900 Reading Area CONVEYOR EDGE 120 Figure 55 Reading diagram for side by side triple diode high resolution model Side by side configurations are shown with the minimum overlap You should adapt the distance between the scanners and therefore the field width according to your application ...

Page 61: ...1400 1200 CONVEYOR PLANE DOF FW 800 600 Reading Area 1240 20 CONVEYOR EDGE 100 1000 Figure 56 Reading diagram for side by side triple diode standard resolution model Side by side configurations are shown with the minimum overlap You should adapt the distance between the scanners and therefore the field width according to your application ...

Page 62: ... FW 1200 1000 CONVEYOR PLANE DOF 1000 700 Reading Area 1040 CONVEYOR EDGE 100 Figure 57 Reading diagram for side by side triple diode standard resolution model Side by side configurations are shown with the minimum overlap You should adapt the distance between the scanners and therefore the field width according to your application ...

Page 63: ...active 5 2 REPLACING THE PROTECTION FUSES FOR AC MODELS WARNING The device must be opened by qualified personnel only WARNING Before removing the fuses from DX8200 make sure the power supply cable is disconnected to avoid shock or harm to the operator Two protection fuses are located next to the on off switch Figure B 3 To replace them turn the device off and disconnect the power supply cable then...

Page 64: ...Mbaud Inputs optocoupled NPN or PNP Encoder Presence Sensor 1 Presence Sensor 2 Encoder Presence Sensor 1 Presence Sensor Aux Outputs No Read optocoupled open emitteror collector Right Code OPTICAL FEATURES see note 1 Light source up to 3 semiconductor laser diodes Wavelength 630 to 680 nm Safety class Class 2 IEC 825 1 Class II CDRH Light receiver Avalanche photodiode READING FEATURES Scan rate 5...

Page 65: ...des WinHost utility program Host Mode receiving commands from the serial port Parameter Storage Non volatile internal EEPROM ENVIRONMENTAL FEATURES Operating temperature 0 to 45 C 32 to 113 F Storage temperature 20 to 70 C 4 to 158 F Humidity 90 non condensing Vibration resistance EN 60068 2 6 test FC 1 5 mm 5 to 9 1 Hz 0 5 G 9 1 to 150 Hz 2 hours on each axis Shock resistance EN 60068 2 27 test E...

Page 66: ...ARACTERISTICS OF INFORMATION TECHNOLOGY EQUIPMENT ITE EN 50082 2 March 1995 ELECTROMAGNETIC COMPATIBILITY GENERIC IMMUNITY STANDARD PART 2 INDUSTRIAL ENVIRONMENT EN 60950 October 1996 SAFETY OF INFORMATION TECHNOLOGY EQUIPMENT INCLUDING ELECTRICAL BUSINESS EQUIPMENT EN 60825 March 1993 RADIATION SAFETY OF LASER PRODUCTS EQUIPMENT CLASSIFICATION REQUIREMENTS AND USER S GUIDE Following the provision...

Reviews: