Customizing Configuration Settings
Product Reference Guide
35
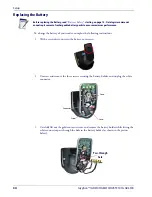
4. Remove the old battery from its place (if present), and insert the new battery in the same
position.
5. Replace the battery holder and three screws, plug in the connector, and return the contacts
circuit to its previous location.
When inserting the new battery into the handle, take care to position the battery
and the connector as shown.
6. Insert the cover in the handle and screw it back into place.
Battery replacement is now complete.
Summary of Contents for Gryphon I GD4100
Page 38: ...Setup 36 Gryphon I GD4100 GM4100 GBT 4100 L GD4300 NOTES ...
Page 318: ...References 316 Gryphon I GD4100 GM4100 GBT4100 L GD4300 NOTES ...
Page 330: ...Technical Specifications 328 Gryphon I GD4100 GM4100 GBT4100 L GD4300 NOTES ...
Page 346: ...Sample Barcodes 344 Gryphon I GD4100 GM4100 GBT4100 L GD4300 NOTES ...
Page 348: ...Keypad 346 Gryphon I GD4100 GM4100 GBT4100 L GD4300 6 7 8 9 ...
Page 349: ...Keypad Product Reference Guide 347 A B C D E F ...
Page 350: ...Keypad 348 Gryphon I GD4100 GM4100 GBT4100 L GD4300 NOTES ...
Page 360: ...Scancode Tables 358 Gryphon I GD4100 GM4100 GBT4100 L GD4300 NOTES ...


