background image

LED CLASS 


R

C

US

SE

E P

A

C

K

A

G

E

 F

O

R


P

A

T

EN

T

 L

IST

IN

G


UK


Class 1 LED product 

Apparecchio LED classe 1 

Appareil à LED de classe 1 

LED Klasse 1 

Clase de LED 1 


This product conforms to EN60825-1:2001. 


PATENTS 


This product is licensed by one or more of the following U.S. 
patents:  

4,894,523; 5,021,642; and 6,158,661 
 

This product is covered by one or more of the following patents:  

U.S. patents  5,992,740; 6,305,606 B1; 6,631,846 B2; 
6,517,003 B2; and 6,712,271 B2 
European patents  851,378 B1; 895,175 B1; 962,880 B1; 
997,760 B1; and 1,128,315 B1 
 
Additional patents pending. 


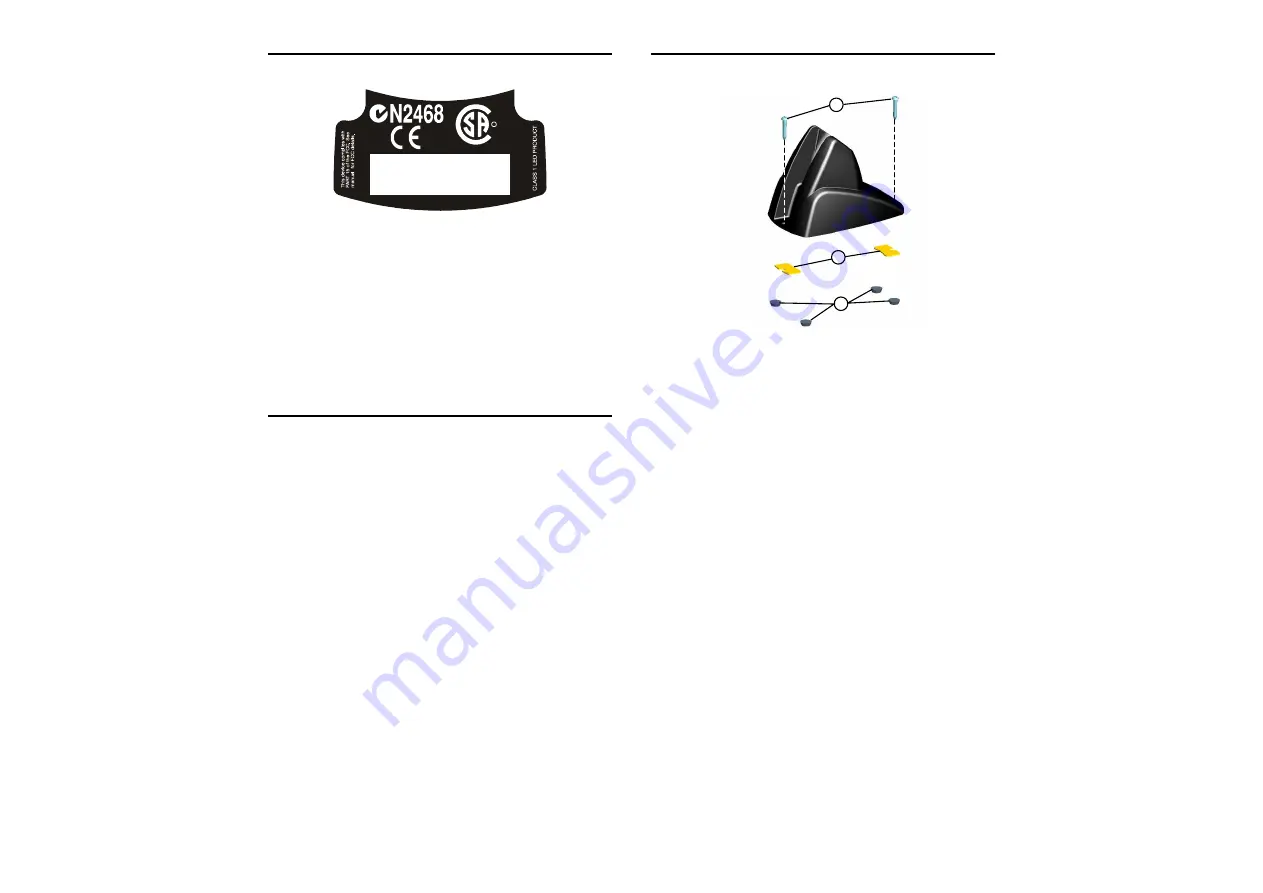
STAND INSTALLATION 


UK


The stand can be mounted by using self-tapping screws, 
double sided adhesive strips or rubber feet: 

A)  mount the stand directly to the surface using the 


self-tapping screws; 

B)  carefully clean the bottom surface of the stand and the 

table surface. Remove the protective plastic from one side 
of the adhesive strips and stick them on the stand bottom. 
Then, remove the plastic from the other side of the strips 
and affix the stand to the table; 

C)  carefully clean the bottom surface of the stand, remove 

the protective film from the rubber feet and stick them in 
the corresponding housing on the bottom surface. It is 
also possible to fix an optional metal plate. 


I


Lo stand può essere montato utilizzando le viti autofilettanti, le 
strisce adesive oppure i piedini di gomma: 

A) 

montare lo stand direttamente sulla superficie utilizzando 
le viti autofilettanti; 

B) 

pulire accuratamente la superficie inferiore della base 
dello stand e la superficie d’appoggio. Togliere la plastica 
protettiva da un lato di ogni striscia e attaccare entrambe 
le strisce alla base dello stand. Rimuovere la plastica 
protettiva dall’altro lato delle strisce adesive e attaccare lo 
stand alla superficie d’appoggio; 

C) 

Pulire accuratamente la superficie inferiore della base 
dello stand, quindi togliere la pellicola protettiva dai piedini 
e attaccarli all’interno delle apposite sedi nella base di 
plastica. Inoltre, è possibile fissare un base metallica 
opzionale. 


A

B

C

Summary of Contents for Heron D140

Page 1: ...Heron D140 READERS QUICK REFERENCE GUIDA RAPIDA GUIDE RAPIDE KURZANLEITUNG GUÍA RÁPIDA 820001211 Rev A ...

Page 2: ...ents of the European Council Directives listed below sont conformes aux spécifications des Directives de l Union Européenne ci dessous den nachstehenden angeführten Direktiven des Europäischen Rats cumple con los requisitos de las Directivas del Consejo Europeo según la lista siguiente 89 336 EEC EMC Directive e 92 31 EEC 93 68 EEC emendamenti successivi and further amendments et ses successifs am...

Page 3: ...anty Extensions and Maintenance Agreements Downloads Software Downloads Manuals and Catalogues Contact Us Listing of Datalogic Subsidiaries and Quality Partners Authorised Repair Centres Products Hand Held Readers Software Tools DL Sm rtSet DL Sm rtSet is a Windows based utility program which allows device configuration using a PC It provides RS232 interface configuration as well as configuration ...

Page 4: ...te de livraison à condition que le produit soit utilisé correctement Datalogic a la faculté de réparer ou de remplacer ce produit Ces mesures ne prolongeront pas l échéance de la garantie La garantie ne s applique pas aux produits qui ont été utilisés de façon incorrecte accidentellement endommagés soumis à des réparations non autorisées ou bien altérés D Datalogic gibt für dieses Produkt eine Gar...

Page 5: ...m on the stand bottom Then remove the plastic from the other side of the strips and affix the stand to the table C carefully clean the bottom surface of the stand remove the protective film from the rubber feet and stick them in the corresponding housing on the bottom surface It is also possible to fix an optional metal plate I Lo stand può essere montato utilizzando le viti autofilettanti le stri...

Page 6: ...el soporte directamente sobre la superficie utilizando los tornillos auto bloqueantes B Limpiar con cuidado la superficie inferior del soporte y la superficie de la mesa Quitar el plástico de protección de una de las caras de las tiras adhesivas y pegarla a la superficie inferior del soporte Luego quitar el plástico de la otra cara de la tira adhesiva y posicionar el soporte en la posición deseada...

Page 7: ...stance on concrete IEC 68 2 32 Test ED 1 8 m Protection Class IP30 Mechanical Features Weight without cable about 165 g 5 8 oz Cable length CAB 397 fully extended CAB 396 fully extended 2 60 m 8 ft 5 in 3 00 m 9 ft 9 in INSERTION INTO STAND UK Pair the reader to the stand paying attention to insert the handle into the stand clip see figure above I Posizionare la pistola nello stand assicurandosi c...

Page 8: ...of the terms used to identify the pins is as follows SCAN This scanner open collector output signal is used to synchronize the decoding logic with the scanner Each transition of this signal from low to high or high to low corresponds to the start of a scan The signal is a square wave with 36 Hz default frequency see the following figure Video and Scan signals GND Supply ground and signal reference...

Page 9: ...input is 5 Vdc VIDEO This open collector scanner output is electrically identical to the barcode It supplies a series of pulses the length of which are proportional to the width of the elements within the barcode read Video polarity is programmable By default a low output level corresponds to a bar The frequency of the pulses depends on the density of the code the distance from code and the progra...

Page 10: ...k i Pk 3 Set to Transparent Mode i k i k i k OPTIONAL CONFIGURATION PARAMETERS UK To configure the reader with the optional parameters follow the procedure 5 steps In step 3 select only the parameters relative to your application I Seguire la procedura per configurare il lettore con i parametri opzionali 5 passi All interno del passo 3 selezionare solamente i parametri relativi alla propria applic...

Page 11: ...k i Pk 3 Set to Transparent Mode i k i k i k OPTIONAL CONFIGURATION PARAMETERS UK To configure the reader with the optional parameters follow the procedure 5 steps In step 3 select only the parameters relative to your application I Seguire la procedura per configurare il lettore con i parametri opzionali 5 passi All interno del passo 3 selezionare solamente i parametri relativi alla propria applic...

Page 12: ...input is 5 Vdc VIDEO This open collector scanner output is electrically identical to the barcode It supplies a series of pulses the length of which are proportional to the width of the elements within the barcode read Video polarity is programmable By default a low output level corresponds to a bar The frequency of the pulses depends on the density of the code the distance from code and the progra...

Page 13: ...of the terms used to identify the pins is as follows SCAN This scanner open collector output signal is used to synchronize the decoding logic with the scanner Each transition of this signal from low to high or high to low corresponds to the start of a scan The signal is a square wave with 36 Hz default frequency see the following figure Video and Scan signals GND Supply ground and signal reference...

Page 14: ...stance on concrete IEC 68 2 32 Test ED 1 8 m Protection Class IP30 Mechanical Features Weight without cable about 165 g 5 8 oz Cable length CAB 397 fully extended CAB 396 fully extended 2 60 m 8 ft 5 in 3 00 m 9 ft 9 in INSERTION INTO STAND UK Pair the reader to the stand paying attention to insert the handle into the stand clip see figure above I Posizionare la pistola nello stand assicurandosi c...

Page 15: ...el soporte directamente sobre la superficie utilizando los tornillos auto bloqueantes B Limpiar con cuidado la superficie inferior del soporte y la superficie de la mesa Quitar el plástico de protección de una de las caras de las tiras adhesivas y pegarla a la superficie inferior del soporte Luego quitar el plástico de la otra cara de la tira adhesiva y posicionar el soporte en la posición deseada...

Page 16: ...m on the stand bottom Then remove the plastic from the other side of the strips and affix the stand to the table C carefully clean the bottom surface of the stand remove the protective film from the rubber feet and stick them in the corresponding housing on the bottom surface It is also possible to fix an optional metal plate I Lo stand può essere montato utilizzando le viti autofilettanti le stri...

Page 17: ...te de livraison à condition que le produit soit utilisé correctement Datalogic a la faculté de réparer ou de remplacer ce produit Ces mesures ne prolongeront pas l échéance de la garantie La garantie ne s applique pas aux produits qui ont été utilisés de façon incorrecte accidentellement endommagés soumis à des réparations non autorisées ou bien altérés D Datalogic gibt für dieses Produkt eine Gar...

Page 18: ...anty Extensions and Maintenance Agreements Downloads Software Downloads Manuals and Catalogues Contact Us Listing of Datalogic Subsidiaries and Quality Partners Authorised Repair Centres Products Hand Held Readers Software Tools DL Sm rtSet DL Sm rtSet is a Windows based utility program which allows device configuration using a PC It provides RS232 interface configuration as well as configuration ...

Page 19: ...ents of the European Council Directives listed below sont conformes aux spécifications des Directives de l Union Européenne ci dessous den nachstehenden angeführten Direktiven des Europäischen Rats cumple con los requisitos de las Directivas del Consejo Europeo según la lista siguiente 89 336 EEC EMC Directive e 92 31 EEC 93 68 EEC emendamenti successivi and further amendments et ses successifs am...

Reviews: