background image

1.9.3 

Updating the Firmware 

 
After copying the firmware image to the host PC (see par. 4.10.1) and installing DFU 
(see par. 1.9.2), you can upgrade the firmware on your Datalogic device. 


The following steps require that you have already established an 
ActiveSync or Windows Mobile

®

 Device Center connection between 

the host computer and the Datalogic device. 

NOTE 


1. 

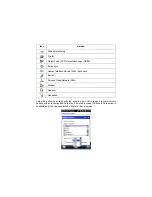
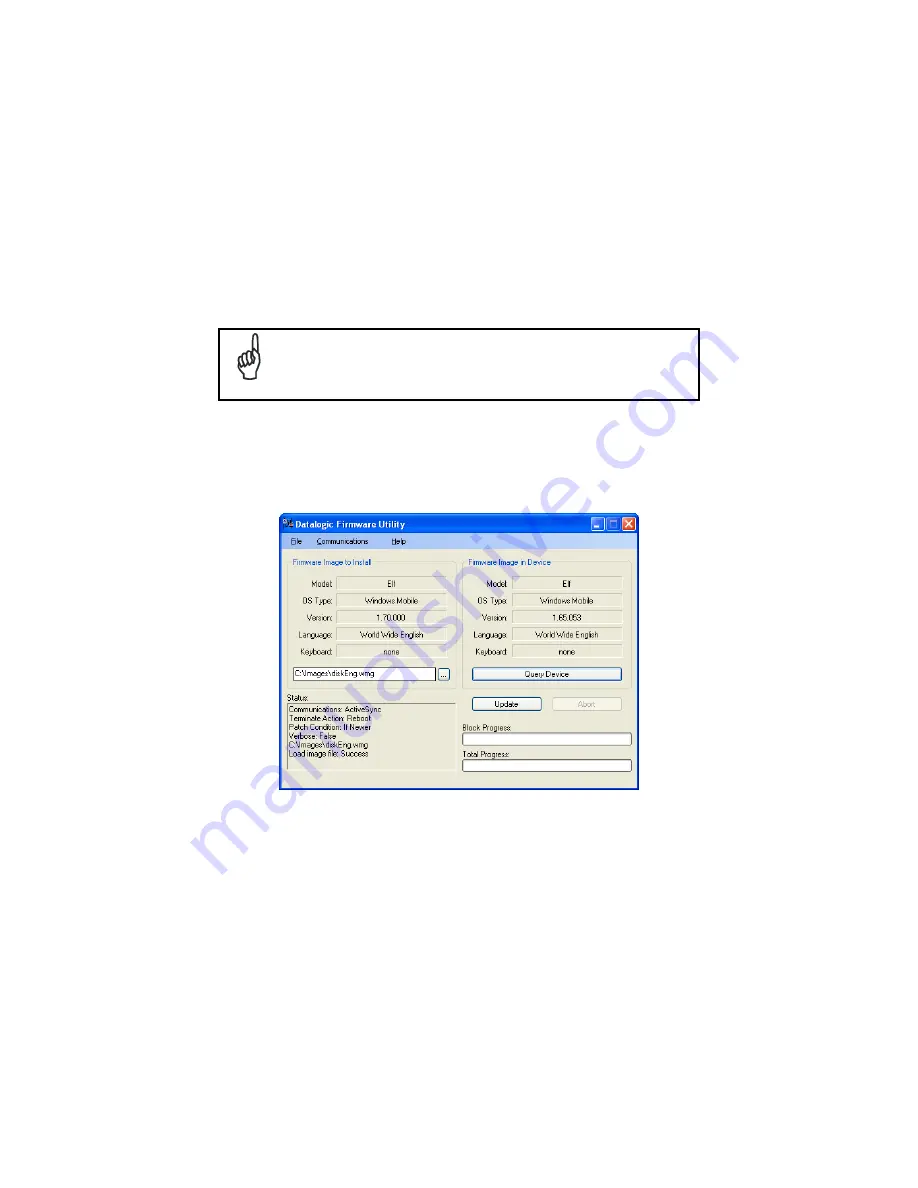
Go to Start > Programs > DFU > Datalogic Firmware Utility. 

2. 

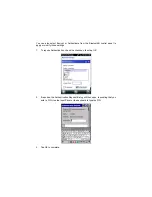
Verify that ActiveSync is selected by clicking Communications > ActiveSync. 

3. 

Click browse (...) and navigate to the location where you saved the firmware 
file for your terminal. 


4. 

Select the current *.out file and click Open. 

5. Click 

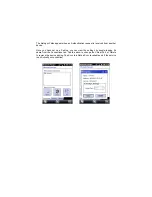
Update. 

6. 

DFU will compare the selected firmware image with the firmware already 
loaded on the device; if the images are different, DFU will proceed to update 
the firmware image on your device. 

7. 

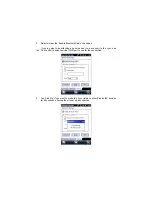
After the firmware of your device has been updated, DFU will automatically 
perform a warm reset of the device. 

Summary of Contents for Lynx 00N0LD-1N0-MEN0

Page 1: ...en equipped with both a 1D laser scanner and 2D bar code imager For being ready also to the most demanding applicatinons an autofocus camera with flash has been foreseen on the back of the product The Lynx provides four wireless technologies in the same form factor without antenna protruding Bluetooth v2 1 EDR for fast data transfer 802 11b g n with CCX v4 802 11i Security UMTS HSPA for real time ...

Page 2: ...N0 MEN0 Lynx with Bluetooth v2 0 Wi Fi 802 11 b g n Decodified Laser SE955 Windows Mobile 6 5 27 Key Numeric 944400001 Lynx H2N0LD 1N1 MEN0 Lynx with Bluetooth v2 0 UMTS HSPA Voice and Data Assisted GPS Wi Fi 802 11 b g n Decodified Laser SE955 Camera Windows Mobile 6 5 27 Key Numeric 944400002 Lynx 00N0WI 1N1 MEN0 Lynx with Bluetooth v2 0 Wi Fi 802 11 b g n 2D Imager 4500 Wide Aspect Camera Windo...

Page 3: ...6 Key QWERTY 944400006 Lynx 00N0WI 1Q1 MEN0 Lynx with Bluetooth v2 0 Wi Fi 802 11 b g n 2D Imager 4500 Wide Aspect Camera Windows Mobile 6 5 46 Key QWERTY 944400007 Lynx H2N0WI 1Q1 MEN0 Lynx with Bluetooth v2 0 UMTS HSPA Voice and Data Assisted GPS Wi Fi 802 11 b g n 2D Imager 4500 Wide Aspect Camera Windows Mobile 6 5 46 Key QWERTY ...

Page 4: ...er packages will contain the accessories necessary for the Lynx connection to the host computer and to the network the cradle one or more connection cables Remove all the components from their packaging check their integrity and congruity with the packing documents Keep the original packaging for use when sending products to the technical assistance center Damage caused by improper packaging is no...

Page 5: ...Rechargeable battery packs are not initially charged Therefore the first operation to perform is to charge them See paragraph 오류 참조 원본을 찾을 수 없습니다 NOTE ...

Page 6: ... memory cards To access the microSD card slot and insert the card proceed as follows 1 Turn off the Lynx 2 Shift the battery latch to the left and remove the battery pack 3 Open the card slot and insert the microSD card with the written part downward ...

Page 7: ...ift the card to the right to lock it into the cardholder close the card slot 5 First insert the bottom contacts and then the upper side of the battery pack into the slot Press until the battery latch clicks ...

Page 8: ...s in the Lynx or the microSD card itself Proper ESD precautions include but are not limited to working on an ESD mat and ensuring that the operator is properly grounded Do not force the card If you feel resistance remove the card check the orientation and reinsert it Do not use the microSD card slot for any other accessories It is highly recommended that users latch the card cage s bale even when ...

Page 9: ...follows 1 Turn off the Lynx 2 Shift the battery latch to the left and remove the battery pack 3 Insert the SIM card with the contacts downwards 4 First insert the bottom contacts and then the upper side of the battery pack into the slot Press until the battery latch clicks ...

Page 10: ... 1 Removing the SIM Card To remove the SIM card follow the steps above to access the SIM area and remove it from its slot All the basic functionalities normally associated to the SIM card are managed by the terminal GPRS connectivity phone calls SMS handling All core functionalities GPRS connectivity phone calls and SMS handling is managed by the terminal Advanced functionality may require additio...

Page 11: ...cro USB 94ACC1381 Power Supply Dock PWR Plug 2 1mm Cables 94A051020 Cable for dock PC RS232 communication 94A051968 Cable Micro USB Client 94A051969 Cable Micro USB Host 94A051970 Cable USB Handylink Client 94A051971 Cable USB Handylink Host 94A051972 Cable RS232 Handylink Client 94A051973 Cable RS232 Handylink Host 94A051974 Cable Dex Handylink Various 95ACC1033 Screen Protector Kit 5 Pack 94ACC1...

Page 12: ...Use only a Datalogic ADC approved power supply and cables Use of an alternative power supply will invalidate any approval given to this device and may be dangerous NOTE ...

Page 13: ... when the battery pack is low It is possible to recharge the battery pack by connecting the power supply directly to the Lynx Alternatively it is also possible to recharge the battery pack by using the single slot dock the powered mobile dock the Ethernet four slot dock or the four slot battery charger Moreover recharging is possible by USB Direct connection with the host computer but with longer ...

Page 14: ...e We recommend charging the battery pack every two to three months to keep its charge at a moderate level to maximize battery life CAUTION Even if the storage temperature range is wider In order to achieve the longest battery life store the terminal and the spare batteries between 20 to 30 ºC 68 to 86 ºF Extended batteries must be charged at a temperature ranging from 0 to 45 C 32 to 113 F Standar...

Page 15: ...The Lynx could get warm during charging this is normal and does not mean a malfunction NOTE Use only a USB IF compliant USB port as a charging source NOTE ...

Page 16: ...ack proceed as follows 1 Turn off the Lynx 2 Shift the battery latch to the left and remove the battery pack 3 Install the new battery pack first insert the bottom contacts and then the upper side of the battery pack into the slot Press until the battery latch clicks ...

Page 17: ...e product damage and may cause heat explode or ignite The area in which the units are charged should be clear of debris and combustible materials or chemicals Do not use the battery pack of this terminal for power devices different from this PDA Immediately discontinue use of the battery pack if while using charging or storing the battery pack the battery pack emits an unusual smell feels hot chan...

Page 18: ...place the battery pack when the device is turned on Do not remove or damage the battery pack s label Do not use the battery pack if it is damaged in any part Battery pack usage by children should be supervised Collect and recycle waste batteries separately from the device in comply with European Directive 2006 66 EC 2002 95 EC 2002 96 EC and subsequent modifications US and China regulatory and oth...

Page 19: ...1 3 CLEANING THE PDA Periodically clean the Lynx with a slightly dampened cloth Do not use alcohol corrosive products or solvents ...

Page 20: ...logic Handylink cable 94A051970 to directly connect the Lynx to a host computer to transfer data through the USB interface Key A Host computer C Lynx B Standard Micro USB cable 94A051968 94A051970 Handylink USB Client Cable Connection through the cable complies to the 1 1 USB standard NOTE A B C ...

Page 21: ...n insert the Lynx PDA into the cradle Key A Host computer C 94A150036 Lynx Single Slot Dock B 94A051968 Micro USB Client Cable D 94ACC1381 Power Adapter Connection through the cradle complies to 1 1 USB standard NOTE The actual data transfer speed can be appreciably lower than the maximum theoretical speed NOTE B D C A ...

Page 22: ...o A USB cable For all these devices maximum current withdrawal must be below 100mA Key A Keyboard with USB interface C 94A051969 Micro USB Host Cable 94A051971 Handylink Micro USB Host Cable B Lynx D Standard A to Micro A USB Cable Key A USB hard drive external memory source C 94A051969 Micro USB Host Cable 94A051971 Handylink Micro USB Host Cable B Lynx D Standard A to Micro A USB Cable A B C D A...

Page 23: ...l memory D Standard A to Micro A USB Cable B Lynx Single Slot Dock E 94ACC1381 Power Adapter C 94A051969 Micro USB Host Cable Lynx works with most of mentioned USB peripherals Datalogic can not guarantee the operations of Lynx with all devices on the market NOTE Connection is compliant to 1 1 USB standard NOTE The actual data transfer speed can be appreciably lower than the maximum theoretical spe...

Page 24: ...4A051972 Handylink Micro RS232 Client Cable The Single Slot Dock can be connected to the Host by means of a standard null modem cable such as Datalogic 94A051020 CAB 427 for 9 pin connections Once the Host has been turned on insert the Lynx PDA into the cradle Key A Host Computer C Lynx Single Slot Dock B 94A051020 CAB 427 RS232 Null Modem Cable D 94ACC1381 Power Adapter A B C A B C D ...

Page 25: ...t computer For models using the 802 11 b g n radio you can find information about the applet for radio configuration http www summitdata com SCU htm To launch this utility you can tap the specific icon if it s visible on the taskbar or you can select the menu item Start Programs Summit and tap the SCU icon Key A Lynx B Access point C Host Application Server A B C A ...

Page 26: ...on the radio power mode and security protocol selected it may take up to 30 seconds for the 802 11 b g n radio driver to re associate the radio to the network NOTE Area coverage and radio performance may vary due to environmental conditions access points types or interference caused by other devices microwave ovens radio transmitters etc NOTE In case of heavy usage the Lynx could get warm this is ...

Page 27: ...n using the Wireless Communications applet see par 오류 참조 원본을 찾을 수 없습니다 and perform the Discovery procedure see par 오류 참조 원본을 찾을 수 없습니다 NOTE Suspending the terminal powers off the Bluetooth radio and drops the piconet Bluetooth connection When the terminal resumes it takes approximately 10 seconds for the Bluetooth radio driver to re initialize the radio NOTE Area coverage and Bluetooth radio perfo...

Page 28: ...NOTE ...

Page 29: ...ommunication In order to use a WWAN Connection you have to install a SIM Card see instructions on par 1 5 In order to avoid wasting energy the GSM module is off by default If you need to have GSM working the module must be powered on using the Wireless Communications applet see par 오류 참조 원본을 찾을 수 없습니다 NOTE Suspending the terminal powers off the GSM radio and drops the connection When the terminal ...

Page 30: ...The GSM voice capability of this PDA has to be addressed to occasional use in well covered areas If the coverage is poor the voice quality can be highly affected NOTE ...

Page 31: ...phone handset by the Lynx headset or by a Bluetooth headset NOTE During a call you can set the speaker volume by pressing the arrow navigation keys NOTE In case of heavy usage the Lynx could get warm this is normal and does not mean a malfunction NOTE ...

Page 32: ...5 cm from their pacemaker and or any other medical device Should not carry this device in a breast pocket Should keep the device at the opposite side of the pacemaker and or any other medical device Should turn this device OFF or move it immediately AWAY if there is any reason to suspect that interference is taking place Should ALWAYS read pacemaker or any other medical device guides or should con...

Page 33: ...rly installed and the air bag inflates serious injury could result WARNING Turn off the device when in any area with a potentially explosive atmosphere Observe restrictions and follow closely any laws regulations warnings and best practices on the use of radio equipment near fuel storage areas or distribution fuel areas chemical plants or where some operation involves use of explosive materials Do...

Page 34: ...talled use the ON OFF key to turn the PDA on and off As soon as the PDA is on the Windows Embedded Handheld 6 5 desktop configuration will appear on the screen Wait a few seconds before starting any activity so that the PDA completes its startup procedure Today Screen Start Menu Use the stylus par 1 1 1 as suggested to select icons and options The PDA goes into power off low power with display and...

Page 35: ...at item On the pop up menu that appears tap the action you want to perform To recalibrate the touch screen use the Stylus Applet see par 1 6 7 Use only original Datalogic styluses supplied with the product itself In harsh applications use of screen protectors should be taken into consideration in order to extend the touch screen operating life To prevent damage to the screen do not use sharp devic...

Page 36: ... boot or following a registry restore to default values the PDA startup see par 1 1 is preceded by the Welcome Wizard Welcome Wizard Screen The Welcome Wizard allows the user to calibrate the touch screen see par 1 6 7 and to configure an email account and a password to protect the terminal Touch Screen Calibration Screen ...

Page 37: ...1 3 DATA CAPTURE To capture data first of all tap Start Settings System Decoding To configure and enable data capture parameters refer to par 1 6 1 ...

Page 38: ... the SCAN key The lighted band emitted by the laser must completely cross the barcode as shown in the figure below If the scan has taken place correctly the Good Read LED gets constant Green for a configurable time if enabled the GoodReadSound emits an acoustic signal if enabled the GreenSpot projects a green spot onto the bar code image ...

Page 39: ...Remove the protective film cover over the Laser Output Window before use NOTE ...

Page 40: ...o the code and press the SCAN Key The Lynx Imager uses an intelligent aiming system pattern similar to those on cameras indicating the field of view which should be positioned over the code Aiming System If the aiming system pattern is centered over the entire symbology as shown in the following figure either wait for the timeout or release the Scan key to capture the image A red beam illuminates ...

Page 41: ... when the Lynx Imager is closer to the code and larger when it is farther from the code Symbologies with smaller bars or elements mil size should be read closer to the unit Symbologies with larger bars or elements mil size should be read farther from the unit See par 오류 참조 원본을 찾을 수 없습니다 for further details If the scan has taken place correctly the Good Read LED gets constant Green for a configurab...

Page 42: ...1 4 DESCRIPTION OF THE KEYS The Lynx comes with two different keyboards an alphanumeric keyboard qwerty having 46 keys and a numeric keyboard having a total of 27 keys 1 4 1 Alphanumeric Keyboard ...

Page 43: ...Numeric Keyboard ...

Page 44: ...above the key Blue modifier one shot key when pressed before a standard key it enables the character or function printed in blue above the key It powers the Lynx ON or OFF It is placed on the upper left side of the terminal The hang up key normally generates the VK_TEND virtual key code used to hang up phone calls and to exit applications In blue mode the hang up key generates a VK_ESCAPE virtual ...

Page 45: ...AM but the file system is preserved Registry is restored from persistent memory A clean boot restores the Lynx to a clean configuration both the registry and the file system returns to a clean status that conforms to factory default Warm Boot To perform a warm boot press and hold the following keys simultaneously Cold Boot To perform a cold boot do the following steps 1 Turn off the Lynx by pressi...

Page 46: ... the 0 and hang up keys simultaneously and then press the on off key A dialog box will appear asking for confirmation Press the Enter Key Warm Boot Cold Boot Clean Boot Registry Restored from flash Restored from flash Clean configuration no user config File System Preserved Preserved Clean Installation no user files ...

Page 47: ...models Time out imager models Green Scanning LED is ON showing a good decode Charging Status left side Green It is constant once the charging process has been completed full charge Red It is constant while charging Red blinking In case of charge fault it is constant for two hours then it starts blinking Keyboard Status center Off Keyboard in primary Yellow solid Yellow alternate key mode Blue soli...

Page 48: ...ard function and the decoding status Windows Embedded Handheld Taskbar ICONS DESCRIPTION Zooms the screen Opens the Wireless Manager see par 1 6 6 Displays the system battery status Allows to set the volume of screen taps Opens Clock Alarms application It allows to set date time and alarms ...

Page 49: ... the Start menu tap Settings The Control Panel is split into three sections Personal System Connections Control panel applets are displayed as icons each icon corresponds to one applet Windows Embedded Handheld Control Panel ...

Page 50: ...iguration pages and multiple Barcode symbology pages DECODING CONFIGURATION PAGES Select the desired configuration from the options shown in the figure below and the other Decoding Properties figures on the following pages Select General or 1D Bar Code then use the menu or tap the left and right arrow keys to navigate the different pages of the Decoding utility The menu options will change to refl...

Page 51: ...e it to set volume tone duration and number of various types of beeps Good Read From the Decoding Properties page tap Configure General Good Read Use it to enable Good Read indications the use of Green Spot and a to set the decoding timeout for decoding labels ...

Page 52: ...igure General Formatting Use it to configure prefix suffix and data separator character strings General Options From the Decoding menu tap Configure General General Options Select from Label Programming Enable Symbology IDs and Group Separator Replacement ...

Page 53: ...erties page tap Configure General Decoding Options Use it to configure the User ID for symbologies Redundancy and Aggressive Decoding if supported by the decoding module Select a symbology to view or change the available properties settings ...

Page 54: ...page tap Configure General Spot Beam It allows enabling and configuration of Spot Beam and triggering modes It is only available on devices equipped with laser and advanced long range laser decoding modules that support the Spot Beam Feature ...

Page 55: ... From the Decoding Properties page tap Configure General Imager Options It configures illumination target beam and Pick List mode and triggering modes It is only available on devices equipped with 2D decoding engines ...

Page 56: ...Devices From the Decoding Properties page tap Configure General Devices Use it to enable or disable the keyboard wedge for Barcode scanner ...

Page 57: ...rent pages of the barcode symbology pages Each barcode symbology opens to its own page as shown in the figure below Refer to the sample symbology control panels for examples of the types of fields and options you can modify Codabar Select Enable Min Max Lengths Enable Checksum Send Checksum Send Start Stop Convert to CLSI and Wide Gaps ...

Page 58: ...lt settings Choose from Factory Defaults Minimum Settings Maximum Settings Save New Settings Revert to Saved Settings The settings are saved when you tap OK The settings are saved when you tap Yes When open Decoding Properties acts as a simple barcode test tool that provides the Data decoded and the Data Type of the barcode scanned ...

Page 59: ...program hardware buttons to launch your most used applications Under Select a button tap the button you want to assign a program to and then select a program from Assign a program To configure the way the up down control repeats use the Up Down Control applet Start Settings Personal Buttons Up Down Control ...

Page 60: ...plications To customize one of these buttons and assign it to a different application you first need to disable it Tap Start Settings System DL Buttons to display the DL Buttons window Select the button you want to disable Select the function None and the click OK To remove the disabled button select it and click Delete ...

Page 61: ...A dialogue box appears asking for confirmation Click Yes To add the button back click New and write the name of the button on the box that appears ...

Page 62: ...To assign a new application to the button select the function and then click OK To restore the old settings do a clean boot ...

Page 63: ...1 6 4 Triggers Triggers are special customizable buttons that are mapped by default by DL Mobile Also they can be set as wakeup buttons TRIGGER APPLICATION Scan Bar Code Pistol Trigger Bar Code ...

Page 64: ...d shortcut key specified in the DL Buttons tab refer to par 1 6 3 When the assigned button is pressed the dialog shown below will be displayed The Esc key can be used to close the Application Switcher NOTE Press the assigned button to open the application switcher Press the assigned button to cycle through the running applications when the dialog is open Press Enter to switch to the selected appli...

Page 65: ...l for wireless connections From here it s possible to turn on or off bluetooth and radio modules Open the Wireless Manager by tapping Start Settings Connections Wireless Manager or by tapping the connectivity icon on the taskbar see par 오류 참조 원본을 찾을 수 없습니다 The following window will appear ...

Page 66: ...it Client Utility SCU Wireless networking has a customized control Summit Client Utility SCU specific to the radio From the Start menu tap Summit SCU The SCU will open to the Main tab Summit Client Utility ...

Page 67: ... profile tap the Profile tab Information about the wireless network can be entered directly in the profile tab or by pressing Scan when the desired network ESSID is in range 2 At the Scan screen select the desired SSID ...

Page 68: ...eters for your network For more detailed settings specific to your installation please contact your wireless network administrator 5 When finished click Commit to save your settings Return to the Main tab if you have not previously selected Commit you will be prompted to save your changes ...

Page 69: ...f you used the scan button the desired profile will have the same name as the ESSID Use the Status tab to check connectivity to the network More detailed information about the applet for radio configuration can be found at http www summitdata com SCU htm ...

Page 70: ...tart Settings System Screen to open the Screen Settings dialog as shown in the figure below 2 Tap Align Screen to open the Calibration screen shown in the figure below 3 Carefully press and briefly hold stylus on the center of the target Repeat as the target moves around the screen 4 By completing the calibration procedure you implicitly accept the new calibration settings 5 New calibration settin...

Page 71: ...me Wizard with Stylus Calibration comes up if valid calibration settings are not available This happens in the following circumstances 1 At the first startup of the terminal 2 After any cold boot if the user skipped stylus calibration earlier 3 After a Clean Boot ...

Page 72: ...nds Audio From the Start Menu tap Settings System Audio The audio control panel can be used to independently set the playback or recording volume for different types of audio inputs and outputs such as a headset powered mobile dock or the internal speakers and microphone Audio Windows ...

Page 73: ...Sounds Notifications From the Start Menu tap Settings Sounds and Notifications The Volume Sounds applet configures audio features of all speakers and headphones Sounds Tab Notifications Tab ...

Page 74: ...To set the Bluetooth headset volume you can also tap Start Settings System Bluetooth Manager Connections and select the headset The following window will appear ...

Page 75: ...nc You can establish a connection to your Lynx through the following interfaces USB either directly or through the Single Dock RS232 either directly or through the Single Dock Bluetooth see par 1 7 2 To establish a partnership between the Lynx and a host PC start Windows Mobile Device Center and follow the steps below 1 Connect the Lynx to the host PC Windows Mobile Device Center configures itself...

Page 76: ...nc prepare to sync windows phone 6 5 with my computer aspx NOTE When a microSD card is inserted Lynx allows a mass storage data connection to a host PC This functionality can be enabled through the Control Panel When doing so the microSD card is not available to the Lynx An ActiveSync connection is not possible when this feature is enabled NOTE ...

Page 77: ...n close range 1 Open the Bluetooth control panel by tapping Start Settings System Bluetooth Manager 2 Search for available Bluetooth devices by tapping the button for the type of device you want Printer Serial or All or tap Discovery Discover to skip this step The Lynx will search for Bluetooth devices within range If you attempt to set up a connection when the Bluetooth radio is disabled you will...

Page 78: ...d in the Discovery tab You can set up a connection to a device in the list by selecting the device and then tapping the Connect button To create a pairing 1 Select a service 2 Configure any encryption authentication or virtual port options required by the service selected ...

Page 79: ...vice HID Keyboard Serial Personal Area Network PAN Modem Headset Handsfree Virtual Port allows you to specify the incoming port which is used to communicate serially with an incoming device just as if it were a physical COM port This option is available only if you have selected a Printer or Serial service ...

Page 80: ...ol panel to apply or modify those settings 1 To require Authentication check the checkbox then tap OK 2 If required the Authentication Request dialog will then open requesting that you enter a PIN Use the Input Panel or the keyboard to type the PIN 3 Tap OK to complete ...

Page 81: ...r device Once you have set up a Pairing you can view the settings by double tapping its name from the Connections tab Tap the arrow to change the Virtual Port or Delete to remove the device pairing Tap Sync to initiate a Sync available only if the service is an ActiveSync connection ...

Page 82: ...ces are within close range and that both Bluetooth enabled devices are discoverable 1 Tap Start Settings System Bluetooth Manager to open the Bluetooth control panel 2 Tap Settings The Settings tab allows you to enable or disable the Bluetooth radio and specify settings for Incoming Connections ...

Page 83: ...oing to be attaching a serial device i e a scanner to the Lynx use the Port control to select a virtual COM port to use for the connection 4 Tap Find Me if you want to make the Lynx visible to other Bluetooth devices for 60 seconds allowing them to set up a connection ...

Page 84: ...By default Bluetooth is turned off If you turn it on and then turn off your device Bluetooth also turns off When you turn on your device again Bluetooth turns on automatically NOTE ...

Page 85: ...1 7 3 Windows Mobile Phone For information on Windows Mobile Phone use and functioning refer to the Windows Mobile web site http www microsoft com windowsmobile ...

Page 86: ... as much as possible to build a composite position and to provide the best possible location available in any environment XPS Program Icon 1 8 2 Configuring XPS When the XPS Settings installation has completed the settings panel will display five tabs that can be used to configure your device The default settings should be correct for most applications NOTE You MUST click Apply when changing setti...

Page 87: ... setting is 4096kb Port tab XPS Port Select the port that XPS will stream location data from by default XPS will select an unused port Disabling other serial drivers Use this option to disable an active device if a port for XPS is needed GPS tab COM Port Select the port that XPS will read the GPS data from default is Auto Baudrate Set the baudrate for your GPS device Description The description of...

Page 88: ...ce On and Off About tab About View the XPS version and copyright information 1 8 3 Uninstalling XPS To remove XPS from your Windows Mobile device 1 Open the Settings panel 2 Open the System panel 3 Tap Remove Programs 4 Select XPS Settings and tap remove ...

Page 89: ...n An internet connection is required after install for XPS to complete setup An internet connection is also needed if you are moving this connection will be present if you have data service Do you have wi fi disabled Enable wi fi and try again Are you in an area with low numbers of access points The WPS portion of XPS requires wireless routers to be in scanning range to provide positioning 5 I ve ...

Page 90: ...u have only a few Datalogic ADC devices to update use the Datalogic Firmware Utility DFU described below to install or update the firmware using an ActiveSync connection The following sections provide procedures for the retrieval and installation of the most current firmware image onto a Datalogic device 1 9 1 Retrieving a Firmware Image Update The following instructions use Internet Explorer to r...

Page 91: ...the host PC NOTE To install the Datalogic Firmware Utility complete the following steps on the PC 1 Insert the CD ROM shipped with your device into the PC and click on the link to install Datalogic Firmware Utility OR Go to the Datalogic ADC website and download the most current version of the Datalogic Firmware Utility Unzip the file then double click to run DFU_Setup exe Click OK to continue onc...

Page 92: ...t Programs DFU Datalogic Firmware Utility 2 Verify that ActiveSync is selected by clicking Communications ActiveSync 3 Click browse and navigate to the location where you saved the firmware file for your terminal 4 Select the current out file and click Open 5 Click Update 6 DFU will compare the selected firmware image with the firmware already loaded on the device if the images are different DFU w...

Page 93: ...d then click on the Get from Device icon to receive the device s current configuration Once loaded the Configuration Tree on the left side of the window is used to navigate the device s configuration The right side of the window is a work area where the values of different parameters may be set for each branch of the configuration tree Click on the parameter group branch to open it and visualize t...

Page 94: ...ws Power is not removed from the feature It can act as a wakeup source for the CPU When the CPU wakes up the device continues to appear off but the device driver on the CPU can interact with the feature Depending on what activity takes place any feature can optionally decide to change the system power state from Suspend to On This would appear to the user as a wakeup event When the user powers off...

Page 95: ... not respond within five seconds the device will power off but leave features as they were The term device off here refers to a condition where the display is off and the device appears unpowered The device CPU may in fact be powered on In this condition the power consumption can be relevant and battery can be completely discharged in some hours ...

Page 96: ...s Create quick access hot keys and configure trigger actions To open the DDU for the first time tap Start Settings System Datalogic Desktop Utility or Start Device tools Datalogic Desktop Utility You can also get into DDU by pressing Alt 6 You can use DL Buttons to associate specific keys such as F1 F10 with specific applications see par 1 6 3 The Alt 6 is the button initially assigned to Datalogi...

Page 97: ...ssword when this utility is launched By default the password is 1234 A password can consist of all standard keyboard characters Re Enter Password Carefully re enter the password in the second text box Set Password Select tap Set Password to enable the password To change or remove the password enter a new value re enter the new value and select tap Set Password Set Defaults Select tap Set Defaults ...

Page 98: ...K to close the Set Password Confirmation dialog You must select tap Set Password prior to exiting DDU in order to store and activate your new password It is not necessary to select Enable Datalogic Desktop NOTE If you select tap Set Defaults it will remove all custom settings and restore all the factory default settings except a previously set password CAUTION Changing a Password To change to a ne...

Page 99: ...open the Datalogic Desktop Utility the DDU Password dialog box opens This dialog box will only open if a password was defined 1 Type in your password using either the keypad on the unit or using the stylus on the soft input panel SIP If you enter an incorrect password the system will prompt you to input the cor rect one 2 Select tap OK to verify the password Or tap X to cancel ...

Page 100: ...ge with instructions on how to recover from the problem WebAppLock Configuration Tab WebAppLock Window Features Error Redirection options Error Type The Error Type pull down list displays available Error Types 400 Invalid Syntax 403 Request Forbidden 404 Object Not Found 406 No Response Format 410 Page Doesn t Exist 500 Internal Server Error 501 Server Can t Do That Generic Error Network Disconnec...

Page 101: ...atus icons view see par 1 12 3 Trap Keys When checked all key presses will be trapped by WebAppLock to prevent the user from accessing other parts of the system DL Buttons keys will not work in WebAppLock when this box is checked When unchecked all system key presses including DL Buttons keys will work ...

Page 102: ...of some status icons that are used in WebAppLock and in Application Selector to display the status of wi fi radio battery and GSM Status Icons Options Set Status Icon Defaults Restores the status icons factory settings Icon Size Sets the status icons size Icon Location Selects the preferred location for each status icon ...

Page 103: ...llow or restrict access to Windows system functions You can disable normal Windows functions such as the taskbar leaving nothing but a blank workspace This allows applications to be run on the full screen and prevents users from accidental or unauthorized use of the taskbar Internet Explorer and any other resident applications ...

Page 104: ...on is displayed or not This option works only when Task Bar Enabled is checked Windows Wifi Error Dialog This control only takes effects in WebAppLock and Internet Explorer When checked the device will display a warning dialog when the WiFi connected device moves out of range of an access point and the user attempts to navigate to a web page This dialog box allows the user to reconfigure the wifi ...

Page 105: ...e application selector When this is enabled the Application Selector replaces the desktop and allows only authorized use of applications Authorized Applications This is a list of applications that the user may access Application Selector Commands New Select tap New to create a new application entry Edit Select tap Edit to edit the selected entry Del Select tap Del to delete the selected entry Up D...

Page 106: ...pplication Selector starts up COMMAND DESCRIPTION Application Title Type the name of the application in this textbox in the way you wish it to appear for the user Executable Displays the path for the executable file which you want to run Browse Select tap to browse for the desired executable file The results of this search are placed in the Executable textbox Arguments Type any command line argume...

Page 107: ... application to auto start when the Application Selector starts up Applications will be started in the order listed in the authorized application list Delay Enter a delay duration in seconds in the combo box This option delays auto start of application s to allow drivers to load prior to starting applications OK Select tap OK to add save changes X Select tap X to cancel the creation of this entry ...

Page 108: ...ation Selector can replace the desktop and limit the user to the specified list of applications By default the Application Selector comes with the WebAppLock preset The administrator can customize this list as shown in chapter 1 12 5 To run an application tap on its name To exit from Application Selector press ALT 6 uncheck the Enable Application Selector check box on the AppSelect Tab and press O...

Page 109: ... the web application website set by the administrator Zoom In and Zoom Out will only affect screen text and not bitmaps NOTE If the taskbar has been disabled the Settings menu is not displayed However the user can still navigate within the web application by using the following keyboard shortcuts Home Ctrl 7 Refresh Ctrl 8 Cancel Ctrl 9 Exit Ctrl 0 ...

Page 110: ... parameter which sets the initial text size to 1 on a scale of 0 to 4 Currently does nothing The value can later be adjusted when not in full screen mode using the Font Size and Font Size menu options T2 optional parameter which sets the initial text size to 2 on a scale of 0 to 4 Default when not set is 1 The value can later be adjusted when not in full screen mode using the Font Size and Font Si...

Page 111: ...omplete within the first 15K of the web page The Datalogic WebAppLock defines some special meta tags that allows the web application to interact with the device In particular the special meta tags allow to enable disable the scan engine triggers enable disable specific codes groups in the scan engine easily handle the keys pressing The trigger decoding and DL_Keys meta tags stay in scope beyond th...

Page 112: ...wing WebAppLock specific error numbers are returned Error Number Error Condition 1000 WiFi is disconnected 2000 Failed to open internet connection with WiFi 3000 Failed to connect to server 4000 Failed to open page on server 5000 Failed to send query to page on server 6000 Failed to receive query from page on server 7000 Failed to find file on device Warning Error redirection from the WebAppLock t...

Page 113: ...eta tag DL_OnPowerResume Invokes the specified javascript function upon power resumption on the device Content The URL to the JavaScript function to be called upon resume Example meta http equiv DL_OnPowerResume content Javascript PowerUp Reboot Warm boot device Meta tag DL_Reboot Warm boot device Content OnPageLoad Warm boot immediately upon page load In future might have more content options Exa...

Page 114: ..._Code_93 DL_Code_UPCA DL_Code_UPCE DL_Code_EAN13 DL_Code_EAN8 DL_Code_MSI DL_Code_MSR DL_Code_GS1_14 DL_Code_GS1_LIMIT DL_Code_GS1_EXP DL_Code_16K DL_Code_49 DL_Code_PDF417 DL_Code_DATAMATRIX DL_Code_MAXICODE DL_Code_TRIOPTIC DL_Code_PHARMA39 DL_Code_RFID DL_Code_MICROPDF417 DL_Code_COMPOSITE DL_Code_QRCODE DL_Code_AZTEC DL_Code_POSTAL Some examples meta http equiv DL_Code_39 content Disable meta ...

Page 115: ... they are defined in hence the existence of the DL_Clear meta tag that allows to clear all the settings and statuses NOTE Scanning Metatags DL_Scan Captures scan results and sends barcode tag value to a javascript function on the web page If the content value is a javascript function the device will be taken out of keyboard wedge mode and start listening for scan events A scanned barcode tag resul...

Page 116: ...cified command line arguments It will take into account any AutoStart options at the beginning of the line Upon a Cold Boot AutoStart installs all the CAB files located in the FlashDisk CAB folder If the CAB folder does not exist no CAB files will be installed AutoStart will then run the Autostart ini from the FlashDisk directory executing each line with the specified command line arguments It wil...

Page 117: ...AB files are installed by AutoStart using the Wceload exe application The following table shows available command line option Option Description noui Specifies that you will not be prompted for any input during the installation If the CAB file is signed any responses will automatically be answered Yes If the CAB is unsigned then any responses will be answered No silent Suppresses dialog boxes duri...

Page 118: ...he AutoStart folder with other CAB files intended for installation on the next reboot 1 15 4 Autostart ini A file named PreAuto ini can also be created in addition to or instead of Autostart ini PreAuto ini is executed before CAB files in the FlashDisk Cab folder are installed Autostart ini is executed after CAB files in the FlashDisk Cab folder are installed The format for the PreAuto ini is iden...

Page 119: ...nt of the line in the Autostart ini If the executable path is in a folder that contains spaces in the name quotes are required to distinguish what the actual executable name is The following is an example of this Program Files ScannerApp exe run valid Program Files ScannerApp exe run invalid The second line is an invalid line because there is no way to distinguish the executable from the argument ...

Page 120: ...re it is ignored Do not wait on line completion This will cause the line to execute and immediately move onto the next line Query Request user confirmation when running the executable This will halt parsing the Autostart ini until the confirmation is answered This is intended for debugging the Autostart ini file Execute only on Cold Reset Execute only after a warm boot Cold Reset Only This will ca...

Page 121: ...nt line to complete execution Query Option The query option is intended for use when debugging the autostart ini When a line with this option is executed the following dialog will appear with the specified executable and command line arguments The populated fields shown in the AutoStart Execute Query are described the next table Field Description Line Number This is the line number in the script b...

Page 122: ...round the given field and make it very clear what the value of the field is The following table describes the results of each choice Button Action Yes The current line will execute No The current line will not execute AutoStart will continue parsing the Autostart ini Cancel The current line will not execute and AutoStart will discontinue parsing the Autostart ini ...

Page 123: ...m with the argument Files App exe Program Files App exe run invalid This will execute Program with the argument Files App exe run Program Files App exe run This will execute the program Program Files App exe with the argument run Windows Pword exe This will confirm the execution of Windows Pword exe If the execution is confirmed AutoStart will immediately process the next line Program Files App ex...

Page 124: ...70ºC 4º to 158ºF HUMIDITY 95 non condensing for temperatures 40 C DROP RESISTANCE Withstands 18 drops from 1 5 m 5 ft onto concrete ENVIROMENTAL SEALING IP64 standard for water and dust resistance ESD PROTECTION 4 KV contact discharge 8 KV air discharge Std batteries must be charged at a temperature ranging from 0 to 40 C High batteries must be charged at a temperature ranging from 0 to 35 C For t...

Page 125: ...10 18 50 Watt hours COMMUNICATIONS INTERFACES Micro USB connector USB 1 1 Client USB 1 1 Host and Client OTG also for supplying power Integrated RS232 up to 115 2 Kbps USB 1 1 Client USB 1 1 Host WIDE AREA NETWORK WAN UMTS HSDPA 850 1900 2100 GSM GPRS EDGE 850 900 1800 1900 MHz for voice and data communication SIM socket under the battery LOCAL AREA NETWORK LAN Summit IEEE 802 11a b g Frequency ra...

Page 126: ...EN 60825 1 CDHR LED CLASSIFICATION IEC Class 1M IMAGER CHARACTERISTICS SCANNING RATE 60 frames sec maximum MINIMUM RESOLUTION Linear codes at 3 mils 2D codes at 5 mils AIMING LASER VLD wavelength 645 665 nm BAR CODES UPC A UPC E EAN 8 EAN 13 Interleaved 2 of 5 Code 39 Code 39 Full ASCII Codabar Code 128 EAN 128 Code 93 MSI PDF417 Micro PDF DataMatrix QR GS1 Databar Aztec Maxicode POSTNET PLANET Ja...

Page 127: ...ing Diagram Reading Zones 10 skew angle 100 200 300 400 0 200 100 300 400 mm 0 100 300 200 400 500 600 700 800 900 1100 1200 1000 mm 0 13 mm 5 mils 0 19 mm 7 5 mils 0 25 mm 10 mils 0 35 mm 14 mils 0 50 mm 20 mils 1 00 mm 40 mils 1 4 mm 55 mils ...

Page 128: ...ram Reading Zones 10 skew angle 50 100 150 200 0 100 50 150 200 mm 0 50 150 100 200 250 300 350 400 450 550 600 500 mm 5 0 mil PDF417 6 67 mil PDF417 7 5 mil Code 39 10 mil PDF417 13 mil UPC A 15 mil PDF417 5 0 mil Code 39 20 mil Code 39 ...

Page 129: ...High Density Codes 0 25 mm 10 mils Code 39 17162H 17162 2 5 Interleaved Ë 8NduÌ 0123456784 Code 128 ÌtestwÎ test 80 EAN 13 x 0B2DE5 KKKKLM 80 EAN 8 6450 TRMN Medium Density Codes 0 38 mm 15 mils Code 39 17162H 17162 ...

Page 130: ...Interleaved 2 5 Ë 8NduÌ 0123456784 Code 128 ÌtestwÎ test 100 EAN 13 x 0B2DE5 KKKKLM 100 EAN 8 6450 TRMN Low Density Codes 0 50 mm 20 mils Code 39 17162H 17162 Interleaved 2 5 Ë 8NduÌ 0123456784 ...

Page 131: ...Code 128 ÌtestwÎ test 120 EAN 13 x 0B2DE5 KKKKLM 120 EAN 8 6450 TRMN ...

Page 132: ...2D Codes Datamatrix ECC200 Example Inverse Datamatrix ECC200 Example ...

Page 133: ...ameter on and 0 turns it off Acceptable Input gives the settings or range of settings for each code parameter Defaults indicates how the parameter is set when the predefined default FF39 FF3A or FF3B is selected Minimum FF39 turns every on off parameter off and sets all minimum and Maximum Label Lengths to the lowest values Maximum FF3A turns every on off parameter on sets all Minimum Label Length...

Page 134: ...ry FF3B This is the default parameter settings that was installed at the factory This default set will work for most applications Defaults Registry FF3C This restores all parameter settings to the values that exist in the registry This is useful for restoring parameters to a known working set of values which have been saved using code parameter FF3F Exit and Restore FF3D Stops a label programming ...

Page 135: ...ecksum Instructs the terminal to include the checksum in the label transmission 0303 On or Off Off Off Off Send Start Stop Instructs the decoder to transmit the decoded start and stop characters of Codabar labels The start and stop characters will both be translated as A B C or D 0305 On or Off Off On Off Convert to CLSI Restricts the Codabar decoder to only read labels that conforms to CLSI speci...

Page 136: ...Label Length should be greater than or equal to Minimum Label Length 0321 01 50 01 50 20 Read Verification Sets the number of times a label must be read before it is transmitted 0322 01 04 01 02 01 User ID Specifies the symbology identifier if any that is sent when parameter Send Code ID Index 0025 is set to 3 ASCII code zero null is used to indicate that an identifier is not to be sent for the sy...

Page 137: ...acter set by replacing various encoded ASCII characters with their corresponding 0105 On or Off Off On On Minimum Label Length Set the minimum label length to be less than or equal to maximum label length 0120 01 50 01 01 01 Maximum Label Length This feature specifies the maximum allowable length of a Code 39 label The length includes check and data characters Maximum Label Length should be greate...

Page 138: ...nal to include the checksum in the label transmission 0112 On or Off Off Off Off Send Start Stop Instructs terminals to prefix a Pharmacode 39 label with an A prior to transmission 0113 On or Off Off On Off User ID Specifies the symbology identifier if any that is sent by the decoder when parameter Send Code ID Index 0025 is set to 3 ASCII code zero null is used to indicate that an identifier is n...

Page 139: ...sive decoding algorithms to be used in order to scan hard to read labels 0109 On or Off Off On Off Read Verification Sets the number of times a label must be read before it is transmitted 0124 01 04 01 02 01 User ID Specifies the symbology identifier if any that is sent when parameter Send Code ID Index 0025 is set to 3 ASCII code zero null is used to indicate that an identifier is not to be sent ...

Page 140: ...aximum label length 0420 01 50 01 01 02 Maximum Label Length This feature specifies the maximum allowable length of a Code 93 label The length includes check and data characters Maximum Label Length should be greater than or equal to Minimum Label Length 0421 01 50 01 50 20 Read Verification Sets the number of times a label must be read before it is transmitted 0422 01 04 01 02 01 User ID Specifie...

Page 141: ...ode 128 labels to use the FNC4 character to encode Extended ASCII characters as defined by the latest Code 128 symbology specification 040F On or Off Off On On ISBT Concatenation Instructs the decoder to concatenate Code 128 labels conforming to the ISBT 128 standard 040E On or Off Off Off Off Minimum Label Length Set the minimum label length to be less than or equal to maximum label length 0424 0...

Page 142: ...ory Laser 2D Imager Lorax User ID Specifies the symbology identifier if any that is sent when parameter Send Code ID Index 0025 is set to 3 ASCII code zero null is used to indicate that an identifier is not to be sent for the symbology 0427 Any single ASCII character 00 Off K K K ...

Page 143: ...the system digit is zero 0513 On or Off Off On On Convert EAN 13 to ISBN This instructs the decoder to identify ISBN labels and append the check digit per ISBN guidelines to the end of the label 0514 On or Off Off Off Off Convert EAN 13 to ISSN This instructs the decoder to identify ISSN labels and append the check digit per ISSN guidelines to the end of the label 0515 On or Off Off Off Off Enable...

Page 144: ...r 2D Imager Lorax User ID Specifies the symbology identifier if any that is sent by the decoder when parameter Send Code ID Index 0025 is set to 3 ASCII code zero null is used to indicate that an identifier is not to be sent for the symbology 0525 Any single ASCII character 00 Off M M M ...

Page 145: ...nclude the check digit in the label transmission 051A On or Off Off On Off Convert EAN 8 to EAN 13 Instructs the decoder to expand EAN 8 labels to their EAN 13 equivalents Any EAN 13 parameters will then apply to the result 051B On or Off Off On Off Read Verification Sets the number of times a label must be read before it is transmitted 0526 01 04 01 02 01 User ID Specifies the symbology identifie...

Page 146: ... Send System Digit Includes the system digit in the label transmission For UPC A the system digit is always zero 0503 On or Off Off On On Convert UPC A to EAN 13 Instructs the decoder to expand UPC A labels to their EAN 13 equivalents Any EAN 13 parameters will then apply to the result 0504 On or Off Off On Off Read Verification Sets the number of times a label must be read before it is transmitte...

Page 147: ...Off On Off Send System Digit This instructs the decoder to include the system digit in the label transmission For UPC E the system digit is zero 050B On or Off Off On Off Convert UPC E to UPC A Instructs the decoder to expand UPC E labels to their UPC A equivalents Any UPC A parameters will then apply to the result 050C On or Off Off On Off Read Verification Sets the number of times a label must b...

Page 148: ...nsion supplemental label to be verified for a successful decode of a label 051D On or Off Off On Off Enable Code 128 Extensions Enables disables Code 128 extensions 051E On or Off Off On Off Require Extensions Instructs the decoder to require any enabled UPC EAN extensions supplemental labels to be with a label in order for a scan to be successful 051F On or Off Off On Off Read Verification Sets t...

Page 149: ...the checksum in the label transmission 0213 On or Off Off Off Off Enable Case Code Restricts Interleaved 2 of 5 label lengths to only 6 and 14 data characters Enabling this parameter overrides the minimum and maximum length values 0214 On or Off Off Off Off Minimum Label Length Set the minimum label length to be less than or equal to maximum label length 0228 02 50 02 02 06 Maximum Label Length Th...

Page 150: ...r 2D Imager Lorax User ID Specifies the symbology identifier if any that is sent by the decoder when parameter Send Code ID Index 0025 is set to 3 ASCII code zero null is used to indicate that an identifier is not to be sent for the symbology 022B Any single ASCII character 00 Off B B B ...

Page 151: ...to recognize labels that are printed using only two bars for start stop characters 0204 On or Off Off Off Off Minimum Label Length Set the minimum label length to be less than or equal to maximum label length 0220 01 50 01 01 06 Maximum Label Length This feature specifies the maximum allowable length of a Standard 2 of 5 label The length includes check and data characters Maximum Label Length shou...

Page 152: ...20B On or Off Off Off Off Minimum Label Length Set the minimum label length to be less than or equal to maximum label length 0224 01 50 01 01 06 Maximum Label Length This feature specifies the maximum allowable length of a Matrix 2 of 5 label The length includes check and data characters Maximum Label Length should be greater than or equal to Minimum Label Length 0225 01 50 01 50 10 Read Verificat...

Page 153: ...to interpret any second MSI check digit as module 11 instead of module 10 060C On or Off Off Off Off Minimum Label Length Set the minimum label length to be less than or equal to maximum label length 0624 01 15 01 01 04 Maximum Label Length This feature specifies the maximum allowable length of an MSI label The length includes check and data characters Maximum Label Length should be greater than o...

Page 154: ...AN 128 Instructs the decoder to transmit the label data as one or more UCC 128 labels The transmission will use the UCC 128 AIM identifier 0804 On or Off Off On Off NOTE If GS1 DataBar 14 GS1 DataBar Expanded GS1 DataBar Limited or GS1 DataBar Composite symbologies are enabled for UCC EAN 128 then that setting is also enabled for all other GS1 DataBar symbologies For the 2D Imager GS1 DataBar Expa...

Page 155: ...UCC EAN 128 Instructs the decoder to transmit the label data as one or more UCC 128 labels The transmission will use the UCC 128 AIM identifier 080C On or Off Off On Off NOTE If GS1 DataBar 14 GS1 DataBar Expanded GS1 DataBar Limited or GS1 DataBar Composite symbologies are enabled for UCC EAN 128 then that setting is also enabled for all other GS1 DataBar symbologies For the 2D Imager GS1 DataBar...

Page 156: ...ff On Off Minimum Sets the minimum bar code label length to be less than or equal to maximum label length 0824 1 74 01 74 01 Maximum This feature specifies the maximum allowable length of a label The length includes check and data characters if applicable Maximum Label Length should be greater than or equal to Minimum Label Length 0825 1 74 01 74 74 User Code ID Specifies the symbology identifier ...

Page 157: ...l length 0B2C 1 3750 1 3750 1 Aztec Code Maximum This feature specifies the maximum allowable length of a label The length includes check and data characters if applicable Maximum Label Length should be greater than or equal to Minimum Label Length 0B2D 1 3750 1 3750 3750 Aztec Code User ID Specifies the symbology identifier if any that is sent when parameter Send Code ID Index 0025 is set to 3 AS...

Page 158: ...1 1500 1 1500 1 Datamatrix Maximum This feature specifies the maximum allowable length of a label The length includes check and data characters if applicable Maximum Label Length should be greater than or equal to Minimum Label Length 0B21 1 1500 1 1500 1500 Datamatrix User Code ID Specifies the symbology identifier if any that is sent when parameter Send Code ID Index 0025 is set to 3 ASCII code ...

Page 159: ... to be less than or equal to maximum label length 0A28 1 2435 1 2435 1 Composite Maximum This feature specifies the maximum allowable length of a label The length includes check and data characters if applicable Maximum Label Length should be greater than or equal to Minimum Label Length 0A29 1 2435 1 2435 2435 Composite User ID Specifies the symbology identifier if any that is sent when parameter...

Page 160: ...0B24 1 138 1 138 1 Maxicode Maximum This feature specifies the maximum allowable length of a label The length includes check and data characters if applicable Maximum Label Length should be greater than or equal to Minimum Label Length 0B25 1 138 1 138 138 Maxicode User ID Specifies the symbology identifier if any that is sent when parameter Send Code ID Index 0025 is set to 3 ASCII code zero null...

Page 161: ...710 1 2710 1 PDF 417 Maximum This feature specifies the maximum allowable length of a label The length includes check and data characters if applicable Maximum Label Length should be greater than or equal to Minimum Label Length 0A21 1 2710 1 2710 2710 PDF 417 User Code ID Specifies the symbology identifier if any that is sent when parameter Send Code ID Index 0025 is set to 3 ASCII code zero null...

Page 162: ...0A24 1 366 1 366 1 MicroPDF 417 Maximum This feature specifies the maximum allowable length of a label The length includes check and data characters if applicable Maximum Label Length should be greater than or equal to Minimum Label Length 0A25 1 366 1 366 366 MicroPDF 417 User Code ID Specifies the symbology identifier if any that is sent when parameter Send Code ID Index 0025 is set to 3 ASCII c...

Page 163: ...pecifies the maximum allowable length of a label The length includes check and data characters if applicable Maximum Label Length should be greater than or equal to Minimum Label Length 0B29 1 3500 1 3500 3500 QR Code User ID Specifies the symbology identifier if any that is sent when parameter Send Code ID Index 0025 is set to 3 ASCII code zero null is used to indicate that an identifier is not t...

Page 164: ... Off Off On On UPU FICS Enable Enables disables UPU FICS symbology 0914 On or Off Off On Off Royal Mail Enable Enables disables Royal Mail symbology 0915 On or Off Off On On Royal Mail Send Chk Transmit Royal Mail symbology check digit 0916 On or Off Off On Off Australian Postal Enable Enables disables Australian Postal symbology 0917 On or Off Off On Off KIX Code Enable Enables disables KIX Code ...

Page 165: ... independent of any targeting beam when using an imager 0008 On or Off On On On Imager Aim Mode Toggles between two different operating modes for the targeting beam Concurrent Off The targeting beam is turned on at the same time as an enabled illumination beam Interlaced On Toggles the aimer and illumination beam 0009 On or Off On On On Enable Aiming Beam Enable the use of a target beam 000A On or...

Page 166: ...ny that is sent by the decoder when parameter Send Code ID Index 0025 is set to 3 ASCII code zero null used to indicate an identifier not to be sent for the symbology 0025 Select symbology identifier to transmit immediately preceding scanned data 0 None 1 DLM identifier before label ID data 2 AIM identifier before label ID modifier data 3 User defined identifier before label ID data 4 DLM identifi...

Page 167: ...ssful read 0010 On or Off On On On Enable Green Spot Enable Green Spot with Good Read 0011 On or Off On On On Remove Non Printables Removes all characters in the range 0x00 0x31 or 0x7F 0x9F from the label data The min max length checks made for each symbology are made before any characters are removed Characters in the code ID prefix suffix or separator will not be removed 0018 On or Off Off Off ...

Page 168: ...ep 1 2 500 ms 40 10000 ms 20 20 20 Beeper Volume Defines the volume of decoding sounds FF20 0 to 7 Soft to Loud 8 lowers the volume by 1 9 raises the volume by 1 7 7 7 Long Range Spot Enable Enable the use of a spot beam if detected 0001 On or Off Off Off Off Long Range Release Time Maximum time laser is on after trigger release using Release Scan spot beam mode 0024 1 5 2 2 2 Target Release Time ...

Page 169: ... Datamatrix v UPC E E Code 93 L Composite s EAN 8 G MSI H Maxicode w EAN 13 M Trioptic X PDF417 s Code 39 C Pharmacode 39 Y MicroPDF a Codabar I GS1 DataBar 14 P QR c Code 128 K GS1 DataBar Limited Q Postal Codes f I 2 of 5 B GS1 DataBar Expanded R S 2 of 5 F Aztec d ...

Page 170: ...eric data in binary form The general format of a barcode symbol consists of a leading margin start character data or message character check character if any stop character and trailing margin Within this framework each recognizable symbology uses its own unique format Baud Rate A measure for data transmission speed Bit Binary digit One bit is the basic unit of binary information Generally eight c...

Page 171: ...oard non volatile memory chip Ethernet The standard local area network LAN access method A reference to LAN LAN connection or network card automatically implies Ethernet Defined by the IEEE as the 802 3 standard Ethernet is used to connect computers in a company or home network as well as to connect a single computer to a cable modem or DSL modem for Internet access Firmware Firmware is a software...

Page 172: ...D A display that uses liquid crystal sealed between two glass plates The crystals are excited by precise electrical charges causing them to reflect light outside according to their bias They use little electricity and react relatively quickly They require external light to reflect their information to the user Light Emitting Diode LED A low power electronic light source commonly used as an indicat...

Page 173: ... links up to eight devices Each piconet is controlled by one master device and up to seven slave devices at any one time Any device may be a member of more than one piconet changing its membership as a user moves from one area to another ...

Page 174: ...ed to a computer A plug and play interface it allows a device to be added without an adapter card and without rebooting the computer the latter is known as hot plugging The USB standard developed by several major computer and telecommunications companies supports data transfer speeds up to 12 megabits per second multiple data streams and up to 127 peripherals WWAN Stands for Wide Area Network It i...

Page 175: ...6 technology that permits communication within about 10 meters in other words a very short range ...

Page 176: ...c Configuration Utility 88 Datalogic Firmware Utility 83 Decoding Parameters 100 Description of the Keys 49 E Lynx Description 9 F FCC Compliance 147 G General View 7 Glossary 153 I Industry Canada Compliance 149 L Laser Safety 138 LED Class 144 LED Status 55 M Mini SD Card Insertion 14 P Package Contents 12 Patents 150 Power Supply 137 R Radio Compliance 145 Reading Diagrams 94 References 6 Repla...

Page 177: ...est Codes 96 U Using the Stylus 43 V Volume Settings 68 W WEEE Compliance 151 Windows Connections 70 Windows Mobile Phone 78 Windows Mobile Welcome Wizard 44 Windows Mobile Device Center 70 Wireless and Radio Frequencies Warnings 40 Wireless Communication 65 WWAN Connection 38 ...

Page 178: ...s productos con la siguientes normas EN 55022 2006 CLASS B ITE SEPTEMBER 2006 AMENDMENT A1 2007 INFORMATION TECHNOLOGY EQUIPMENT RADIO DISTURBANCE CHARACTERISTICS LIMITS AND METHODS OF MEASUREMENTS EN 55024 1998 AMENDMENT A1 2001 AMENDMENT A2 2003 INFORMATION TECHNOLOGY EQUIPMENT IMMUNITY CHARACTERISTICS LIMITS AND METHODS OF MEASUREMENT ETSI EN 301 489 1 V1 8 1 APRIL 2008 ELECTROMAGNETIC COMPATIB...

Page 179: ...FETY PART 1 GENERAL REQUIREMENTS EN 62311 2008 ASSESSMENT OF ELECTRONIC AND ELECTRICAL EQUIPMENT RELATED TO HUMAN EXPOSURE RESTRICTIONS FOR ELECTROMAGNETIC FIELDS 0 HZ 300 GHZ Lippo di Calderara June 27th 2011 Paola Chientaroli Quality Assurance Manager ...

Page 180: ...ärung basiert darauf daß das Produkt den folgenden Normen entspricht Esta declaración se basa en el cumplimiento de los productos con la siguientes normas EN 55022 2006 CLASS B ITE SEPTEMBER 2006 AMENDMENT A1 2007 INFORMATION TECHNOLOGY EQUIPMENT RADIO DISTURBANCE CHARACTERISTICS LIMITS AND METHODS OF MEASUREMENTS EN 55024 SEPTEMBER 1998 AMENDMENT A1 2001 AMENDMENT A2 2003 INFORMATION TECHNOLOGY E...

Page 181: ...COVERING THE ESSENTIAL REQUIREMENTS OF ARTICLE 3 2 OF THE R TTE DIRECTIVE ETSI EN 300 328 V1 7 1 OCTOBER 2006 ELECTROMAGNETIC COMPATIBILITY AND RADIO SPECTRUM MATTERS ERM WIDEBAND TRANSMISSION SYSTEMS DATA TRANSMISSION EQUIPMENT OPERATING IN THE 2 4GHZ ISM BAND AND USING WIDE BAND MODULATION TECHNIQUES HARMONIZED EN COVERING ESSENTIAL REQUIREMENTS UNDER ARTICLE 3 2 OF THE R TTE DIRECTIVE ETSI EN 3...

Page 182: ...urther information regarding Lynx refer to the SDK Help on Line SERVICES AND SUPPORT Datalogic provides several services as well as technical support through its website Log on to www adc datalogic com and click on the links indicated for further information including PRODUCTS Search through the links to arrive at your product page where you can download specific Manuals and Software Utilities SER...

Page 183: ...eiver D LEDs E Front Scan Key F Keyboard G Stylus H Laser Safety Label I Loudspeaker J Color Camera K Flash L Product Label M MicroSD Card Slot under battery N SIM Card Slot under battery Remove protective film cover before use A E F D B G C I M J K L H N ...

Page 184: ...O Side Scan Key right P Up down Volume Keys Q Side Scan Key left R Headset Connector S Micro USB Charging Port O P T U Q R S ...

Page 185: ...T Data Capture Laser Output Window U Handylink Connector host slave ...

Page 186: ... or altering of this document is prohibited without express written consent from Datalogic ADC Inc Datalogic and the Datalogic logo are registered trademarks of Datalogic S p A in many countries including the U S A and the E U Lynx and the Lynx logo are trademarks of Datalogic ADC Inc All other brand and product names mentioned herein are for identification purposes only and may be trademarks or r...

Page 187: ...ETY REGULATIONS 6 2 1 General Safety Rules 6 2 2 Power Supply 6 2 3 Laser Safety 7 2 4 LED Class 13 2 5 Radio Compliance 13 2 5 1 Information for the User 14 2 6 FCC Compliance 15 2 7 RF Exposure Information SAR 16 2 8 Industry Canada Compliance 17 2 9 SAR Compliance 18 2 10 Patents 18 2 11 WEEE Compliance 19 ...

Page 188: ......

Page 189: ...e to recharge the battery pack by connecting the power supply directly to the Lynx Alternatively it is also possible to recharge the battery pack by using a Single Cradle or the Lynx Multi Battery Charger Moreover recharging is possible by USB Direct connection with the host computer but with longer charging times During the charging process the LED positioned at the right side of the display is r...

Page 190: ...charged at a temperature ranging from 0 to 44 C 33 8 to 111 2 F NOTE The battery level may not be displayed correctly for some minutes after the disconnection if the Lynx is disconnected from power supply before the charging cycle is completed NOTE The Lynx could get warm during charging this is normal and does not mean a malfunction NOTE Use only a USB IF compliant USB port as a charging source ...

Page 191: ...pack proceed as follows 1 Turn off the Lynx 2 Shift the battery latch to the left and remove the battery pack 3 Install the new battery pack first insert the bottom contacts and then the upper side of the battery pack into the slot Press until the battery latch clicks ...

Page 192: ...roduct damage and may cause heat explode or ignite The area in which the units are charged should be clear of debris and combustible materials or chemicals Do not use the battery pack of this terminal for power devices different from this mobile computer Immediately discontinue use of the battery pack if while using charging or storing the battery pack the battery pack emits an unusual smell feels...

Page 193: ...e battery pack when the device is turned on Do not remove or damage the battery pack s label Do not use the battery pack if it is damaged in any part Battery pack usage by children should be supervised Collect and recycle waste batteries separately from the device in comply with European Directive 2006 66 EC 2002 95 EC 2002 96 EC and subsequent modifications US and China regulatory and others laws...

Page 194: ...e life of the Lynx mobile computer disposal must be performed in compliance with the laws in force Before using the devices and the battery packs read chapter 1 Do not submerge the Lynx in liquid products For further information refer to this manual and to the Datalogic Mobile web site www adc datalogic com 2 2 POWER SUPPLY This device is intended to be connected to a UL Listed CSA Certified compu...

Page 195: ...SER SAFETY The laser light is visible to the human eye and is emitted from the window indicated in the figure This information applies to both laser models and the Lynx Imager Aiming System Laser output window ...

Page 196: ... la figura LUCE LASER NON FISSARE IL FASCIO APPARECCHIO LASER DI CLASSE 2 MASSIMA POTENZA DI USCITA 1 7mW LUNGHEZZA D ONDA EMESSA 650nm CONFORME A IEC 60825 1 2007 LASERSTRAHLUNG NICHT IN DER STRAHL BLINKEN PRODUKT DER LASERKLASSE 2 MAXIMALE AUSGANGLEISTUNG 1 7mW WELLENLÄNGE 650nm ENTSPR IEC 60825 1 2007 RAYON LASER EVITER DE REGARDER LE RAYON APPAREIL LASER DE CLASSE 2 MAXIMUM PUISSANCE DE SORTIE...

Page 197: ...ult in exposure to hazardous visible laser light The product utilizes a low power laser diode Although staring directly at the laser beam momentarily causes no known biological damage avoid staring at the beam as one would with any very strong light source such as the sun Avoid that the laser beam hits the eye of an observer even through reflective surfaces such as mirrors etc CAUTION Use of optic...

Page 198: ...ore anche attraverso superfici riflettenti come gli specchi ATTENZIONE L uso di strumenti ottici assieme allo scanner può aumentare il pericolo di danno agli occhi Tali strumenti ottici includono cannocchiali microscopi occhiali e lenti di ingrandimento DEUTSCH Die folgenden Informationen stimmen mit den Sicherheitshinweisen überein die von internationalen Behörden auferlegt wurden und sie beziehe...

Page 199: ...on du terminal NORMES DE SECURITE LASER Ce produit est conforme aux normes de sécurité laser en vigueur à sa date de fabrication CDRH 21 CFR 1040 sous chapitre J et IEC 60825 1 2007 Il n est pas nécessaire d ouvrir l appareil pour l installation l utilisation ou l entretien ATTENTION Ne pas essayer d ouvrir ou de réparer les composants de la cavité optique L ouverture de la cavité optique ou la ré...

Page 200: ...culo óptico Abrir o dar servicio a las piezas del receptáculo óptico por parte del personal no autorizado podría ser una violación a los reglamentos de seguridad El sistema óptico se puede reparar en la fábrica solamente ATENCIÓN La utilización de procedimientos o regulaciones diferentes de aquellas describidas en la documentación puede causar una exposición peligrosa a la luz láser visible El apa...

Page 201: ...installation takes place Be absolutely sure that the system frequencies are correctly set to be compliant with the spectrum requirements of the country The Radio modules used in this product automatically adapt to the frequencies set by the system and do not require any parameter settings The TYPE field shows the correspondence between LYNX types and radio modules TYPE ABCDEE FGH IJJK LMMMM A 0 if...

Page 202: ...té compétente en la gestion des appareils à radio fréquence de votre pays pour vérifier d éventuelles restrictions ou licences Pour tout renseignement vous pouvez vous adresser au site web http europa eu int comm enterprise rtte spectr htm DEUTSCH Wenden Sie sich an die für Radiofrequenzgeräte zuständige Behörde Ihres Landes um zu prüfen ob es Einschränkungen gibt oder eine Lizenz erforderlich ist...

Page 203: ...rference to radio communications However there is no guarantee that interference will not occur in a particular installation If this equipment does cause harmful interference to radio or television reception which can be determined by turning the equipment off and on the user is encouraged to try to correct the interference by one or more of the following measures Reorient or relocate the receivin...

Page 204: ... power output While there may be differences between the SAR levels of various devices and at various positions they all meet the government requirement The FCC has granted an Equipment Authorization for this model device with all reported SAR levels evaluated as in compliance with the FCC RF exposure guidelines SAR information on this model device is on file with the FCC and can be found under th...

Page 205: ...NMB 003 du Canada This device and its antenna s must not be co located or operating in conjunction with any other antenna or transmitter The County Code Selection feature is disabled for products marketed in the US Canada IMPORTANT NOTE IC Radiation Exposure Statement This EUT is compliant with SAR for general population uncontrolled exposure limits in IC RSS 102 and had been tested in accordance ...

Page 206: ...to radio frequency fields from hand held and body mounted wireless communication devices Human models instrumentation and procedures Procedure to determine the specific absorption rate SAR for hand held devices used in close proximity to the ear frequency range of 300 MHz to 3 GHz 4 EN 62209 2 2010 Human exposure to radio frequency fields from hand held and body mounted wireless communication devi...

Page 207: ...ogic com Information for the user in accordance with the European Commission Directive 2002 96 EC At the end of its useful life the product marked with the crossed out wheeled wastebin must be disposed of separately from urban waste Disposing of the product according to this Directive avoids potentially negative consequences to the environment and human health which otherwise could be caused by in...

Page 208: ...ente y la salud derivadas de una eliminación inadecuada recuperar los materiales obteniendo así un ahorro importante de energía y recursos Para obtener una información más detallada sobre la eliminación por favor póngase en contacto con el proveedor donde lo compró o consultar la sección dedicada en el Web site www mobile datalogic com Benutzerinformation bezüglich Richtlinie 2002 96 EC der europä...

Page 209: ...eguenti This declaration is based upon compliance of the products to the following standards Cette déclaration repose sur la conformité des produits aux normes suivantes Diese Erklärung basiert darauf daß das Produkt den folgenden Normen entspricht Esta declaración se basa en el cumplimiento de los productos con la siguientes normas EN 55022 2010 CLASS B ITE INFORMATION TECHNOLOGY EQUIPMENT RADIO ...

Page 210: ...R BOTH ARE OFFERED SEPARATELY IEC 60825 1 2007 SAFETY OF LASER PRODUCTS PART 1 EQUIPMENT CLASSIFICATION AND REQUIREMENTS IEC 62471 2006 EN 62471 2008 PHOTOBIOLOGICAL SAFETY OF LAMPS AND LAMPSYSTEM EN 62209 1 2006 HUMAN EXPOSURE TO RADIO FREQUENCY FIELDS FROM HAND HELD AND BODY MOUNTED WIRELESS COMMUNICATION DEVICES HUMAN MODELS INSTRUMENTATION AND PROCEDURES PROCEDURE TO DETERMINE THE SPECIFIC ABS...

Page 211: ...la conformità dei prodotti alle norme seguenti This declaration is based upon compliance of the products to the following standards Cette déclaration repose sur la conformité des produits aux normes suivantes Diese Erklärung basiert darauf daß das Produkt den folgenden Normen entspricht Esta declaración se basa en el cumplimiento de los productos con la siguientes normas EN 55022 2010 INFORMATION ...

Page 212: ...ING ESSENTIAL REQUIREMENTS UNDER ARTICLE 3 2 OF THE R TTE DIRECTIVE 1999 5 EC ETSI EN 301 908 1 V5 2 1 2011 ELECTROMAGNETIC COMPATIBILITY AND RADIO SPECTRUM MATTERS ERM BASE STATIONS BS REPEATERS AND USER EQUIPMENT UE FOR IMT 2000 THIRD GENERATION CELLULAR NETWORKS PART 1 HARMONIZED EN FOR IMT 2000 INTRODUCTION AND COMMON REQUIREMENTS COVERING THE ESSENTIAL REQUIREMENTS OF ARTICLE 3 2 OF THE R TTE...

Page 213: ...ICTIONS RELATED TO HUMAN EXPOSURE TO ELECTROMAGNETIC FIELDS 300MHZ 3GHZ EN 62209 1 2006 HUMAN EXPOSURE TO RADIO FREQUENCY FIELDS FROM HAND HELD AND BODY MOUNTED WIRELESS COMMUNICATION DEVICES HUMAN MODELS INSTRUMENTATION AND PROCEDURES PROCEDURE TO DETERMINE THE SPECIFIC ABSORPTION RATE SAR FOR HAND HELD DEVICES USED IN CLOSE PROXIMITY TO THE EAR FREQUENCY RANGE OF 300 MHZ TO 3 GHZ EN 62209 2 2010...

Reviews: