2-12
Magellan
®
8100/8100
Ω
and 8200
/
8200
Ω
Scanner
Cables should be easy to remove in the event that replace-
ment is required. A little planning now will save a lot of frus-
tration later.
4. Connect and verify all system operations.
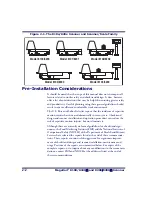
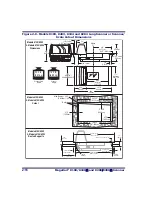
The scanner should be installed so that leading and trailing edges of the
All Weighs™ Platter are flush with the countertop to enhance smooth,
slide-through scanning (reference the insert in Figure 2-6). Keep in mind
that the debris chutes on both sides of the platter provide the necessary
clearance for proper scale operation if you are installing a scanning-scale
(you won’t need to provide an additional gap for that).
Summary of Contents for MAGELLAN 8100
Page 1: ...Magellan 8100 8100Ω 8200 8200Ω Product Reference Guide Model 8204 shown ...
Page 14: ...12 Magellan 8100 8100Ω and 8200 8200Ω Scanner NOTES ...
Page 62: ...2 34 Magellan 8100 8100Ω and 8200 8200Ω Scanner NOTES ...
Page 81: ...Product Reference Guide 4 5 Figure 4 1 7 Segment LED Display 7 Segment Display ...
Page 90: ...4 14 Magellan 8100 8100Ω and 8200 8200Ω Scanner NOTES ...
Page 100: ...5 10 Magellan 8100 8100Ω and 8200 8200Ω Scanner Figure 5 2 Shift Test A C B D A C B D ...
Page 108: ...5 18 Magellan 8100 8100Ω and 8200 8200Ω Scanner NOTES ...
Page 378: ...6 270 Magellan 8100 8100Ω and 8200 8200Ω Scanner NOTES ...
Page 402: ...D 2 Magellan 8100 8100Ω and 8200 8200Ω Scanner NOTES ...
Page 416: ...E 14 Magellan 8100 8100Ω and 8200 8200Ω Scanner NOTES ...
Page 432: ...F 16 Magellan 8100 8100Ω and 8200 8200Ω Scanner NOTES ...
Page 433: ...Product Reference Guide F 17 NOTES ...
Page 434: ...F 18 Magellan 8100 8100Ω and 8200 8200Ω Scanner NOTES ...


