Product Reference Guide
5-5
6. Reinstall the weigh platter.
7. Press the Scale Zero Push Button. The Yellow LED will go out for
approximately 10 seconds (or less) and the Remote Display will
alternately display
and
until the scale is
ready to proceed.
8. When the scale is ready, the Yellow LED will begin blinking again
and the display will show the message “Ad20 (add twenty
pounds)” or “Ad10 (add ten kilograms).” The scanner/scale will
also sound one tone if the scale is weighing in kilograms or two
tones for pounds. Place the correct weight (twenty pounds for cal-
ibration in pounds, or ten kilograms for metric calibration) from
the Field Standard Weight set on the center of the weighing area
and press the Scale Zero Push Button again.
9. The Yellow LED will extinguish for approximately 10 seconds
and the Remote Display will alternately display
and
until the scale is ready to proceed.
10. If the calibration was successful, the speaker sounds a single tone,
the Scale Status LED begins blinking again, and “End-” appears
in the Remote Display.
11. If the calibration was not successful, the speaker will sound five
tones indicating a scale failure, and the Scale Status LED will
blink twice, strobe (fast blinks) and then continually repeat this
sequence until reset. Remove all weight from the Weigh Platter,
and repeat the procedure starting with step 8.
12. Press the Scale Zero Push Button again to permanently store the
calibration data and exit Calibration Mode. You have completed
the calibration of the scanner/scale. The unit’s calibration must
now be verified as required by state and/or local weights and mea-
sures regulations. The verification procedure must be performed
to assure that a scale will pass Weights and Measures requirements
before it is placed into commercial/retail service.
Summary of Contents for MAGELLAN 8100
Page 1: ...Magellan 8100 8100Ω 8200 8200Ω Product Reference Guide Model 8204 shown ...
Page 14: ...12 Magellan 8100 8100Ω and 8200 8200Ω Scanner NOTES ...
Page 62: ...2 34 Magellan 8100 8100Ω and 8200 8200Ω Scanner NOTES ...
Page 81: ...Product Reference Guide 4 5 Figure 4 1 7 Segment LED Display 7 Segment Display ...
Page 90: ...4 14 Magellan 8100 8100Ω and 8200 8200Ω Scanner NOTES ...
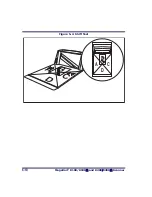
Page 100: ...5 10 Magellan 8100 8100Ω and 8200 8200Ω Scanner Figure 5 2 Shift Test A C B D A C B D ...
Page 108: ...5 18 Magellan 8100 8100Ω and 8200 8200Ω Scanner NOTES ...
Page 378: ...6 270 Magellan 8100 8100Ω and 8200 8200Ω Scanner NOTES ...
Page 402: ...D 2 Magellan 8100 8100Ω and 8200 8200Ω Scanner NOTES ...
Page 416: ...E 14 Magellan 8100 8100Ω and 8200 8200Ω Scanner NOTES ...
Page 432: ...F 16 Magellan 8100 8100Ω and 8200 8200Ω Scanner NOTES ...
Page 433: ...Product Reference Guide F 17 NOTES ...
Page 434: ...F 18 Magellan 8100 8100Ω and 8200 8200Ω Scanner NOTES ...


