Product Reference Guide
2-19
Operational Verification
Follow these steps to ensure that your unit has arrived undamaged and is
fully functional before installing it in the counter and connecting it to
your POS system.
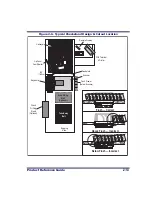
1. If the unit is a scanning-scale, connect the Remote Scale Display
to the proper connector on the unit’s connector panel (refer to
Figure 2-17). Note that if the Remote Scale Display is not con-
nected, a scanner power-up Selftest will sound a long, low beep,
and the number “8” will appear on the 7-segment display indicat-
ing a remote display error. Power-down, connect a known-good
Remote Display to the appropriate port, and restart to correct this
problem. Alternatively, you can disable the Remote Display using
programming bar codes (see Section 6,
for more
information).
2. Connect the power cable at the scanner then at the AC outlet.
When power is applied to the unit, the normal indicator sequence is:
•
The green light will be lit (dim) steadily.
•
If the Selftest detects a problem, the 7-segment display will dis-
play a number code. Refer to Section 4,
description of failure codes and problem isolation procedures.
3. The unit should be permitted to reach thermal equilibrium
before proceeding to the next steps. (Reference the topic
in Section 1.) When the unit is moved from a cooler
temperature (such as a storage area) to a warmer environment
(such as a checkstand location), a period of 60 minutes must be
allowed to acclimate the unit to ambient conditions. Once
installed and powered up, a “power-up” warm-up period of 15
minutes must be allowed before calibrating or performing weigh-
ing operations. These two warm-up periods may run concur-
rently.
NOTE
Scale calibration may be necessary to obtain a zero reading on the display
on rare occasions.
Summary of Contents for MAGELLAN 8100
Page 1: ...Magellan 8100 8100Ω 8200 8200Ω Product Reference Guide Model 8204 shown ...
Page 14: ...12 Magellan 8100 8100Ω and 8200 8200Ω Scanner NOTES ...
Page 62: ...2 34 Magellan 8100 8100Ω and 8200 8200Ω Scanner NOTES ...
Page 81: ...Product Reference Guide 4 5 Figure 4 1 7 Segment LED Display 7 Segment Display ...
Page 90: ...4 14 Magellan 8100 8100Ω and 8200 8200Ω Scanner NOTES ...
Page 100: ...5 10 Magellan 8100 8100Ω and 8200 8200Ω Scanner Figure 5 2 Shift Test A C B D A C B D ...
Page 108: ...5 18 Magellan 8100 8100Ω and 8200 8200Ω Scanner NOTES ...
Page 378: ...6 270 Magellan 8100 8100Ω and 8200 8200Ω Scanner NOTES ...
Page 402: ...D 2 Magellan 8100 8100Ω and 8200 8200Ω Scanner NOTES ...
Page 416: ...E 14 Magellan 8100 8100Ω and 8200 8200Ω Scanner NOTES ...
Page 432: ...F 16 Magellan 8100 8100Ω and 8200 8200Ω Scanner NOTES ...
Page 433: ...Product Reference Guide F 17 NOTES ...
Page 434: ...F 18 Magellan 8100 8100Ω and 8200 8200Ω Scanner NOTES ...


