Calibration Procedures
78
Magellan™ 9800i Scanner
Calibrating the Scale (Pounds & Kilograms)
1. Before proceeding, ensure that the scanner/scale has been prepared for this process by
performing the preceding steps titled,
Preparing the Scanner/Scale for Calibration
2. Verify that there are no obstructions under the weigh platter. Remove the weigh platter
(L-Platter) and make sure that there are no obstructions in the debris chutes (see
3. If one is present, cut and remove the seal securing the calibration switch access cover.
The seal may not be present if this is the initial installation of the scanner/scale.
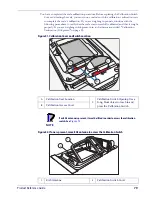
4. Slide the cover to reveal the switch as shown in
5. Use a long, blunt object, such as the eraser end of a pencil to press and release the Cal-
ibration Switch and place the scanner/scale in Calibration Mode (see
c). The
scanner/scale will sound a tone indicating that it is in Calibration Mode. The Scale Sta-
tus (yellow LED) will flash, indicating the scale is in Calibration Mode. If one is pres-
ent, the Remote Display will show the message “ESCL” (empty scale).
6. Reinstall the weigh platter.
7. Press the Scale Zero Button. The Scale Status (yellow LED) will go out for approxi-
mately 10 seconds (or less) and the Remote Display (if present) will alternately display
---- and ____ until the scale is ready to proceed.
8. When the scale is ready, the Scale Status (yellow LED) begins blinking again, and the
Remote Display (if present) will show the message “Ad20 (add twenty pounds)” or
“Ad10 (add ten kilograms).” The scanner/scale will also sound one tone if the scale is
weighing in kilograms or two tones for pounds if you don’t have a Remote Display.
9. Place the correct weight (twenty pounds for calibration in pounds, or ten kilograms for
metric calibration) from the Field Standard Weight set, onto the center of the weighing
area. Press the Scale Zero Button again.
10. The Scale Status LED extinguishes for approximately 10 seconds and the Remote
Display (if present) alternately displays ---- and ____ until the scale is ready to pro-
ceed.
11. If the calibration was successful, the speaker sounds a single tone, the Scale Status
LED begins blinking again, and “End-” appears in the Remote Display (if one is pres-
ent).
12. If the calibration was not successful, the speaker sounds five tones indicating a scale
failure, and the Scale Status LED will blink twice, strobe (fast blinks), and then contin-
ually repeat this sequence until reset. Remove all weight from the Weigh Platter, and
repeat the procedure starting with step
13. Press the Scale Zero Button again to permanently store the calibration data and exit
Calibration Mode. You have completed the calibration of the scale. The unit’s calibra-
tion must now be verified as required by state and/or local weights and measures regu-
lations. The verification procedure must be performed to assure that a scale will pass
Weights and Measures requirements before it is placed into commercial/retail service.
Summary of Contents for Magellan 9800i
Page 1: ...MagellanTM 9800i Product Reference Guide...
Page 62: ...Site Preparation and Installation 50 Magellan 9800i Scanner NOTES...
Page 102: ...Calibration Procedures 90 Magellan 9800i Scanner NOTES...
Page 112: ...Programming 100 Magellan 9800i Scanner NOTES...
Page 158: ...Enter Exit Programming Mode 146 Magellan 9800i Scanner NOTES...
Page 174: ...EAS Features 162 Magellan 9800i Scanner NOTES...
Page 378: ...Enter Exit Programming Mode 366 Magellan 9800i Scanner NOTES...
Page 400: ...2D Symbology Programming 388 Magellan 9800i Scanner NOTES...
Page 414: ...402 Magellan 9800i Scanner NOTES...
Page 424: ...412 Magellan 9800i Scanner NOTES...
Page 438: ...426 Magellan 9800i Scanner NOTES...
Page 450: ...438 Magellan 9800i Scanner NOTES...

