background image

Battery Installation

1.

Push the latch release button and pull the latch down; then remove
the battery cover. 


2.

First insert the upper side (contacts), then the bottom side of the 
battery pack into the slot:

3.

Reinsert the cover. First insert first the upper side and then press the 
latch release button and pull the latch down to insert the bottom. 
Push the knurled section of the latch upwards to close the cover:

Charging Instructions

The battery pack is not initially fully charged. After installing the battery,
charge it with the power supply or with the single slot dock.

Charge with Power Supply


Charge with the Single Slot Dock

NOTE

Use only a Datalogic approved power supply.

CAUTION

Do not use the Memor X3 until batteries are charged for minimum
4 hours.

PUSH

MicroSD Card Installation

1.

Turn off the Memor X3-HC.

2.

Push the latch release button and pull the latch down; then remove the 
battery cover

 (see 

Battery Installation

, step 1). 

Remove the battery pack:

3.

Open the microSD card slot by lifting up the locking plate:

4.

Shift the cardholder upwards and then pull it up:

5.

Insert the microSD card with the written part upward:


6.

Lock the card into place by pushing the cardholder down and then 
shifting it downwards; push the locking plate down:

7.

Reinsert the battery cover (see section 

Battery Installation

, step 3.).

Scanning with a Memor X3 Linear Imager

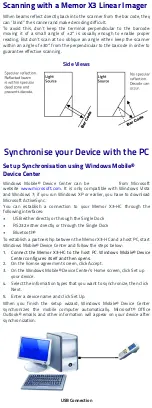
When beams reflect directly back into the scanner from the bar code, they
can “blind” the scanner and make decoding difficult. 
To avoid this, don’t keep the terminal perpendicular to the barcode:
moving it of a small angle of ±2° is usually enough to enable proper
reading. But don’t scan at too oblique an angle either: keep the scanner
within an angle of ±30° from the perpendicular to the barcode in order to
guarantee effective scanning.

Side Views

Synchronise your Device with the PC

Set up Synchronisation using Windows Mobile® 
Device Center

Windows Mobile® Device Center can be 

from Microsoft

website 

www.microsoft.com

.  It  is  only  compatible  with  Windows  Vista

and Windows 7; if you run Windows XP or earlier, you have to download
Microsoft ActiveSync.
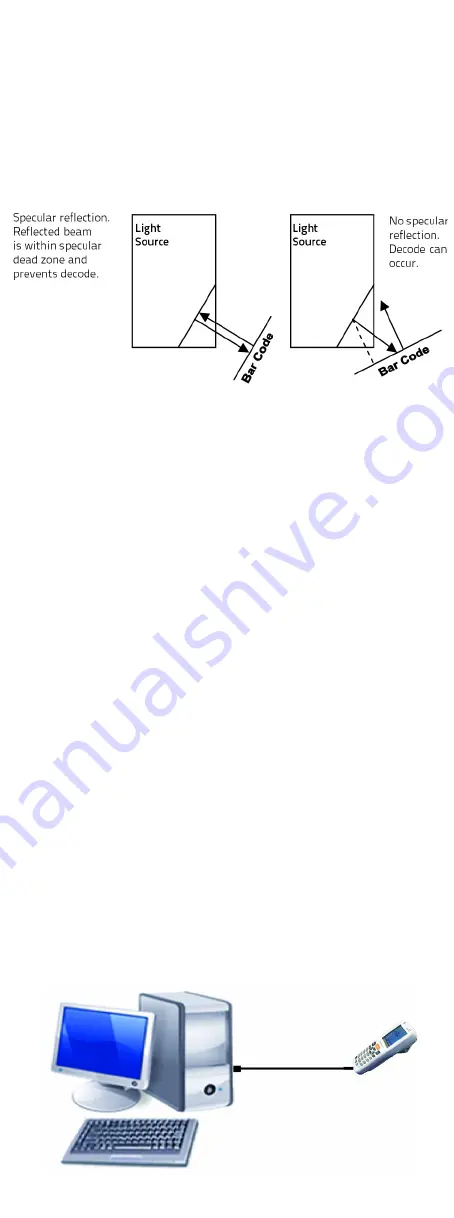
You can establish a connection to your Memor X3-HC through the
following interfaces:

USB either directly or through the Single Dock

RS232 either directly or through the Single Dock

Bluetooth® 

To establish a partnership between the Memor X3-HC and a host PC, start
Windows Mobile® Device Center and follow the steps below:

1.

Connect the Memor X3-HC to the host PC. Windows Mobile® Device
Center configures itself and then opens.

2.

On the license agreement screen, click Accept.

3.

On the Windows Mobile® Device Center’s Home screen, click Set up 
your device.

4.

Select the information types that you want to synchronize, then click 
Next.

5.

Enter a device name and click Set Up.

When you finish the setup wizard, Windows Mobile® Device Center
synchronizes the mobile computer automatically. Microsoft® Office
Outlook® emails and other information will appear on your device after
synchronization.

USB Connection

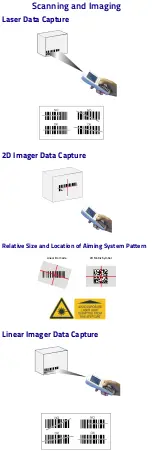
Scanning and Imaging

Laser Data Capture

2D Imager Data Capture

Relative Size and Location of Aiming System Pattern

Linear Imager Data Capture

Linear Bar Code

2D Matrix Symbol

Summary of Contents for Memor X3 Healthcare

Page 1: ...Memor X3 Healthcare HC Mobile Computer Quick Start Guide 822002480 Rev A June 2017 ...

Page 2: ...ddendum Remove all the components from their packaging check their integrity and compare them with all the packing documents General View CAUTION Keep the original packaging for use when sending products to the technical assistance center Damage caused by improper packaging is not covered under the warranty Front View Back View Top View Bottom View NOTE Before using the terminal remember to remove...

Page 3: ...ressed again After a blue modifier key press it opens the Start menu After a blue modifier key press it opens the file manager After a blue modifier key press it switches ON OFF the dis play backlight After a blue modifier key press it switches ON OFF the key board backlight After a blue modifier key press it locks and unlocks the key board After a blue modifier key press it disables the touchscre...

Page 4: ...tch release button and pull the latch down to insert the bottom Push the knurled section of the latch upwards to close the cover Charging Instructions The battery pack is not initially fully charged After installing the battery charge it with the power supply or with the single slot dock Charge with Power Supply Charge with the Single Slot Dock NOTE Use only a Datalogic approved power supply CAUTI...

Page 5: ...move the battery pack 3 Open the microSD card slot by lifting up the locking plate 4 Shift the cardholder upwards and then pull it up 5 Insert the microSD card with the written part upward 6 Lock the card into place by pushing the cardholder down and then shifting it downwards push the locking plate down 7 Reinsert the battery cover see section Battery Installation step 3 ...

Page 6: ...Scanning and Imaging Laser Data Capture 2D Imager Data Capture Relative Size and Location of Aiming System Pattern Linear Imager Data Capture Linear Bar Code 2D Matrix Symbol ...

Page 7: ...rlier you have to download Microsoft ActiveSync You can establish a connection to your Memor X3 HC through the following interfaces USB either directly or through the Single Dock RS232 either directly or through the Single Dock Bluetooth To establish a partnership between the Memor X3 HC and a host PC start Windows Mobile Device Center and follow the steps below 1 Connect the Memor X3 HC to the ho...

Page 8: ...n any reproductions of the documentation Should future revisions of this manual be published you can acquire printed versions by contacting your Datalogic representative Electronic versions may either be downloadable from the Datalogic website www datalogic com or provided on appropriate media If you visit our website and would like to make comments or suggestions about this or other Datalogic pub...

Page 9: ...UTERS category link From this page you can select your product model from the dropdown list which gives you access to Downloads including Data Sheets Manuals Software Utilities and Drawings Repair Program for On Line Return Material Authorizations RMAs plus Repair Center contact information Service Program containing details about Maintenance Agreements Technical Support through email or phone War...

Page 10: ... for additional regulatory safety and legal information 2017 Datalogic S p A and or its affiliates All rights reserved Datalogic and the Datalogic logo are registered trademarks of Datalogic S p A in many countries including the U S and the E U www datalogic com ...

Reviews: