background image


25 

 AirStick Reader User Manual – v. 1.0 

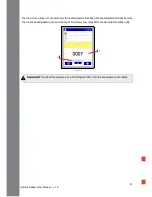
The main screen 

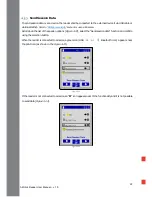
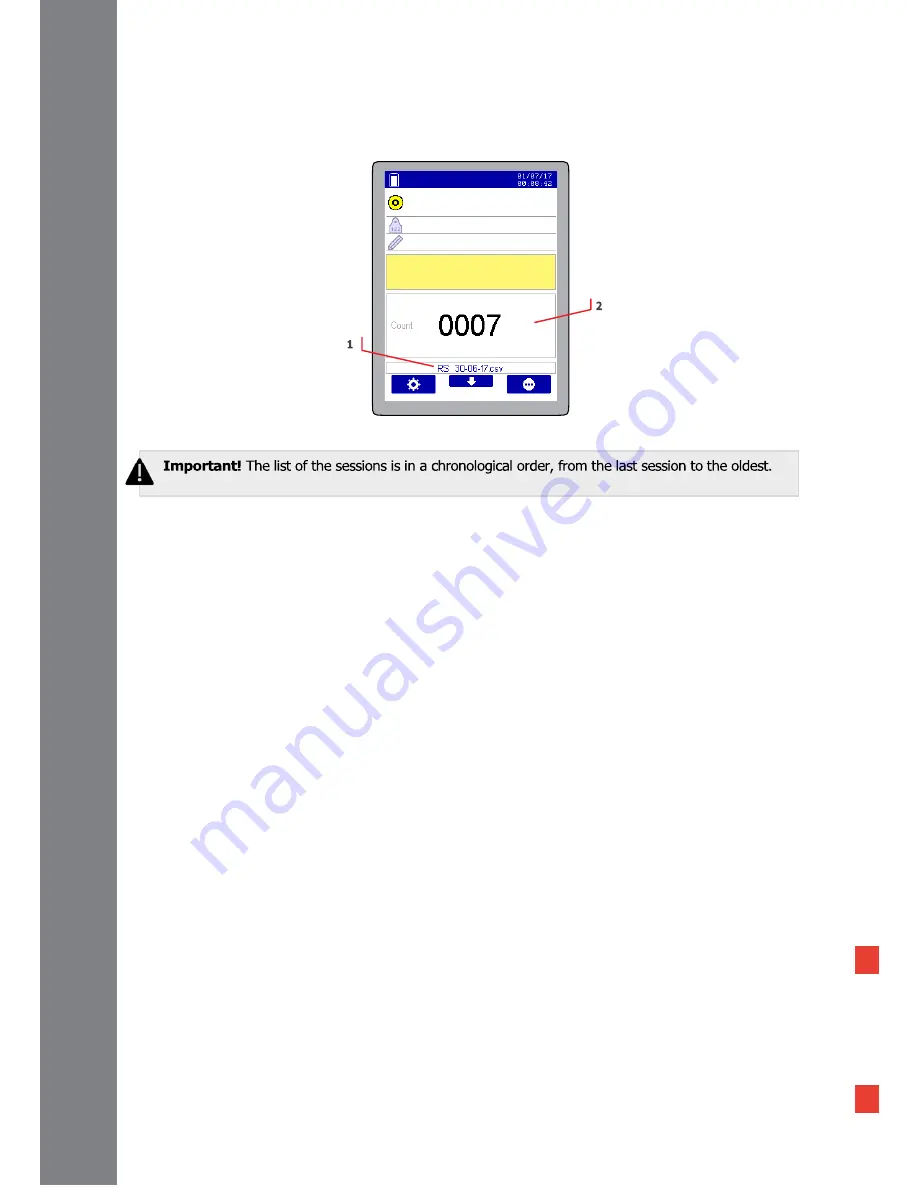
(Figure 4-5) now shows the reading session that has just been selected which has become 

the current Reading Session (

1) and the Count field shows how many EIDs are stored in this session (2). 


Figure 4-5


Summary of Contents for AirStick EID

Page 1: ...Portable EID Tags Reader User Manual ...

Page 2: ...n AirStick reader 10 To switch off AirStick reader 11 Display 12 Settings 13 Application Menu 15 Transponder types EID 16 3 Operations 17 Reading an EID Ear Tag 17 Single Mode 18 Continuous Mode 18 Managing Duplicates 18 Linking Data to an EID 19 Insert and modify a VID 19 Insert and modify an Alert 20 Notes 22 4 Session functions 23 Create a New Session 23 Continue Session 23 Sessions Options 26 ...

Page 3: ...ooth Keyboard wedge 49 USB Memory Stick 51 Reader backup 53 Session download 53 Reader restore 54 Session upload 54 7 Firmware update 55 8 Care and Maintenance 55 9 Specification 56 10 Troubleshooting 57 Bad reading performances 57 The reader does not work 57 A triangle has appeared on the status toolbar 58 11 Certification 59 12 End of life 60 Disassembly Instructions for AirStick reader 60 Tools...

Page 4: ...784 AMD1 FDX B and HDX transponders High reading distance 31 cm FDX B 37 cm HDX glass tag 32 mm Flashing LED vibration and audio to notify successful tag reading Robust and waterproof IP67 Easy wireless connectivity via Bluetooth and data transfer via USB Long life rechargeable and replaceable battery for extended use outdoors two batteries included 4 GB memory capacity 1 million codes stored Sear...

Page 5: ... all EIDs eg Note 1 Date of Birth Note 2 Place of birth or use it in different ways for different EIDs This data is read only on AirStick and can be added and edited in S ID only Magnifier Highlights the information you consider the most important EID VID or alert with a bigger font size For the EID and the VID you can customize the number of digits you want to highlight from 3 to 12 Reading sessi...

Page 6: ...D is detected The light is switched off if no reading operations are ongoing 2 Antenna 3 Read button on the back 4 Rear screwing cap on the bottom 5 DC Plug charger connection 6 Battery removal button 7 Replaceable battery 8 Mini USB port to connect the reader to a PC via USB cable 9 Standard USB port to connect a USB memory stick 5 6 8 Figure 1 2 ...

Page 7: ...out 3 seconds refer to _Switch_ON OFF_AirStick section for more information Switch OFF the reader Press for 2 seconds and then press again to confirm refer to Switch ON OFF AirStick reader section for more information Select When the reader is turned on press to activate the select command displayed in the action toolbar Read Button The read button is placed on the back of the reader and it is the ...

Page 8: ...rtant to follow the steps described in this section 1 Open the rear screwing cap on the bottom of the reader 2 Insert the battery into AirStick battery compartment The powerpack cavity is designed to allow an easy and proper installation The battery will snap into place when it is properly inserted To remove the battery from AirStick reader 1 Open the rear screwing cap on the bottom of the reader ...

Page 9: ...ocket of the car Battery level indicator The battery logo shows the battery level Please note that when the bar become red about 30 minutes of power charge are left While the battery is charging the red and green LED indicator will light and will be steadily lit When the battery is fully charged the red LED indicator will turn off and the green LED indicator will be steadily lit Charging Problems I...

Page 10: ...r how many EID read in the current Reading session 4 The current Reading session name 5 EID VID ALERT fields the yellow icon indicate which field is highlighted in the magnifier when a tag is read When the reader is turned on for the first time the magnifier highlights the EID Scroll down with the down arrow to change the information you want to highlight in the magnifier When a different field is...

Page 11: ...the ON OFF Selection button on the reader for 3 seconds Figure 2 2 The following screen will appear on the display Press the Selection button to confirm The reader can be switched off in any moment except while reading Stop reading by pressing the read button and then turn the reader off Figure 2 2 ...

Page 12: ...ate Time 5 Transponder type EID Refer to Settings section for more information 6 VID 7 Alert 8 Safety Lock An Open Closed safety lock appears to indicate if the field selected is editable or not 9 Magnifier An Alert is shown in the example 10 Shortcut to data transfer It appears while the reader is connected to a device Green icon when ready to send Session Data 11 Application menu 12 Scroll down ...

Page 13: ...oolbar on the top of the screen While in Single mode you can decide to read continuously when needed Refer to Reading an EID Ear Tag section for more information Duplicates A Not allowed B Allowed when selected the icon appears on the status toolbar on the top of the screen Refer to Duplicates section for more information Bluetooth Selecting this setting you can set Bluetooth functionalities navig...

Page 14: ...tion you can select the desired format to store and transfer EIDs selection Refer to Transponder information EID Section for more information Magnifier digits It is possible to choose how many digits you want the EID and the VID highlighted on the magnifier configurable from 3 digits A to 12 B A B This setting is not applicable to the Alert which is displayed in the magnifier entirely Example EID ...

Page 15: ...ssion 2 Continue Session to select an already existing session where you can continue saving data 3 Session Options to manage sessions printing editing EIDs deleting data managing duplicates Refer to Session functions section for more information B Search Functions 4 Search EID to search an existing EID in a specific session 5 Search VID to search the EID marked with a specific VID 6 Search Alert ...

Page 16: ...23 char Industrial R00060000000000123456 21 char ISO Short Animal 964 000000123456 16 char Industrial 0006 0000000000123456 21 char ISO TIRIS Texas Instruments Registration and Identification System Animal A 00000 0 964 000000123456 26 char Industrial R 0006 0000000000123456 23 char F 210 Animal A 00000 0 0999 000000123456 27 char Industrial R 0006 0000000000123456 23 char BDN ITA Animal 100000009...

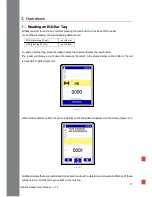
Page 17: ... EID ear tag place the reader nearby the animal and press the read button The reader will display a count down the message Reading in the status toolbar on the bottom The red led will start to blink Figure 3 1 When AirStick detects an EID the green led blinks and reading data is displayed on the screen Figure 3 2 AirStick indicates that a successful reading has been made with a vibration and an au...

Page 18: ...ing the read button the AirStick continues reading tags until the read button is pressed again when no EID is found time out is reset after every reading In the Continuous mode the continuous mode icon appears on the status toolbar on the top on the screen Press the read button to start reading once the reader is at a proper distance from the animal and press the read button once again to stop the...

Page 19: ...w down We recommend downloading sessions not used and try to optimize data organization in AirStick Linking Data to an EID Each time an EID is read it is possible to link data i e VID ALERT and up to five notes this last information with S ID software only These data are shown on the reader s screen each time the EID is read and are available to the user with S ID software Refer to S ID software m...

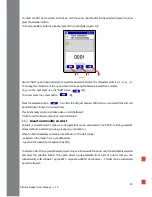
Page 20: ...lock or not closed lock This functionality can be customized also on S ID Software Refer to S ID software manual for more information Insert and modify an Alert An Alert is an alphanumeric code up to 16 digits that can be associated to the EID to notifying a specific status met by the animal grouping pregnancy vaccination When an EID is detected an alert can be linked to it The alert can be select...

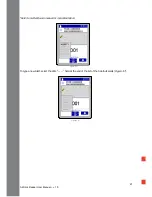
Page 21: ...irStick Reader User Manual v 1 0 Refer to S ID software manual for more information To type a new Alert select the dots field at the end of the list of the 5 default alerts Figure 3 7 Figure 3 7 Figure 3 6 ...

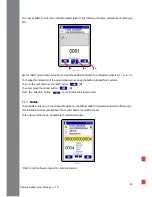
Page 22: ...the button pressed for 2 seconds To go to the next digit use the ABC arrow 2 To cancel press the cancel button 3 Press the selection button to confirm the Alert just entered Notes It is possible to link up to 5 read only data which can be added edited or deleted using S ID software only This information will be recalled near the counter each time an EID is read In the Figure 3 9 is shown an exampl...

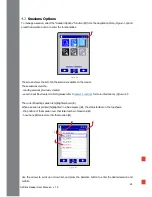
Page 23: ...button and the new session will be created Figure 4 2 The new session will be named with the current date When a new Reading session is created it becomes automatically the current Reading session file The name of the session can not be changed directly on the screen of the reader but it is possible via a PC when the reader is connected to it either using the S ID software or Refer to S ID softwar...

Page 24: ...ns section for more information Figure 4 4 The current Reading session is highlighted in red 1 When a session is pointed highlighted in a blue square 2 the status toolbar on the top shows the position of that session over that total number of sessions 3 how many EIDs are store into that session 4 Use the arrows to scroll up or down list and press the Selection button to choose the desired session ...

Page 25: ... Manual v 1 0 The main screen Figure 4 5 now shows the reading session that has just been selected which has become the current Reading Session 1 and the Count field shows how many EIDs are stored in this session 2 Figure 4 5 ...

Page 26: ...ssions previously created search input files created on S ID please refer to Search Functions for more information Figure 4 7 The current Reading session is highlighted in red 1 When a session is pointed highlighted in a blue square 2 the status toolbar on the top shows the position of that session over that total number of sessions 3 how many EIDs are store into that session 4 Use the arrows to s...

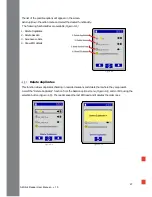
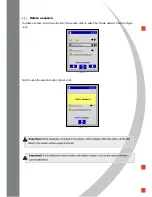
Page 27: ... Delete Duplicates 2 Delete Session 3 Send Session Data 4 Show EID details Delete duplicates This function allows duplicates checking in recorded sessions and delete them where they are present Select the Delete Duplicates function from the Session options menu Figure 4 9 and confirm using the selection button Figure 4 10 The reader keeps the last EID read and it deletes the older ones Figure 4 8 ...

Page 28: ...Delete a session To delete a session scroll down the list of the session options select the Delete Session function Figure 4 11 Confirm using the selection button Figure 4 12 Figure 4 12 Figure 4 11 ...

Page 29: ...rmation Scroll down the list of the session options Figure 4 13 select the Send session data function and confirm using the selection button When the reader is connected to a device a green icon USB or Bluetooth icon appears near the print icon as shown in the Figure 4 13 If the reader is not connected to a device an X icon appears near of the functionality and it is not possible to send data Figu...

Page 30: ... that appear on the main screen Figure 4 15 while the reader is connected to a device 1 There are two possible ways to send Session Data Connect the reader to a device as Virtual COM Port via USB or Bluetooth Connect the reader to a device as Keyboard wedge via USB or Bluetooth Figure 4 15 ...

Page 31: ...ns menu Figure 4 16 and press the Selection button to confirm The list of all the EIDs read in that specific session will appear on the screen Figure 4 17 Select the desired EID and confirm The screen will display all the EID s details already registered Figure 4 18 From this screen is possible to delete the EID and the realted data pressing the delete button or go back to the previous list Figure...

Page 32: ...etails the screen shows the first EID listed in the session If the session is empty the session options menu shows the message no EIDs Figure 4 19 at the voice Show EID details If you enter it the screen shows that 0000 EIDs are contained in that session Figure 4 20 Figure 4 18 Figure 4 19 Figure 4 20 ...

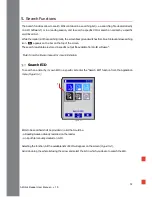
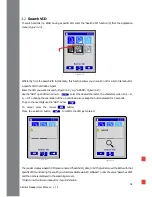
Page 33: ...the screen The search result data are stored in specific output file available from S ID software Refer to S ID software manual for more information Search EID To search an animal by its own EID in a specific list enter the Search EID function from the Application menu Figure 5 1 EIDs to be searched shall be provided in a list that could be a Reading Session already recorded on the reader an input...

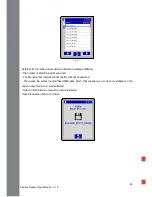
Page 34: ... will be searched The file name that contains the list of EIDs that will be searched The session file output named SearchEID_date_time that will allow you to do some statistics on the search using Figure 5 3 S ID software Refer to S ID software manual for more information Press the selection button to confirm Figure 5 2 Figure 5 3 ...

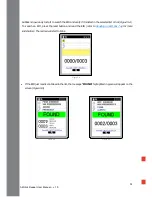
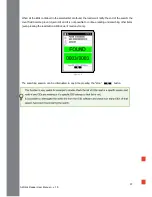
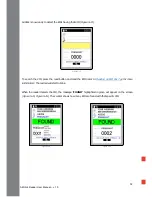
Page 35: ...ected list or not Figure 5 4 To search an EID press the read button and read the EID refer to Reading an EID Ear Tag for more information The red led will start to blink If the EID just read is contained in the list the message FOUND highlighted in green will appear on the screen Figure 5 5 Figure 5 4 Figure 5 5 Figure 5 6 ...

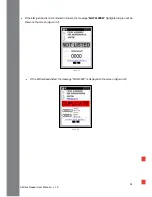
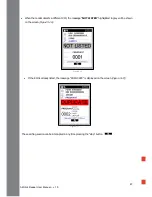
Page 36: ... the EID just read is not contained in the list the message NOT LISTED highlighted in grey will be shown on the screen Figure 5 7 If the EID is already listed the message DUPLICATE is displayed on the screen Figure 5 8 Figure 5 7 Figure 5 8 ...

Page 37: ...e reader will notify the end of the search the count field become green Figure 5 9 and it is not possible to continue reading and searching other items even pressing the read button AirStick won t read any more The searching session can be interrupted in any time pressing the stop button Figure 5 9 ...

Page 38: ...e desired character The characters order is 0 1 9 A Z To change the orientation of the up and down arrow keep the button pressed for 2 seconds To go to the next digit use the ABC arrow To cancel press the cancel button Press the selection button to confirm the VID just entered The reader creates a Search VID session named SearchVID_date_time that will store all the EIDs with that specific VID foun...

Page 39: ... read button and read the EID refer to Reading an EID Ear Tag for more information The red led will start to blink When the reader detects the VID the message FOUND highlighted in green will appear on the screen Figure 5 14 Figure 5 15 The counter shows how many EID are found with that specific VID Figure 5 13 Figure 5 14 Figure 5 15 ...

Page 40: ...D the message NOT LISTED highlighted in grey will be shown on the screen Figure 5 16 If the EID is already listed the message DUPLICATE is displayed on the screen Figure 5 17 The searching session can be interrupted in any time pressing the stop button Figure 5 16 Figure 5 17 ...

Page 41: ... e EIDs by specific Alert enter the Search Alert function 6 from the Application menu Figure 5 18 Select the Alert according to which you want to search the animals and confirm Figure 5 19 It is also possible to search an Alert not already listed Figure 5 18 Figure 5 19 ...

Page 42: ...n arrow keep the button pressed for 2 seconds To go to the next digit use the ABC arrow 2 To cancel press the cancel button The reader creates a Search Alert session named SearchAlert_date_time that will store all the EIDs with that specific Alert found during the search such list is available via S ID software under the voice Searches Alert and the name is displayed in the searching screen Refer ...

Page 43: ...search the Alert press the read button and read the EID refer to Reading an EID Ear Tag for more information The red led will start to blink When the reader detects the EIDs with the Alert the message FOUND highlighted in green will appear on the screen Figure 5 23 Figure 5 24 Figure 5 22 Figure 5 24 Figure 5 23 ...

Page 44: ...When the reader detects a different Alert the message NOT LISTED highlighted in grey will be shown on the screen Figure 5 25 If the EID is already listed the message DUPLICATE is displayed on the screen Figure 5 26 Figure 5 25 Figure 5 26 ...

Page 45: ...fer data function The data transfer shortcut icon will appear on the main screen of the reader There are two possible ways to connect AirStick to a device for example a PC via the USB cable provided via Bluetooth USB wired To connect the reader to a device via the USB cable provided in the packaging follow the step here below Figure 6 1 1 Open the rear screwing cap on the bottom of the reader 2 Co...

Page 46: ...oolbar on the top of the screen Connect the reader to one of the Virtual Com Ports of the device and AirStick sends the data using RS232 protocol When connected the USB icon will be displayed in green Warning Some devices may require specific operations eg Install drive run a program for a successful connection with AirStick USB Keyboard wedge With the KWG profile data is transmitted via USB to th...

Page 47: ...e types of PIN available are 0000 1234 9999 or None When the Bluetooth is ON a white Bluetooth icon appears on the status toolbar on the top of the screen Figure 6 4 When the reader and a device are paired and connected the Bluetooth icon become green Figure 6 5 When Bluetooth is switched on the following operations are allowed Figure 6 6 1 Select Virtual COM port keyboard profile 2 Find a device ...

Page 48: ...vice via Bluetooth The list of all the Bluetooth devices currently available will progressively appear Figure 6 7 and the name of the devices will be displayed in the list When the entire list of the devices is uploaded it is possible to select the desired device and wait until they will be paired Figure 6 8 3 Manual Auto Select the Manual option to search manually a device each time the Bluetooth...

Page 49: ... data is transmitted via Bluetooth to the receiving third party application where a mouse cursor is active as if it were being input via a keyboard refer to the examples at the end of this section for clarification No configuration on the device is needed To connect the reader in Keyboard wedge mode select the function from the Bluetooth menu When connected a green keyboard icon appears on the sta...

Page 50: ...d mode in the desired connection USB or Bluetooth On the device place the cursor in the field of the spreadsheet where the EID should be printed Read the EID following instructions described in Reading an EID Ear Tag section The code will be typed in the selected EID format in the field previously selected Figure 6 10 Figure 6 10 ...

Page 51: ...void the accidental upload of data different from those managed by the reader To connect the USB memory stick to AirStick open the screwing cup on the bottom of the reader Figure 6 11 The reader displays a temporary screen which shows a memory stick and a white memory stick icon appears on the status toolbar on the top Figure 6 12 When the reader is effectively connected to the memory stick the me...

Page 52: ... following functionalities are available 1 Reader backup Figure 6 14 2 Session Download Figure 6 15 From the USB to the reader the following functionalities are available 3 Reader Restore Figure 6 16 4 Session upload Figure 6 17 Figure 6 13 Figure 6 15 Figure 6 14 ...

Page 53: ...inished the reader shows the previous screen with all the available functions On the USB stick you will find a folder named AirStick_Date and Time containing Reading Sessions Search input files Masterfile folder Search Output folders Connecting the memory stick to a PC or MAX you can enter all the data transferred from the reader to the memory stick Session download It is possible to download a si...

Page 54: ...Output folders For example you can use one of the reader backups previously downloaded and modified through S_ID or you can import the reader s library created on S ID Select the Reader restore function and confirm The list of backups available for restoring contained on the USB memory stick appears on the screen Scroll down the list using the up and down arrows and select the one you want to rest...

Page 55: ...pair to your local dealer Any attempt to open the reader yourself will void the IP67 certification AirStick is equipped with Li Ion type battery This battery lasts longer and does not contain Cadmium or lead which makes it much safer for the environment If the reader has to be destroyed please return it to a battery specialist for battery recycling The display of the reader may change colour if ex...

Page 56: ...0 C 55 C 95 RH non condensing Charging Temperature 5 C 45 C 95 RH non condensing Long term Storage Temperature 20 C 45 C 85 RH non condensing Wireless communication Bluetooth wireless technology to connect to most of weight scales and portable printers profiles supported SPP Keyboard emulator Apple SPP ready Wired communication USB Keyboard or Virtual COM Port profile Data storage USB host can rea...

Page 57: ...antenna The reading distance is reduced if the transponder is still in the needle Item Legend Description 1 Reading area Area in which the ear tags and the implants can be detected 2 EID Ear Tag 3 EID Implant Bolus 4 Best position Best position of the ear tags to be detected by the antenna 5 AirStick s Antenna 6 AirStick The reader does not read the transponder Change the angle of the reader and t...

Page 58: ...his or other DATAMARS products please contact your dealer A triangle has appeared on the status toolbar A yellow or red triangle could appear on the status toolbar on screen if the antenna is not properly tuned Figure 10 2 Move the reader in a new location The icon will disappear in 10 minutes or restart the reader If the icon is still on the screen move the reader again in a new position and wait...

Page 59: ... 1 0 11 Certification Datamars Via ai Prati CH 6930 Bedano declares under its own responsibility that the product AirStick is in accordance with the following standards CE RED Europe FCC USA IC Canada C TICK Australia and New Zealand ...

Page 60: ... party will void the product warranty and may irreparably damage the product Tools Required Tool Description Tool Size if applicable Nipper Medium Philips screwdriver 0 Small Cutter pliers Medium Hot Air Gun Big Product Disassembly Process 1 Open the reader by using a screwdriver and remove all internal components 2 Dispose all the plastic and rubber parts of the reader according to the local recy...

Page 61: ...tronics parts of the reader according to the local recycling laws 5 Dispose the battery packs according to the local recycling laws 6 Dispose all the cables according to the local recycling laws 7 Dispose all metallic parts according to the local recycling laws ...

Reviews: