background image


Contents 


General Precautions ...................................................................................................... 1 

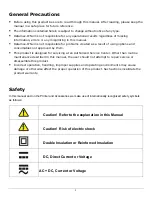
Safety ........................................................................................................................... 1 

1   Getting Started ....................................................................................................... 2 

1.1   Unpacking the Printer ...................................................................................... 2 

1.2   Installing and Charging the Battery Cartridge...................................................... 3 

1.2.1  Installing the Battery............................................................................ 3 

1.2.2   Charging the Battery ............................................................................ 4 

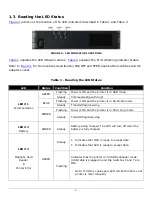
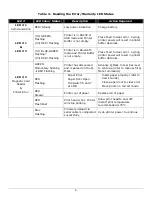
1.3   Reading the LED Status ................................................................................... 5 

1.4   Attaching Shoulder Strap System ...................................................................... 7 

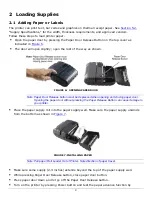
2   Loading Supplies..................................................................................................... 9 

2.1   Adding Paper or Labels .................................................................................... 9 

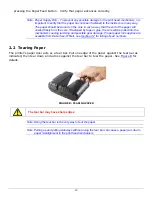
2.2   Tearing Paper............................................................................................... 10 

3  Using the Printer................................................................................................... 11 

3.1   Initial Power-Up and Self-Test ........................................................................ 11 

3.2   Connecting the Printer ................................................................................... 11 

3.2.1   Dip Switches Location......................................................................... 12 

3.2.2  Setting Dip Switches .......................................................................... 12 

3.2.3   Dip Switch Functions .......................................................................... 13 

3.3   Communications ........................................................................................... 14 

3.4   USB Communication...................................................................................... 14 

3.5   Bluetooth Communications ............................................................................. 15 

3.6   802.11 Communications (Option) .................................................................... 15 

3.7   Serial RS232 (Option).................................................................................... 15 

3.7   Magnetic Stripe Reader (Option) ..................................................................... 16 

4 Printer 

Maintenance.............................................................................................. 17 

4.1   Print Head Cleaning Instructions ..................................................................... 17 

4.2   Charging the Printer Battery ........................................................................... 18 

Summary of Contents for Apex 4

Page 1: ...APEX 4 User Guide 7A300024 2 Rev A ...

Page 2: ......

Page 3: ... Paper or Labels 9 2 2 Tearing Paper 10 3 Using the Printer 11 3 1 Initial Power Up and Self Test 11 3 2 Connecting the Printer 11 3 2 1 Dip Switches Location 12 3 2 2 Setting Dip Switches 12 3 2 3 Dip Switch Functions 13 3 3 Communications 14 3 4 USB Communication 14 3 5 Bluetooth Communications 15 3 6 802 11 Communications Option 15 3 7 Serial RS232 Option 15 3 7 Magnetic Stripe Reader Option 16...

Page 4: ...ate 19 4 4 Battery and Safety Information 19 4 5 Recycling Batteries 20 4 6 Troubleshooting 20 4 7 Printer Supplies 21 5 Specifications 23 5 1 Printer Specifications 23 5 2 Supply Specifications 23 5 3 Regulatory Notes 24 5 3 1 FCC Part 15 Class B 24 5 3 2 Warranty 24 5 3 3 Warranty and or Repair Service 24 6 Customer Support 25 ...

Page 5: ...m This product is designed for servicing at an Authorized Service Center Other than routine maintenance described in this manual the user should not attempt to repair service or disassemble this product Incorrect operation handling improper supplies and operating environments may cause damage or otherwise affect the proper operation of this product Such actions invalidate the product warranty Safe...

Page 6: ... others where point of service receipts are required The package contains Printer Battery Cartridge Universal Adapter USA UK European and Australian plugs for charging the battery inside the printer Shoulder Strap with Quick Clip Roll of Paper Supply already loaded in the printer Print Head Cleaning Pen Both cabled and wireless communication is possible Figure 1 shows an overview of the APEX 4 pri...

Page 7: ...ycle a battery fully charge it and then allow full discharge through normal use in the printer 1 2 1 Installing the Battery Note Refer to Figure 2 below to install the battery pack in the printer Unlock the battery door by sliding the battery door locking tab up Open the battery door to an angle of about 90 degrees Do not force open Insert the battery as shown non contact end first and let contact...

Page 8: ... BATTERY CARTRIDGE Note To ensure a full charge do not operate the printer while charging Note The wall mounted charger is a Class II equipment Multiple plug configurations comply with most international standards The wall mounted charger is not supplied with plugs for use in Korea Model APEX 4 Input Voltage Current 100 240 VAC 0 4A Input Frequency 47 63 HZ Do not use a charger not approved by Dat...

Page 9: ...eady Communicating with host Flashing Power is ON and the printer is in Bluetooth mode BLUE Steady Transmitting receiving Flashing Power is ON and the printer is in 802 11b g mode LED 1 Communication AMBER Steady Transmitting Receiving LED 2 Battery AMBER Steady Battery being charged The LED will turn off when the battery is fully charged Steady Indicates that MCR is ready to accept data Indicates...

Page 10: ...result in printer buffer data loss GREEN Momentary flashing RED Flashing Printer has discovered and is parked on the Q Mark Advance Q Mark to tear bar level to continue refer to manual for Q Mark commands RED Flashing Paper Error Paper Door Open Dip Switch 5 and 7 are ON Insert paper properly refer to User s Guide Close paper door to clear error Place printer in correct mode RED Steady Printer out...

Page 11: ...on the sides of the connector of the Shoulder Strap Slide the knob located on the back of the printer into the connector slot Release the two latches on the connector The printer is now secure To release the printer press in on the two latches on the connector and pull the knob clear of the slot Note Do not force or pull the printer from the connector without pressing in on the two latches FIGURE ...

Page 12: ...8 ...

Page 13: ...utton must be depressed when opening and closing paper door Opening the paper door without pressing the Paper Release Button can cause damage to your printer Place the paper supply roll into the paper supply well Make sure the paper supply unwinds from the bottom as shown in Figure 7 FIGURE 7 INSTALLING PAPER Note Pull paper Roll Leader Out of Printer Note direction of paper travel Make sure some ...

Page 14: ...chanism causing jamming and possible gear damage Proper paper roll supplies are available from Datamax O Neil see Section 4 7 for listing of part numbers 2 2 Tearing Paper The printer s paper door acts as a tear bar Pull one edge of the paper against the tear bar as indicated then tear down and across against the tear bar to tear the paper See Figure 8 for details FIGURE 8 TEARING PAPER The tear b...

Page 15: ...ON OFF switch The printer will start printing the self test message Release the FEED and ON OFF switches Press the ON OFF or FEED switch to stop or cancel the self test print The first few lines of self test show the printer firmware version the current printer settings for example Bluetooth or USB mode and a list of any optional or special features installed Figure 9 shows a printing sample 3 2 C...

Page 16: ...DIP switch location The functions assigned to these switches are shown in Table 3 3 2 2 Setting Dip Switches FIGURE 11 DIP SWITCH 2 SHOWN IN ON POSITION Note Be careful when changing dip switch settings Carefully use a pointer on the dip switch you are going to change DO NOT use a screw driver or apply excessive force Dip Switch Location FIGURE 10 DIP SWITCH LOCATION ...

Page 17: ... RS232 and IrDA only 115200 OFF OFF OFF 57600 ON OFF OFF 38400 OFF ON OFF 19200 ON ON OFF 14400 OFF OFF ON 9600 ON OFF ON Use for fixed IrDA 2400 OFF ON ON 1200 ON ON ON Parity Bit SW 6 SW 7 Parity Enabled ODD ON ON Does not apply for IrDA Parity Enabled EVEN ON OFF Does not apply for IrDA Auto Power Save SW 8 Power Save Enabled ON Auto Power Down Power Save Disabled OFF Manual On Off 1 If IrDA is...

Page 18: ... position Any position Any position Any position Any position OFF ON Any position Compatible Software The host and printer communicate through a method called the Virtual Com Port in which a software intermediary called the driver makes the USB connection look like a com port to the end application Consequently all software that communicates through the com port is compatible Software Driver Insta...

Page 19: ...itch 1 must be in the OFF position Dip Switch 2 must be in the ON position Note Adjust baud rate settings to match those of the 802 11 module in your computing device The printer can be powered up by pressing the power ON OFF switch Pressing the power ON OFF switch again will turn the printer OFF Note It is necessary that the 802 11b g settings match the settings of your wireless network Infrastru...

Page 20: ...gnetic stripe reader Quickly swipe the card through the reader either left to right or right to left The magnetic stripe must be facing toward the paper supply door while it is passed through the reader Refer to Table 4 for the description of the LED indicator Status Table 4 Magnetic Card LED Indicator LED Indicator State Status ON Ready waiting for card to be swiped Green OFF Card not ready to be...

Page 21: ...oll Use the cleaning pen or moisten a cotton swab with isopropyl alcohol and clean the print head Clean the platen roller with a dry cloth or small brush Note You can also use the cleaning pen or another cotton swab moistened with isopropyl alcohol Turn the platen roller with your finger and run the cotton swab or dry cloth across it Make sure the platen roller is clean all the way around Use the ...

Page 22: ...inters require an adapter output of 10 VDC 1 32 A The battery Fast Charge is initiated each time the power adapter is connected to the printer The fast charge controller checks the battery s voltage and temperature before the start of the fast recharge process If the battery voltage or the temperature is outside of the fast charge limits the charger defaults to trickle charge at C 10 or 70 mA rate...

Page 23: ...eceipt If the self test receipt is printed the DC power is ok To test if the battery is accepting charge Press ON OFF switch and wait until all LED s are off Plug the AC power adapter into the printer Press ON the green LED is illuminated and after about 20 seconds the LED should go off If the amber LED is on this will continue on through this test indicating that the battery is accepting a charge...

Page 24: ...ackwards Verify communication between the host device and the printer by disconnecting the communication cable and performing a printer self test Light printing Check or recharge the battery Adjust the print contrast through print application Voids in printing Clean the print head following the cleaning instruction listed in the Section 4 1 Red Error LED on Check that paper roll is not out and pap...

Page 25: ...56984 IP54 Certified Environmental Case No MCR 756998 2 Belt Loop System 740853 104 Spare Paper 103 per roll 770183 200 Thermal Print Head Cleaning Pen 757351 Shoulder Strap System 767400 1 Battery Charger 2 Bay Li Ion 120V 767400 2 Battery Charger 2 Bay Li Ion 220V 767400 4 Battery Charger 2 Bay Li Ion 240V 7A1000014 1 Li Ion Battery Cartridge 7 4 VDC 2200 mAh 5892USB USB Cable 2 0 Available from...

Page 26: ...22 ...

Page 27: ...s Bitmap 3 Resident Font Tables 6 Downloadable Font Tables Bold Font and Proportional Font Supported Bar Codes Codabar Code 39 UCC EAN 128 UPC EAN JAN Interleaved 2 of 5 Code 128 PDF 417 Memory Flash 4MB SRAM 2MB Charging Time Approximately 180 minutes Communications USB Bluetooth 802 11b 5 2 Supply Specifications Supplies Thermal direct receipt paper tag stock Supply Thickness 2 2 to 6 mils recei...

Page 28: ...ubject to the following two conditions 1 This device may not cause harmful interference 2 This device must accept any interference received including interference that may cause undesired operation 5 3 2 Warranty This printer is warranted by Datamax O Neil to be free of defects in parts and workmanship for a period of one year from date of shipment This warranty does not apply to defects resulting...

Page 29: ...3 5542 tech_support datamax oneil com Datamax O Neil EMEA Valence France Monday Friday 0830 1700 GMT Tel 33 0 4 75 75 63 00 Fax 33 0 4 75 82 98 38 eurotech datamaxcorp com Datamax O Neil Asia Pacific Singapore Monday Friday 0830 1730 Tel 65 6505 2250 Fax 65 6769 8135 tsaspa datamax oneil com COPYRIGHT 2011 DATAMAX O NEIL ...

Page 30: ......

Reviews: