87
6.2 Troubleshooting Print Quality
Tools
Datamax-O’Neil approved media
Datamax-O’Neil approved matching ribbon (for printers with the thermal transfer
option)
3mm hex head wrench
1.5mm hex head wrench
Magnifying lens
Barcode verifier and grading system
Printhead cleaning card
Printhead cleaning pen
Preliminary Instructions
1.
Ensure the latest software has been loaded.
2.
Load the media and ribbon according to the instructions in the Setup section.
Note:
Verify that the ribbon is tightly wound on the supply roll with no wrinkles.
Note:
Verify that the paper is properly exiting the printer.
3.
Specify the appropriate media and ribbon in the menu.
4.
Print a Quality Label from the Test menu.
5.
Examine the print quality.
Note:
Some imperfections can be caused by a contaminated printhead. Clean the printhead and
reprint the label.
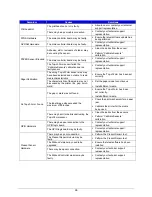
Symptom
Possible Solutions
No Print or Poor Print Quality
Verify the proper media and ribbon are being used.
Verify the printhead connections are fully seated.
Light Print on One Side
Adjust the ribbon cam and ribbon shield to add tension to the light
print side.
Verify the printhead connections are fully seated. Replace the
printhead.
Contact your technical support representative.
Print Quality Defect
Clean the printhead and platen roller with factory-approved cleaning
supplies.
Verify there are no ribbon folds or wrinkles under the printhead.
Replace the printhead if there is a missing dot.
Print Quality gets worse over time
Printhead is at the end of life and should be replaced.
Contact your technical support representative.

