background image

MICROFLASH 4TE PRINTER USER'S GUIDE

7

5. Place the roll of paper in the paper cavity so it is

sitting tightly. Remove any excess paper by grasping

the top corner of the paper and pulling it away.

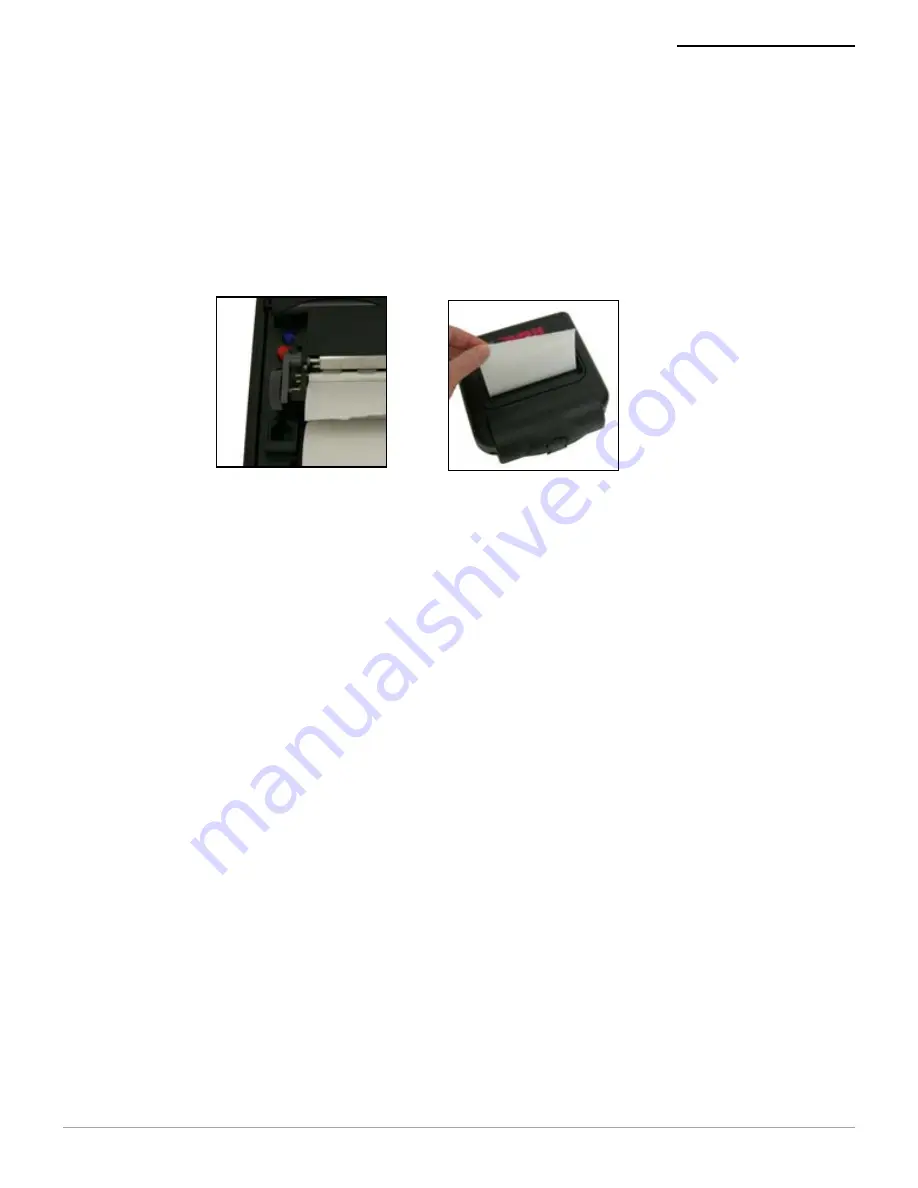
6. Lower the gray, print head release lever (Figure 12).
7. Close and latch the printer's cover (Figure 13).

Figure 12

Figure 13

Summary of Contents for MICROFLASH 4TE

Page 1: ...MICROFLASH 4TE User Guide ...

Page 2: ... Battery Condition 4 Installing Paper 6 Printing a Self Test 8 Configuring the Printer 8 Using Printer Data Cables 8 Using 802 11b Bluetooth 9 802 11b Parameters 9 Bluetooth Parameters 9 Audio Indicators and LEDs 10 Audio Indicators 10 Radio LED 11 Charge LED 12 Power LED 13 CardReader Audio Indicators 13 CardReader LED 13 Using a CardReader 14 General Guidelines 14 Using External Charging 15 Over...

Page 3: ...sh 4Te Printer Open View Power LED Radio LED Charge Battery LED Figure 1 LEDs Figure 2 Roller Paper Cavity Power Port 1 Battery Retaining Clip Media Function Button Charge LED Print Head Release Lever Data Port Figure 3 Radio LED Power LED Battery Battery Well Battery Retaining Clip ...

Page 4: ...MICROFLASH 4TE PRINTER USER S GUIDE 2 microFlash 4Te Printer Side View Power Port 2 Figure 4 ...

Page 5: ...the battery isolator labels Both batteries must be installed for your printer to operate properly Installing and or Replacing Batteries 1 Open the printer s cover Figure 5 2 Lift the battery cover up by pushing the retainer clip inward with your finger Figure 6 3 Lift up the outside end of the battery to remove it 4 Insert or replace the new batteries Verify the battery contacts are facing down an...

Page 6: ...is installed with external charge capabilities you can also charge your printer using Datamax O Neil approved accessories For more information see Using External Charging on page 15 Determining Battery Condition To determine the battery s condition print a self test For more information see Printing a Self Test on page 8 The battery voltage varies between 6 2 and 8 4 volts Caution To obtain full b...

Page 7: ...operating temperature when used with a Datamax O Neil power supply for charging the portable printer is limited to 40 C Please charge the printer in a suitable location that meets this temperature requirement Caution For US Canada Please only use the Datamax O Neil part number 220240 100 power supply with this product ...

Page 8: ...y print head release lever until it is fully open Do not stop at the partial open position Figure 9 3 Wake up the printer by briefly pressing the red self test button Figure 10 4 Feed the end of the paper under the roller The paper automatically feeds under the roller and exits the top of the print head Verify the paper exits the print head straight Figure 11 Figure 8 Figure 9 Figure 10 Figure 11 ...

Page 9: ...of paper in the paper cavity so it is sitting tightly Remove any excess paper by grasping the top corner of the paper and pulling it away 6 Lower the gray print head release lever Figure 12 7 Close and latch the printer s cover Figure 13 Figure 12 Figure 13 ...

Page 10: ... many configurable settings To configure or upgrade firmware download the Windows configuration program Using Printer Data Cables 1 Select the appropriate cable for use with the host and or device you are using 2 Insert the plug into the printer s data port Figure 14 3 Lead the cable through the notch on the outside of the printer s cover 4 With the cable exiting the front of the printer close and...

Page 11: ... proper system operation set the following parameters on your printer and host computer 802 11b Parameters ESS ID IP Address if not DHCP DHCP Sub Net Mask WEP Encryption Port Network Type Bluetooth Parameters Device Name Authentication Bondable Discoverable Connectable Encryption For information on setting parameters see Configuring the Printer on page 8 Contact your network administrator to verif...

Page 12: ...paper 3 Low battery Charge battery 1 short RF power is on when blue RF power button is pressed and power was turned off None 2 short RF power is off when blue RF power button is pressed and power was turned on None 1 long Boot code is starting or restarting when downloading new firmware Redownload firmware 8 short CRC error in firmware Redownload firmware ...

Page 13: ...is on only 10 of the time the printer has a very weak signal When the signal quality option is turned on the blue radio LED indicates signal strength only When the printer is asleep the radio strength is not indicated Radio LED Blue flash slow RF power is on and printer is asleep Blue flash fast RF power is on and printer is awake Blue flash to solid red The printer is out of range of the access p...

Page 14: ... in indicates the battery charge is low Charge the battery If A C power is plugged in the LED flashes and charging is in progress None Wait for the charge LED to turn green Green solid The battery is near or at full capacity If A C power is not plugged in the battery is well charged None If A C power is plugged in the LED is solid and charging is complete None Red to orange flash fast Battery volt...

Page 15: ...tatus LED flashes orange red or green depending on the battery status LED color that is initially displayed to indicate the AC adapter is plugged in None Power LED Description Green Printer is awake Off Printer is asleep Beep s Description Action 1 long Bad read None 2 short Good read None LED Description Green flash Good read Red flash Bad read LED Description Red flash Smart CardReader power on ...

Page 16: ...ld contacts facing away from the printer and leave the card in CardReader slot If you are using a Magnetic CardReader insert a card with the stripe facing toward the printer then slowly remove the card from the CardReader slot For information on CardReader LED indicators and audio indicators see Audio Indicators and LEDs on page 10 Note The following information applies to printers installed with ...

Page 17: ...MICROFLASH 4TE PRINTER USER S GUIDE 15 Using External Charging Note The following information applies to printers installed with external charge capabilities Figure 16 2 Charging contact points ...

Page 18: ...arge capable printer is mounted to one of these accessories the printer s batteries are automatically charged For more information see the instruction sheet s included with the accessories Warning Use of any product not approved by Datamax O Neil for use with their printers could cause damage to the batteries and or printer and will void the warranty Failure to observe the instructions and or warn...

Page 19: ...ns However there is no guarantee that interference will not occur in a particular installation If this equipment does cause harmful interference to radio or television reception which can be determined by turning the equipment off and on the user is encouraged to try to correct the interference by one or more of the following measures Reorient or relocate the receiving antenna Increase the separat...

Page 20: ... fitness for a particular purpose Datamax O Neil shall not be liable for any errors or for incidental or consequential damages in connection with the furnishing performance or use of this manual or the examples herein This guide is copyrighted All rights are reserved This guide may not in whole or in part be reproduced translated stored in a retrieval system or transmitted in any form or by any me...

Page 21: ... print performance Quality supplies are also the key to extending the life of the printer Datamax O Neil strongly recommends using Datamax O Neil Certified Supplies only Maintenance Supplies We recommend that you follow a regular maintenance schedule using our cleaning card or cleaning kit when using linerless labels Datamax O Neil cleaning cards are designed to effectively remove dirt and other c...

Reviews: