XD20 Installation and Operating Guide
Version 1.1
Document # 9301H264001.1
xiv
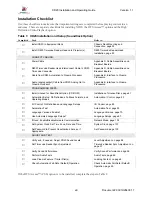
Table 2: CSS Installation and Setup
Completed Task
Install License for CSS Option (CD-ROM)
Installation of Licenses, page 61
Install Cable from EMA Control Connector to EMA
Appendix J. Installing the CSS Option.
Install Cable from Subtitle Projector to XD20 Media Player
Appendix J, Installing the CSS Option.
Set Up the Subtitle Projector
Cinema Subtitling System (CSS) Setup,
page 76
Set CSS language
CSS Language, page 34
Set I/O control, if desired
I/O Control, page 85
Set up audio levels
Level Adjustment, page 68
If the Video option is to be installed, complete the steps in Table 3.
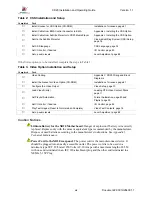
Table 3: Video Option Installation and Setup
Completed Task
Video Cabling
Appendix C, XD20 Wiring and Block
Diagrams.
Install the license for Video Option (CD-ROM)
Installation of Licenses, page 61
Configure the Video Output
Video Setup, page 70
Load Video Disc(s)
Loading DTS Video Content Discs,
page 11
Set Playlist Automation
Format Automation, page 80 and
Playlist, page 90
Set I/O control, if desired
I/O Control, page 85
Play Test Images (Reset to Normal when Complete)
Video Test Contents, page 76
Set up audio levels
Level Adjustment, page 68
Caution Notices
Lithium Battery for the XD20
Motherboard
: Danger of explosion if battery is incorrectly
replaced. Replace only with the same or equivalent type recommended by the manufacturer.
Dispose of used batteries according to the manufacturer's instructions. See
Appendix I,
Technical Maintenance
.
Power Cord to the XD20
rear panel
: The power cord is the main disconnect device. It
should be plugged into an easily accessible outlet. The power cord is to be used in a
minimum type SVT 18/3 rated 250 Volts AC, 10 Amps with a maximum length of 4.5 M,
with one end terminated in an IEC 320 attachment plug and the other end terminated in a
NEMA 5-15P Plug.


