XD20 Installation and Operating Guide
Version 1.1
Appendix I. Technical Maintenance
I-4
Document #: 9301H264001.1
Inside the XD20
Refer to
Error! Reference source not found.
for location of components within the XD20 chassis.
•
The Main board (H222) contains all timecode and audio processing circuitry.
•
The front panel contains the front panel power button and USB connector, display screen, LEDs,
and four soft keys, in addition to the navigation buttons.
The Timecode Offset is set in the software according to the timecode reader location. This setting is
different depending on type of projector or location of the timecode reader. See the XD20 Installation
and Operation Guide for instructions to determine the OFFSET setting.
The status LEDs on the front panel include:
Table 1. Front Panel LED Indicators
LED
Color
Indication
VIDEO
Green
Playing video playlist or test material.
AUDIO
Blue
Playing audio playlist or test material.
TIMECODE
Green
Reading valid timecode from the reader head.
NARRATION
Green
Playing narration track to timecode.
CAPTIONS
Green
Playing CSS subtitles or captions.
SERIAL
Green
Serial text for data wall
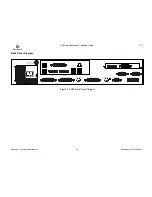
A circuit breaker protects the power going to the D600 Timecode Reader Head (through the 9-pin
connector) against short circuits. The breaker is self-resetting so replacement is unnecessary.
The 9-pin connector (accessed on the XD20 rear panel) is used to connect the timecode cable to the
Timecode Reader on the projector.
Power Supply
This unit supplies power to the XD20. This supply is switchable between 110 VAC and 220 VAC and
adjusts automatically.
The cooling fan in the power supply should be rotating when the power switch on the front panel is
switched on.
To prevent dirt from being pulled into the interior, do not block the ventilation holes at the side of
the XD20 chassis.

