UM-0085-B09
DT80 Range User Manual
Page 128
RG
Menu
The
menu
bar across the top works in the same way as the menu bar in any other window-based application. Note that
many of the menus have cascading sub-menus, as shown in the screenshot.
Figure 24: Add measurement menu
Six menus are provided:
•
The
File
menu is used to clear the current configuration or load an existing configuration, which may be either
the logger's current configuration or a locally saved file. This menu also allows you to save a completed
configuration to the logger, which will also "activate" the configuration, i.e. it will start running. See
.
•
The
Edit
menu simply duplicates the functions of the tree view buttons.
•
The
View
menu allows you to view the logger program generated from your current settings.
•
The
Logger
menu can be used to perform a few basic logger management tasks, including setting the time,
reloading the current configuration, halting and resuming schedules, and clearing all logged data.
•
The
Add
menu is used to define new tree entries – schedules and channels.
•
Finally, the
Help
menu identifies the version of the configuration builder. It also provides links to various useful
files on the
DT80
, including the user manual and firmware release notes, as well as links to online resources
such as training documents and videos.
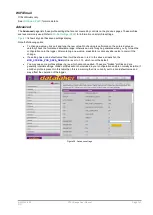
Banner Area
The banner area along the top of the screen contains:
•
a
Logger Home
button, which returns you to the
Logger Home
page
•
the
dataTaker
logo on the right hand side will jump to the dataTaker website,
Note:
Navigating away from the configuration builder using the
Logger Home
button, or the dataTaker web link, or pressing the
browser Refresh button will all cause any unsaved configuration entries to be lost. Be sure to save your work (using
File / Save to
disc...
) before leaving the configuration builder.
It is often convenient to have the configuration builder running in one browser tab, and the
dEX
web interface running in
another. You can then easily switch between them without having to return to the Logger Home page.
Defining Schedules
When the configuration builder starts up, two pre-defined schedules are shown: the immediate schedule (
On logger
activation
) and one user schedule (A).
If you click on schedule A's entry in the tree view its details will be displayed in the properties pane. The
On logger
activation
(immediate) schedule does not have a trigger or any storage options, so if you select it the properties pane
will be blank.


