background image

86 


For using color matching fluorescent lights as the main lighting source to 
do the indoor video shooting.   


Auto

The “Auto” White Balance mode is a way that the camcorder will 

adjust the White Balance value automatically when the lighting source 
or the lighting condition is changed. In most of the situations, it is 
recommended to use this mode for achieving good color performance 
for the shot image. Please refer to the following section for the 
scenarios which are suitable for using the “Auto” White Balance mode.  


For mixed lighting source: If you have sunlight and light to be the 
lighting source at the same time, it is best to use the “Outdoor” White 
Balance mode. 


For the scenario which the color temperature of the lighting source is 
changing rapidly: For example, if you want to shoot a video for an 
evening party, the lighting of the stage is changing rapidly and it is 
recommended to use the “Indoor” White Balance mode.  


Beginners are especially reminded to note that lighting conditions often 
change after changing shooting occasions, so you should pay attention 
to adjusting the white balance mode in time. For example, when 
shooting video for a wedding, you often go from indoors to outdoors, 
and then back indoors, you must find the appropriate white balance 
mode for shooting. In the case of frequently changing venues, it is best 
to use the “Auto” White Balance mode, so as not to forget to adjust the 
White Balance mode when you are busy. 


Color Temp.


Lighting Source 

Color Temperature Value 

Sunlight(Sunrise/Sunset) 

3200 °K 

Tungsten/Halogen Lights 

2800-3400 °K 

Sunlight (noon) 

5500 °K 

HID Lights 

5500-7500 °K 

Sunlight(cloudy day) 

6500-7500 °K 

Summary of Contents for BC-15P

Page 1: ...BC 15P ...

Page 2: ...5 1 OSD MENU 20 5 2 BUTTONS AND RULES FOR OPERATING THE OSD MENU 31 5 2 1 Buttons for Operating the OSD menu 31 5 2 2 Rules for Operating the OSD menu 33 6 SELECTING AND SETTING WAYS FOR OPTIONS IN THE OSD MENU 35 6 1 THE FIRST PAGE OF THE OSD MENU 35 6 2 THE SECOND PAGE OF THE OSD MENU 68 7 APPLICATION OF THE WHITE BALANCE MODES AND SPECIAL FUNCTION INTRODUCTION 85 7 1 INTRODUCTION OF THE WHITE B...

Page 3: ... may not be correct or may be incomplete This manual may contain typing errors omissions or incorrect information Datavideo Technologies always recommend that you double check the information in this document for accuracy before making any purchase decision or using the product Datavideo Technologies is not responsible for any omissions or errors or for any subsequent loss or damage caused by usin...

Page 4: ...ious damage 6 Slots and openings on the cabinet top back and bottom are provided for ventilation To ensure safe and reliable operation of this unit and to protect it from overheating do not block or cover these openings Do not place this unit on a bed sofa rug or similar surface as the ventilation openings on the bottom of the cabinet will be blocked This unit should never be placed near or over a...

Page 5: ...ill void your warranty Refer all service issues to qualified service personnel 13 Unplug this product from the wall outlet and refer to qualified service personnel under the following conditions a When the power cord is damaged or frayed b When liquid has spilled into the unit c When the product has been exposed to rain or water d When the product does not operate normally under normal operating c...

Page 6: ...puter systems are not covered under warranty All mail or transportation costs including insurance are at the expense of the owner All other claims of any nature are not covered All accessories including headphones cables and batteries are not covered under warranty Warranty only valid in the country or region of purchase Your statutory rights are not affected Three Year Warranty All Datavideo prod...

Page 7: ...n point for the recycling of waste electrical and electronic equipment The separate collection and recycling of your waste equipment at the time of disposal will help to conserve natural resources and ensure that it is recycled in a manner that protects human health and the environment For more information about where you can drop off your waste equipment for recycling please contact your local ci...

Page 8: ... and power PoE it makes setting up a new angle so much easier And the three 1 4 screw holes bring the flexibility of mounting it anywhere anyway BC 15P is one of the best choice for capturing eSport players with the wide angle lens that comes with the package While changing back to the standard lens it will fulfill the other wide range applications Features Supports SRT output Supports Power over ...

Page 9: ...9 2 System Diagram ...

Page 10: ... the camera lens please face to the back panel of the BC 15P at first Twist the lens clockwise Focus Near Twist the lens counter clockwise Focus Far Note The lens you have should be the standard lens mounted on There are two different camera lenses for the BC 15P including Standard Lens and Wide angle Lens Please refer to the following table for details ...

Page 11: ...ecially with closer object Note When changing the camera lens of the BC 15P please remember to change the selection of the camera lens from OSD Menu Camera Setting Lens Select 2 Tally LED This tally LED will light up when it receives a tally signal from a controller which supports the DVIP control protocol When powering on the tally LED of the BC 15P will light up in the sequence of orange green a...

Page 12: ...he OSD menu of the BC 15P is opened this button is used as an Up Arrow key for you to move up the arrow icon on the OSD menu When the Button Shortcut option in the OSD menu is selected as On and the OSD menu is not open you can press this button directly for zooming in 3 Down Arrow Zoom Out button When the OSD menu of the BC 15P is opened this button is used as a Down Arrow key for you to move dow...

Page 13: ...elected as On and the OSD menu is not open you can press this button directly for increasing the GAIN value 5 Left Arrow Gain button When the OSD menu of the BC 15P is opened this button is used as a Left Arrow key for you to move to the left side or move to the previous page of the OSD menu When the Button Shortcut option in the OSD menu is selected as On and the OSD menu is not open you can pres...

Page 14: ... streaming to streaming platforms such as Facebook or Youtube 2 DC IN 12V DC in socket connects the supplied 12V PSU The connection can be secured by screwing the outer fastening ring of the DC In plug to the Socket 3 HDMI Please use an HDMI cable to connect from this HDMI interface to the HDMI interface of an external monitor or a switcher and then the real time screen which is shot by the BC 15P...

Page 15: ...net interface allows you to transfer PoE Power over Ethernet LAN and DVIP control signals with an RJ 45 Ethernet cable only This interface allows for PoE video streaming and DVIP remote controlling for the BC 15P camera at the same time ...

Page 16: ...Screw Hole This 1 4 UNC screw hole allows you to install an external accessory such as a tripod Top of the Camera 1 1 4 20 UNC Screw Hole This 1 4 UNC Screw hole allows you to install an external accessory such as a tripod Bottom of the Camera ...

Page 17: ...17 1 1 4 20 UNC Screw Hole This 1 4 UNC screw hole allows you to install an external accessory such as a tripod ...

Page 18: ... 4 Please use three Ethernet cables to connect from the LAN POE DVIP interfaces which are located on the right panels of the three BC 15P cameras to three LAN interfaces which are located on the rear panel of the first router 5 Please use an Ethernet cable to connect from the LAN interface which is located on the rear panel of the first router to the DVIP interface which is located on the rear pan...

Page 19: ...H 264 USB Recorder to do the backup video recording for the PROGRAM screen output 12 Please use an HDMI cable to connect from the CG PREVIEW HDMI interface which is located on the rear panel of the ShowCast 100 4K ShowCast Studio to the VIDEO INPUT HDMI 1 interface which is located on the rear panel of the Datavideo TLM 170L 17 3 3G SDI TFT LCD Monitor for previewing the CG text or pictures which ...

Page 20: ...low summarizes the main option items and their sub options the first page Main Options Zoom Gain Limit Shutter White Balance Exposure Image Setting Camera Setting Sub Options Zoom Gain Limit Shutter Auto Global Contrast Lens Select Escape Escape Escape Indoor Center Brightness AGC Outdoor eSport Saturation Gamma Mode One Push Lock Hue 3DNR Color Temp Manual Sharpness WDR OSD Menu Gain Limit Shutte...

Page 21: ...21 R B Gain Escape Escape Mirror Lock Rotation Escape Anti Flicker Escape Video Output Escape Sub Options Video Output Escape ...

Page 22: ...page Main Options Streaming Network Info Audio System Escape Sub Options TS over TCP UDP Camera IP Audio Input Camera Name RTSP DHCP Soundtrack Language RTMP RTMPS Reset IP Audio Standard Preset HLS Escape Escape Tally Mode SRT Button Shortcut Off Firmware Escape Factory Default Escape ...

Page 23: ...Sub Menu Options Zoom 1 0X 1 1X 1 2X 1 3X 1 4X 1 5X 1 6X 1 7X 1 8X 1 9X 2 0X Gain Limit 1 0dB 2 0dB 3 0dB 4 0dB 5 0dB 6 0dB 7 0dB 8 0dB 9 0dB 10 0dB 11 0dB 12 0dB 13 0dB 14 0dB 15 0dB 16 0dB 17 0dB 18 0dB 19 0dB 20 0dB 21 0dB 22 0dB 23 0dB 24 0dB 25 0dB 26 0dB 27 0dB Shutter Shutter 1 60 1 90 1 120 1 150 ...

Page 24: ...lance Auto Indoor Outdoor One Push Color Temp Color Temp 2500K 2600K 2700K 2800K 2900K 3000K 3100K 3200K 3300K 3400K 3500K 3600K 3700K 3800K 3800K 3900K 4000K 4100K 4200K 4300K 4400K 4500K 4600K 4700K 4800K 4900K 5000K 5100K 5200K 5300K 5400K 5500K 5600K 5700K 5800K ...

Page 25: ...K 6400K 6500K 6600K 6700K 6800K 6900K 7000K 7100K 7200K 7300K 7400K 7500K 7600K 7700K 7800K 7900K 8000K 8100K 8200K 8300K 8400K 8500K 8600K R 8700K 8800K 8900K 9000K R B Gain RGain 0 8 16 24 32 40 48 56 64 72 80 88 96 104 112 120 128 ...

Page 26: ...26 136 144 152 160 168 176 184 192 200 208 216 224 232 240 248 256 BGain 0 8 16 24 32 40 48 56 64 72 80 88 96 104 112 120 128 136 144 152 160 168 176 184 192 200 208 216 224 232 240 248 256 Escape Lock ...

Page 27: ...al Center eSport Lock Manual Escape Image Setting Contrast Contrast 0 1 2 3 4 5 6 7 8 9 10 Escape Brightness Brightness 0 1 2 3 4 5 6 7 8 9 10 Escape Saturation Saturation 0 1 2 3 4 5 6 7 8 9 10 Escape Hue Hue 0 1 2 3 4 5 6 7 ...

Page 28: ... Setting Lens Select Standard Lens eSport Lens Escape AGC ON Off Escape Gamma Mode Standard Mode1 Mode2 Mode3 Escape 3D NR ON Off Escape WDR ON Off Escape Mirror Off H V H V Escape Rotation 0 90 270 Escape Anti Flicker Off 50HZ 60HZ Escape Escape Video Output Video Output 2160 60p ...

Page 29: ...80 30p 1080 29 97p 1080 25p Escape Escape The second page Main Manu Sub Menu Options Streaming TS over TCP UDP RTSP RTMP RTMPS HLS SRT Off Escape Network Info Camera IP DHCP Reset IP No Yes Escape Audio Audio Input Line IN Mic IN Escape Soundtrack Stereo Mono Escape Audio Standard SMPTE ...

Page 30: ...nal Chinese Simplified Chinese Escape Preset Preset Default Load User1 Load User2 Save User1 Save User2 Escape Tally Mode Red Green Red Green Off Escape Button Shortcut On Off Escape Firmware Version Update Info Get Escape Update No Yes Escape Factory Default No Yes Escape Escape ...

Page 31: ... 15P is connected to an external monitor you can open BC 15P s OSD menu by pressing the MENU button 2 Up Arrow button When the OSD menu is opened please press this key to move the arrow icon up 3 Down Arrow button When the OSD menu is opened please press this button to move the arrow icon down 4 Right Arrow button When the OSD menu is opened you can press this button to go to the next page When th...

Page 32: ... OSD menu is opened you can press this button to go to the previous page When the sub menu is opened and you want to adjust the value of each option you can press this key to reduce the value the adjusted value will be shown in blue ...

Page 33: ...ge will be saved and then it will go back to the previous page When the OSD menu is shown when you press the Right Arrow button which is located on the rear panel of the BC 15P to go to the next page the second page of the OSD menu the arrow icon will always be located at the first option Streaming On the other hand if you press the Left Arrow button to go to the previous page the arrow icon will ...

Page 34: ...e is changed for non manual related options the setting values for the Manual related settings for the last time will be removed If the MENU button which is located on the rear panel of the BC 15P is pressed when the R B Gain page is shown the R Gain and B Gain values will be saved simultaneously When streaming is in progress the only way to stop the streaming is to go to the second page of the OS...

Page 35: ...Shutter White Balance Exposure Image Setting Camera Setting Video Output and Escape which are shown on the main screen of the OSD menu Moreover there are several operation reminders for the OSD menu including Move Enter and Next Page which are shown at the bottom of the OSD menu Zoom This option allows you to adjust the Zoom ratio of the BC 15P camera There are several Zoom ratios for you to selec...

Page 36: ...ress the MENU button which is located on the rear panel of the BC 15P camera to confirm your settings Moreover there are several operation reminders for the OSD menu including Move Set and Change Value which are shown at the bottom of the OSD menu 4 If you don t want to change the existing settings you can use the Up Arrow button or the Down Arrow button to select the Escape option After that plea...

Page 37: ...B 2 0dB 3 0dB 4 0dB 5 0dB 6 0dB 7 0dB 8 0dB 9 0dB 10 0dB 11 0dB 12 0dB 13 0dB 14 0dB 15 0dB 16 0dB 17 0dB 18 0dB 19 0dB 20 0dB 21 0dB 22 0dB 23 0dB 24 0dB 25 0dB 26 0dB and 27 0dB Moreover you can select the Escape option to go back to the main menu of the OSD Menu 1 On the main menu of the OSD Menu please use the Up Arrow button or the Down Arrow button which is located on the rear panel of the B...

Page 38: ...n Limit value by the Left Arrow button or the Right Arrow button which is located on the rear panel of the BC 15P camera 3 After the adjustment is done please press the MENU button which is located on the rear panel of the BC 15P camera to confirm your settings Moreover there are several operation reminders for the OSD menu including Move Set and Change Value which are shown at the bottom of the O...

Page 39: ... select 1 At first please make sure that the Exposure option is set in Manual mode 2 Please use the Up Arrow button or the Down Arrow button to select the Shutter option 3 After that you can press the MENU button which is located on the rear panel of the BC 15P camera to enter the sub menu which is shown in the following diagram After that you can adjust your desired Shutter value by the Left Arro...

Page 40: ...st the White Balance mode of the BC 15P camera You can use several built in White Balance modes including Auto Indoor Outdoor One Push Color Temp R B Gain and Lock Moreover you can select the Escape option to go back to the main menu of the OSD Menu ...

Page 41: ...own in the following diagram After that you can adjust your desired White Balance mode Auto Indoor Outdoor and One push by the Up Arrow button or the Down Arrow button which is located on the rear panel of the BC 15P camera The application scenarios for each White Balance mode are listed below Auto This is the Auto White Balance If this option is selected the BC 15P will select the most suitable W...

Page 42: ...ettings Moreover there are two operation reminders for the OSD menu including Move and Set which are shown at the bottom of the OSD menu How to adjust the Color Temperature manually 1 Please select the White Balance option from the main menu of the OSD Menu 2 Please press the MENU button which is located on the rear panel of the BC 15P camera to enter the sub menu of the White Balance 3 Please use...

Page 43: ... desired color temperature value by the Color Temp option 6 Please press the MENU button which is located on the rear panel of the BC 15P to confirm and save the selected value and then go back to the main menu of the OSD Menu Moreover you can select the Escape option to exit and to go back to the previous layer of the OSD menu ...

Page 44: ... Balance option from the main menu of the OSD Menu 2 Please press the MENU button which is located on the rear panel of the BC 15P to enter the sub menu of the White Balance option 3 Please use the Up Arrow button or the Down Arrow button which is located on the rear panel of the BC 15P to select the R B Gain option 4 Please press the MENU button to enter the R B Gain sub menu 5 Please use the Up ...

Page 45: ...n or BGain value 7 Please press the MENU button which is located on the rear panel of the BC 15P camera to confirm and save the selected value and to go back to the main menu of the OSD menu Moreover you can select the Escape option to exit and to go back to the previous layer of the OSD menu ...

Page 46: ...nu of the White Balance option 3 Please use the Up Arrow button or the Down Arrow button to select the Auto option 4 Please press the MENU button which is located on the rear panel of the BC 15P camera to confirm and save the selected value and to go back to the main menu of the OSD menu 5 Please press the MENU button which is located on the rear panel of the BC 15P camera to enter the sub menu of...

Page 47: ...P camera to enter the sub menu of the White Balance option and then you can see the original Auto option will be changed to the Auto Lock option 9 If you want to release the White Balance Auto Lock please use the Up Arrow button or the Down Arrow button to select the Unlock option After that please press the MENU button which is located on the rear panel of the BC 15P camera to confirm you selecti...

Page 48: ...cated on the rear panel of the BC 15P camera to go back to the main menu of the OSD menu Exposure This option allows you to select your desired Exposure mode Moreover you can also select the Manual option to adjust the Exposure related parameters manually Global This option can average the brightness of the whole screen Center If this option is selected it meters the brightness for the center only...

Page 49: ...ption can help you to go back to the main menu of the OSD menu 1 Please select the Exposure option from the main menu of the OSD menu 2 Please press the MENU button which is located on the rear panel of the BC 15P camera to enter the sub menu of the Exposure option 3 Please use the Up Arrow button or the Down Arrow button to select your desired Exposure mode 4 Please press the MENU button which is...

Page 50: ... menu 2 Please press the MENU button which is located on the rear panel of the BC 15P camera to enter the sub menu of the Image Setting 3 Please use the Up Arrow button or the Down Arrow button to select your desired image parameters such as Contrast Brightness Saturation Hue or Sharpness 4 Please press the MENU button which is located on the rear panel of the BC 15P to enter the sub menu of that ...

Page 51: ...e the selected value and to go back to the Image Setting page After that please select the Escape option and then press the MENU button which is located on the rear panel of the BC 15P to go back to the main menu of the OSD menu Escape This option allows you to go back to the main menu of the OSD menu ...

Page 52: ... camera to enter the sub menu of that option 3 Please use the Up Arrow button or the Down Arrow button to select the Lens Select option 4 Please press the MENU button which is located on the rear panel of the BC 15P camera to enter the sub menu of that option 5 Please use the Up Arrow button or the Down Arrow button to select the Standard Lens or the eSport Lens option 6 Please press the MENU butt...

Page 53: ...53 ...

Page 54: ...SD menu to enter the sub menu of that option 3 Please use the Up Arrow button or the Down Arrow button which is located on the rear panel of the BC 15P to select the AGC option 4 Please press the MENU button which is located on the rear panel of the BC 15P to enter the sub menu of that option 5 Please use the Up Arrow button or the Down Arrow button to select the On or Off option 6 Please press th...

Page 55: ...re are various modes including Standard Mode1 Mode2 and Mode3 for you to select 1 Please select the Camera Setting from the main menu of the OSD menu 2 Please press the MENU button which is located on the rear panel of the BC 15P camera to enter the sub menu of that option ...

Page 56: ...b menu of that option 5 Please use the Up Arrow button or the Down Arrow button which is located on the rear panel of the BC 15P camera to select the Standard Mode1 Mode2 or Mode3 6 Please press the MENU button which is located on the rear panel of the BC 15P camera to confirm and save the selected value and to go back to the Camera Setting page If you don t want to change the setting you can sele...

Page 57: ... Please select Camera Setting option from the main menu of the OSD menu 2 Please press the MENU button which is located on the rear panel of the BC 15P camera to enter the sub menu of that option 3 Please use the Up Arrow button or the Down Arrow button which is located on the rear panel of the BC 15P camera to select the 3DNR option ...

Page 58: ... Arrow button which is located on the rear panel of the BC 15P camera to select the On or Off option 6 Please press the MENU button which is located on the rear panel of the BC 15P camera to confirm and save the selected value and to go back to the Camera Setting page If you don t want to change the setting you can select the Escape option to go back to the previous page ...

Page 59: ...el of the BC 15P camera to enter the sub menu of that option 3 Please use the Up Arrow button or the Down Arrow button which is located on the rear panel of the BC 15P camera to select the WDR option 4 Please press the MENU button which is located on the rear panel of the BC 15P camera to enter the sub menu of that option 5 Please use the Up Arrow button or the Down Arrow button which is located o...

Page 60: ...ch is located on the rear panel of the BC 15P camera to confirm and save the selected value and to go back to the Camera Setting page If you don t want to change the setting you can select the Escape option to go back to the previous page ...

Page 61: ...the rear panel of the BC 15P camera to select the Mirror option 4 Please press the MENU button which is located on the rear panel of the BC 15P camera to enter the sub menu of that option 5 Please use the Up Arrow button or the Down Arrow button which is located on the rear panel of the BC 15P camera to select the Off H V or H V option 6 Please press the MENU button which is located on the rear pa...

Page 62: ...lect 1 Please select Camera Setting option from the main menu of the OSD menu 2 Please press the MENU button which is located on the rear panel of the BC 15P camera to enter the sub menu of that option 3 Please use the Up Arrow button or the Down Arrow button which is located on the rear panel of the BC 15P camera to select the Mirror option ...

Page 63: ...row button which is located on the rear panel of the BC 15P camera to select the Off H V or H V option 6 Please press the MENU button which is located on the rear panel of the BC 15P camera to confirm and save the selected value and to go back to the Camera Setting page If you don t want to change the setting you can select the Escape option to go back to the previous page ...

Page 64: ...l of the BC 15P camera to enter the sub menu of that option 3 Please use the Up Arrow button or the Down Arrow button which is located on the rear panel of the BC 15P camera to select the Anti Flicker option 4 Please press the MENU button which is located on the rear panel of the BC 15P camera to enter the sub menu of that option 5 Please use the Up Arrow button or the Down Arrow button which is l...

Page 65: ...ch is located on the rear panel of the BC 15P camera to confirm and save the selected value and to go back to the Camera Setting page If you don t want to change the setting you can select the Escape option to go back to the previous page ...

Page 66: ... several operation reminders for the OSD menu including Move Enter and Next Page which are shown at the bottom of the OSD menu 2 Please press the MENU button which is located on the rear panel of the BC 15P camera to enter the sub menu of that option 3 And then you can use the Left Arrow button or the Right Arrow button which is located on the rear panel of the BC 15P camera to adjust your desired...

Page 67: ...the Up Arrow button or the Down Arrow button to select the Escape option and then please press the MENU button which is located on the rear panel of the BC 15P camera to exit the first page of the main menu for the OSD menu ...

Page 68: ...aming This option is currently Not Available Network Info This option is currently Not Available Audio This option allows you to set the options including Audio Input Soundtrack and Audio Standard Audio Input This option allows you to select the audio input ways including Mic In and Line In 1 Please press the MENU button which is located on the rear panel of the BC 15P camera to open the main menu...

Page 69: ...ch is located on the rear panel of the BC 15P camera to select the Line In or the Mic In option 8 When your desired option is selected please press the MENU button which is located on the rear panel of the BC 15P camera to confirm and save the selected audio input way and to go back to the previous layer of the OSD menu If you don t want to change the setting you can select the Escape option and t...

Page 70: ...press the MENU button which is located on the rear panel of the BC 15 camera to open the main menu of the OSD menu 2 Please press the Right Arrow button which is located on the rear panel of the BC 15P camera when the first page of the OSD menu is shown and then you can jump to the second page of the OSD menu ...

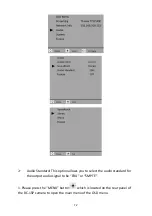
Page 71: ...e rear panel of the BC 15P to enter the sub menu of that option 7 Please use the Up Arrow button or the Down Arrow button which is located on the rear panel of the BC 15P camera to select the Stereo or the Mono option 8 When your desired option is selected please press the MENU button which is located on the rear panel of the BC 15P camera to confirm and save the selected audio input way and then ...

Page 72: ...is option allows you to select the audio standard for the output audio signal to be EBU or SMPTE 1 Please press the MENU button which is located on the rear panel of the BC 15P camera to open the main menu of the OSD menu ...

Page 73: ...ion 5 Please use the Up Arrow button or the Down Arrow button which is located on the rear panel of the BC 15P camera to select the Audio Standard option 6 Please press the MENU button which is located on the rear panel of the BC 15P camera to enter the sub menu of that option 7 Please use the Up Arrow button or the Down Arrow button which is located on the rear panel of the BC 15P camera to selec...

Page 74: ... located on the rear panel of the BC 15P camera to go back to the main menu of the OSD menu System This option allows you to set several parameters including Camera Name Language Preset Tally Mode Button Shortcut Firmware Factory Default and Escape ...

Page 75: ... which is located on the rear panel of the BC 15P camera to open the main menu of the OSD menu 3 Please press the Right Arrow button which is located on the rear panel of the BC 15P when the first page of the OSD menu is shown and then you can jump to the second page of the OSD menu 4 Please use the Up Arrow button or the Down Arrow button which is located on the rear panel of the BC 15P camera to...

Page 76: ...76 9 Please press the MENU button which is located on the rear panel of the BC 15P camera for saving the preset for the User1 ...

Page 77: ...amera to select the System option 5 Please press the MENU button which is located on the rear panel of the BC 15P camera to enter the sub menu of that option 6 Please use the Up Arrow button or the Down Arrow button which is located on the rear panel of the BC 15P camera to select the Preset option 7 Please press the MENU button which is located on the rear panel of the BC 15P camera to enter the ...

Page 78: ...n or the Down Arrow button to select the Yes option After that please press the MENU button which is located on the rear panel of the BC 15P and then the preset of User1 will be loaded and the BC 15P camera will be rebooted automatically ...

Page 79: ...for you to turn on or turn off the Button Shortcut function If this option is set as On you can use the Up Down Arrows Left Right Arrows buttons which are located on the rear panel of the BC 15P camera for Zooming In T Zooming Out W increasing Gain value GAIN and decreasing Gain value GAIN operations directly ...

Page 80: ...ss the MENU button which is located on the rear panel of the BC 15P camera to enter the sub menu of that option 5 Please use the Up Arrow button or the Down Arrow button which is located on the rear panel of the BC 15P camera to select the Button Shortcut option 6 Please press the MENU button which is located on the rear panel of the BC 15P camera to enter the sub menu of that option 7 Please use ...

Page 81: ...function please use the Up Arrow button or the Down Arrow button which is located on the rear panel of the BC 15P camera to select the Off option and then please press the MENU button which is located on the rear panel of the BC 15P for confirmation ...

Page 82: ...s including Video Output Audio Standard and Language 1 Please press the MENU button which is located on the rear panel of the BC 15P camera to open the main menu of the OSD menu 2 Please press the Right Arrow button which is located on the rear panel of the BC 15P when the first page of the OSD menu is shown and then you can jump to the second page of the OSD menu 3 Please use the Up Arrow button ...

Page 83: ...rear panel of the BC 15P camera to enter the sub menu of that option 7 Please use the Up Arrow button or the Down Arrow button which is located on the rear panel of the BC 15P camera to select the Yes option 8 Please press the MENU button which is located on the rear panel of the BC 15P camera and then the BC 15P will be reset to its factory default value and then the BC 15P camera will reboot aut...

Page 84: ... menu 1 Please use the Up Arrow button or the Down Arrow button which is located on the rear panel of the BC 15P camera to select the Escape option 2 Please press the MENU button which is located on the rear panel of the BC 15P camera to exit to the main menu of the OSD menu ...

Page 85: ...descent lamps as the main lighting source the Indoor White Balance mode should also be used to obtain correct natural colors For the video shooting under sodium or mercury lamps Outdoor For the outdoor video shooting it uses sunlight as the main lighting source So the actual meaning of the Outdoor White Balance mode is to do the video shooting with the lighting source which the color temperature i...

Page 86: ...e lighting source is changing rapidly For example if you want to shoot a video for an evening party the lighting of the stage is changing rapidly and it is recommended to use the Indoor White Balance mode Beginners are especially reminded to note that lighting conditions often change after changing shooting occasions so you should pay attention to adjusting the white balance mode in time For examp...

Page 87: ...ing In this situation it will cause the camera to shake or the subject to blur 2DNR 2DNR is to identify and suppress noise for a single frame The advantage is that it will not cause continuous moving picture blur but the disadvantage is that the details of the picture will be eliminated 3DNR 3DNR can judge and suppress the noise based on comparing the differences between the consecutive frames bef...

Page 88: ...sed laptop or PC Latest firmware firmware update tool Download from https www datavideo com product BC 15P Router x 1 if you want to update the firmware by DHCP mode Procedure Firmware update by connecting the BC 15P and your laptop or PC directly 1 At first please download the latest firmware and firmware update tool for the BC 15P camera from the Datavideo official website www datavideo com prod...

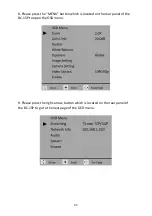
Page 89: ...located on the rear panel of the BC 15P to open the OSD menu 7 Please press the right arrow button which is located on the rear panel of the BC 15P to go to the next page of the OSD menu After that you can see the default IP address from the Network Info option which is 192 168 100 115 In this example the IP address of the BC 15P is 192 168 1 220 ...

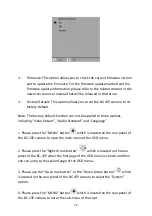
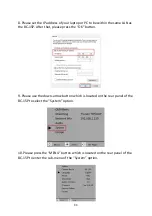
Page 90: ...he BC 15P After that please press the OK button 9 Please use the down arrow button which is located on the rear panel of the BC 15P to select the System option 10 Please press the MENU button which is located on the rear panel of the BC 15P to enter the sub menu of the System option ...

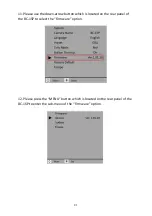
Page 91: ...down arrow button which is located on the rear panel of the BC 15P to select the Firmware option 12 Please press the MENU button which is located on the rear panel of the BC 15P to enter the sub menu of the Firmware option ...

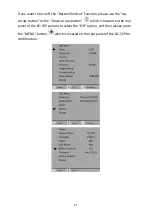
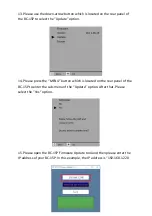
Page 92: ...ion 14 Please press the MENU button which is located on the rear panel of the BC 15P to enter the sub menu of the Update option After that Please select the Yes option 15 Please open the BC 15P Firmware Update tool and then please enter the IP address of your BC 15P In this example the IP address is 192 168 1 220 ...

Page 93: ...BC 15P firmware from the hard disk of your laptop or PC 17 Please press the Send button 18 After the latest firmware is sent you can see the screen which is shown in the following diagram Please wait for a moment After the firmware update is finished the BC 15P will reboot automatically ...

Page 94: ...he DC IN 12V interface which is located on the right panel of the BC 15P camera 4 Please connect an RJ 45 Ethernet cable from the RJ 45 Ethernet interface which is located on the right panel of the BC 15P camera to the first LAN interface of your router 5 Please connect another RJ 45 Ethernet cable from the RJ 45 Ethernet interface of your laptop or PC to the second LAN interface of your router 6 ...

Page 95: ...ess the MENU button which is located on the rear panel of the BC 15P to open the OSD menu 9 Please press the right arrow button which is located on the rear panel of the BC 15P to go to the next page of the OSD menu ...

Page 96: ... the BC 15P to select the System option 11 Please press the MENU button which is located on the rear panel of the BC 15P to enter the sub menu of the System option 12 Please use the down arrow button which is located on the rear panel of the BC 15P to select the Firmware option ...

Page 97: ...enu of the Firmware option 14 Please use the down arrow button which is located on the rear panel of the BC 15P to select the Update option 15 Please press the MENU button which is located on the rear panel of the BC 15P to enter the sub menu of the Update option After that Please select the Yes option ...

Page 98: ...e tool and then please enter the IP address of your BC 15P In this example the IP address is 192 168 1 220 17 Please press the Select BC 15P Firmware button to select the downloaded latest BC 15P firmware from the hard disk of your laptop or PC ...

Page 99: ...ss the Send button 19 After the latest firmware is sent you can see the screen which is shown in the following diagram Please wait for a moment After the firmware update is finished the BC 15P will reboot automatically ...

Page 100: ...ions and follow all suggested solutions If the problem still exists please contact your distributor or the service center No Problems Solutions 1 How to solve the issue that the tally LED stays orange when the BC 15P is turned on Please disconnect the HDMI cable from BC 15P and then reboot the unit After the boot process is finished connect back the HDMI cable ...

Page 101: ...101 10 Dimensions Unit mm ...

Page 102: ...10 1 500 1 600 1 1000 1 1200 1 2000 1 2400 1 4000 1 4800 1 8000 1 9000 sec Zoom Ratio 2x Digital Zoom Gamma Control Standard Mode1 Mode2 Mode3 Iris Control Fixed Iris F1 0 Digital Noise Reduction 2D 3D On Screen Display OSD English Simplified Chinese Traditional Chinese White Balance Auto Indoor Outdoor OnePush Color Temp R B Gain Lock ACG Gain Control On Off Mirror Flip Image Yes Focus Mode Full ...

Page 103: ...mpression Format AAC Audio Bitrate 128Kbps IP Interface 10 100 1000M Streaming Protocols TS over TCP UDP RTSP RTMP S HLS SRT First Stream Supported Resolution 1920x1080 1280x720 1024x576 960x540 640x480 640x360 Second Stream Supported Resolution 1920x1080 1280x720 1024x576 960x540 640x480 640x360 Video Bitrate 1Mbps 7Mbps Single Stream 1Mbps 7Mbps Copy Stream 1Mbps 4Mbps Dual Stream Video Bitrate ...

Page 104: ...W Update Ethernet Camera Control Unit RMC 300 series PTZ View Assist APP Tripod Mount 1 4 20 UNC Color Black Dimension LxWxH 77mm W x 82mm D x 78mm H Weight 200g Operating Temp Range 0 40 C Power DC 7 15V 9W ...

Page 105: ...105 Note ...

Page 106: ...106 Note ...

Page 107: ...107 Note ...

Page 108: ...www datavideo com product BC 15P Jun 10 2022 Ver E1 Datavideo Technologies Co Ltd All rights reserved 2020 ...

Reviews: