9
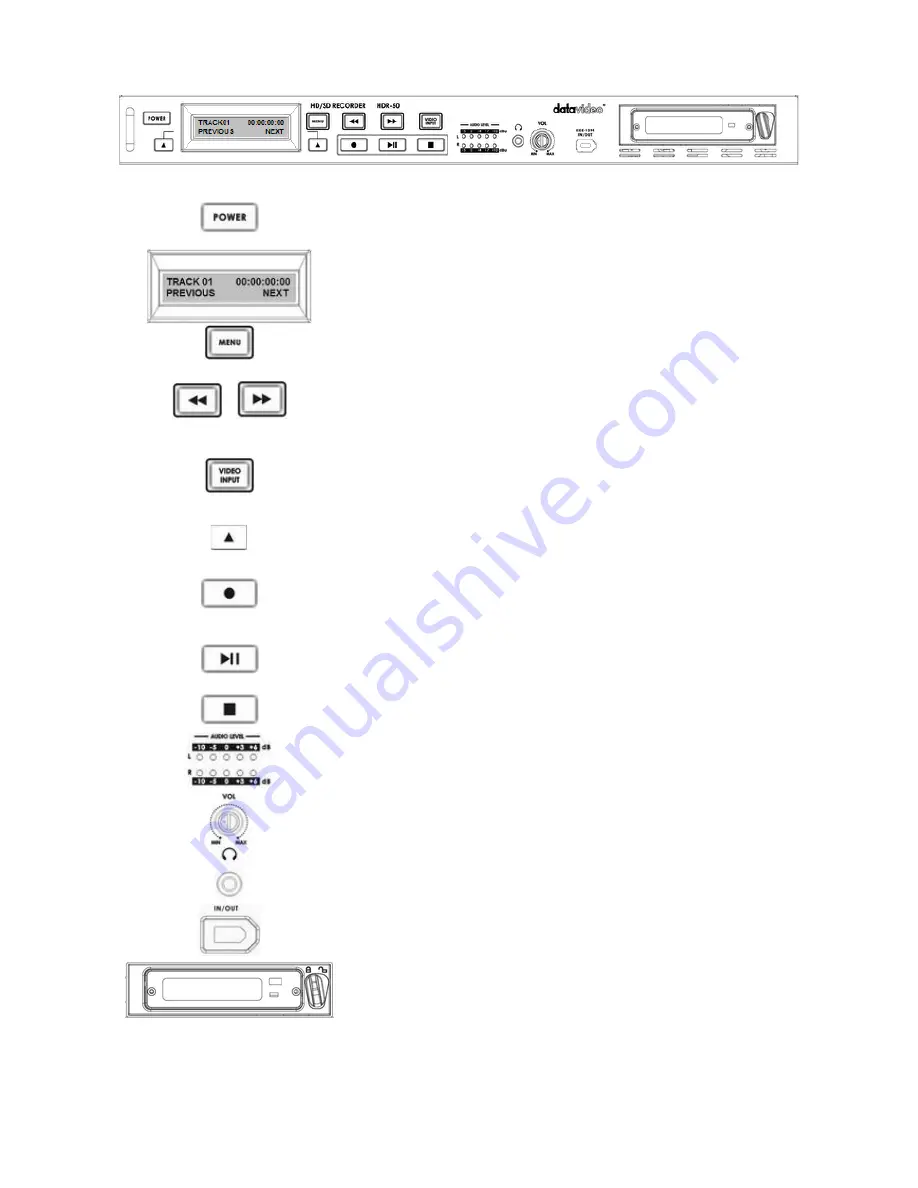
HDR-50 Front Panel
Power On / Off Button.
This is a soft power on / off button which
powers the unit on from a state of standby; the main power on / off
switch is on the rear panel.
Display Panel.
Displays the status of the HDR-50. The display will
show Track Number, time code, or if the Menu Button is pressed the
Menu Display.
Menu Button.
This calls up the menu display which is navigated using
the Fwd / Rew Buttons and Previous / Next Buttons.
Fwd / Rew Buttons.
In playback mode these buttons will operate as
Fast Forward and Rewind Buttons. If the Menu Button is pressed these
buttons will navigate backwards and forwards between the various
menu options.
Video Input Button
. Switches the HDR-50 to Video Input SDI - Video
Inputs can only be recorded in SDI or HD-SDI formats. See
Page 20
Previous / Next Buttons
. These buttons navigate up and down
between recorded tracks and menu options.
Record Button.
Puts the HDR-50 into record mode. To start recording
press the Record Button and Play Button simultaneously.
N.B. Unit will not record if no video signal is present.
Play / Pause Button
. Starts playback of a track, or pauses playback of
a track- status will be displayed on the Display Panel. Also Starts /
Pauses a recording when unit is in Record mode
Stop Button
. Stops playback or record.
The Audio Input Level LEDs
. show the audio input levels from the
incoming source.
Audio Level Adjustment
. This allows you to adjust the headphone
volume.
Stereo Mini Jack Plug
for headphones. The headphone volume is
controlled by the Audio Level Adjustment.
6 Pin DV In/Out Port.
This is a convenient front mounted DV / IEEE-
1394 Port for connection to a computer for file transfer.
2.5" Removable HDD enclosure
, SATA & USB interface for
connecting to a computer for file transfer.
Locking Switch
position left
to lock HDD in place and position right to allow removal of HDD.
USO
RESTRITO


