background image


2

Warnings and Precautions


1.  Read all of these warnings and save them for later reference. 

2.  Follow all warnings and instructions marked on this unit. 

3.  Unplug this unit from the wall outlet before cleaning. Do not use liquid or aerosol cleaners. Use a 

damp cloth for cleaning. 

4.  Do not use this unit in or near water. 

5.  Do not place this unit on an unstable cart, stand, or table. The unit may fall, causing serious 

damage. 

6.  Slots and openings on the cabinet top, back, and bottom are provided for ventilation. To ensure 

safe and reliable operation of this unit, and to protect it from overheating, do not block or cover 

these openings. Do not place this unit on a bed, sofa, rug, or similar surface, as the ventilation 

openings on the bottom of the cabinet will be blocked. This unit should never be placed near or 

over a heat register or radiator. This unit should not be placed in a built-in installation unless proper 

ventilation is provided. 

7.  This product should only be operated from the type of power source indicated on the marking label 

of the AC adapter. If you are not sure of the type of power available, consult your Datavideo dealer 

or your local power company. 

8.  Do not allow anything to rest on the power cord. Do not locate this unit where the power cord will be 

walked on, rolled over, or otherwise stressed. 

9.  If an extension cord must be used with this unit, make sure that the total of the ampere ratings on 

the products plugged into the extension cord do not exceed the extension cord’s rating. 

10.  Make sure that the total amperes of all the units that are plugged into a single wall outlet do not 

exceed 15 amperes. 

11.  Never push objects of any kind into this unit through the cabinet ventilation slots, as they may touch 

dangerous voltage points or short out parts that could result in risk of fire or electric shock. Never 

spill liquid of any kind onto or into this unit. 

12.  Except as specifically explained elsewhere in this manual, do not attempt to service this product 

yourself. Opening or removing covers that are marked “Do Not Remove” may expose you to 

dangerous voltage points or other risks, and will void your warranty. Refer all service issues to 

qualified service personnel. 

13.  Unplug this product from the wall outlet and refer to qualified service personnel under the following 

conditions: 

a.  When the power cord is damaged or frayed; 

b.  When liquid has spilled into the unit; 

c.  When the product has been exposed to rain or water; 

d.  When the product does not operate normally under normal operating conditions. Adjust 

only those controls that are covered by the operating instructions in this manual; improper 

adjustment of other controls may result in damage to the unit and may often require 

extensive work by a qualified technician to restore the unit to normal operation; 

e.  When the product has been dropped or the cabinet has been damaged; 

f. 

When the product exhibits a distinct change in performance, indicating a need for service. 


Summary of Contents for NVS-10

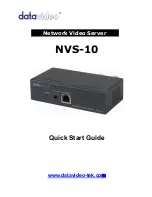
Page 1: ...Network Video Server NVS 10 Quick Start Guide www datavideo tek com...

Page 2: ...nt Panel 4 Rear Panel 5 NVS 10 Finder Setup 6 Download ActiveX Control 10 NETWORK VIDEO SERVER Setup 13 HOME Setup 13 Stream Setup 14 Networking Setup 16 System Setup 19 User Setup 23 Select Language...

Page 3: ...at the total of the ampere ratings on the products plugged into the extension cord do not exceed the extension cord s rating 10 Make sure that the total amperes of all the units that are plugged into...

Page 4: ...is supports NTSC and PAL video standards User can view real time video with audio data through the WEB UI of this box Features z Composite signal Input z Support NTSC PAL system auto detected z Video...

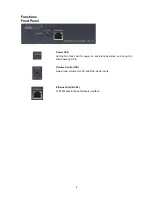
Page 5: ...wer LED LED light in Red color for power on and stand by status and no light in disconnecting DC in Volume Control VR Adjust input volume for XLR and RCA Audio inputs Ethernet Port RJ 45 100 10M base...

Page 6: ...ia an external audio mixer connect the audio mixer s line level output to this unbalanced Audio input Video In Composite video input takes a BNC connector from the composite output of a VCR camera DVD...

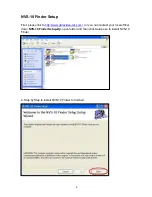
Page 7: ...st please link to http www datavideo tek com or you can contact your local office down NVS 10 Finder Setup zip open folder and then click Setup exe to install NVS 10 Finder 2 Step by Step to install N...

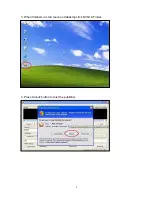
Page 8: ...7 3 When finished in start menu and desktop click NVS 10 Finder 4 Press Unlock button to trust the publisher...

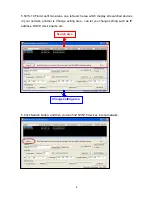
Page 9: ...ich display all searched devices in your network another is Change setting area can let you change setting such as IP address DHCP device name etc 6 Click Search button and then you can find NVS 10 de...

Page 10: ...9 7 Click the red circle part and then you can find edit below setting 8 Click Open in IE will open NETWORK VIDEO SERVRE windows on the screen...

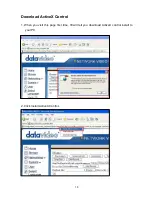
Page 11: ...10 Download ActiveX Control 1 When you visit this page first time IE will tell you download ActiveX control install to your PC 2 Click Install ActiveX Control...

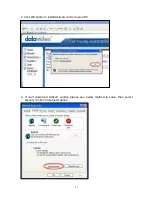
Page 12: ...11 3 Click OK button to install ActiveX control to your PC 4 If can t download ActiveX control please see below method to solve then select security control in Internet Options...

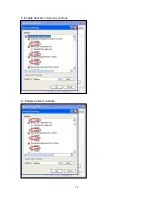
Page 13: ...12 5 Enable ActiveX in Security controls 6 Enable ActiveX controls...

Page 14: ...Set screen size on 1x Set screen size on 1 2x Set screen size on 2x Set screen size on Full Print Screen Snap Shot Screen Start Record Set photo file save position and save photo Set record file save...

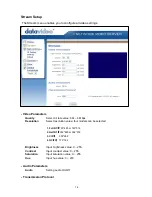
Page 15: ...elect resolution value four models can be selected 1 Full D1 720 480 or 720 576 2 Half D1 352 480 or 352 576 3 CIF 352 288 4 QCIF 176 144 Brightness Input brightness value 0 255 Contrast Input contras...

Page 16: ...15 Port Input transport stream port value 1 65534...

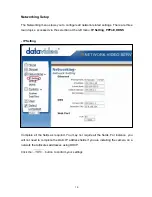
Page 17: ...the selection at the left menu IP Setting PPPoE DDNS IP Setting Complete all the fields as required You may not require all the fields For instance you will not need to complete the static IP address...

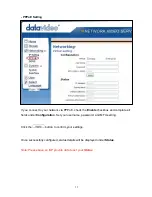
Page 18: ...le checkbox and complete all fields under Configuration Set your username password and MTU setting Click the button to confirm your settings Once successfully configured status details will be display...

Page 19: ...standard Go to http www dyndns com to register a domain name and obtaina username and password Enter this domain name username and password in the DDNS settings screen Click the button to confirm you...

Page 20: ...the system configuration screen Here is displayed all system information including firmware version Upnp device name and where you can upgrade firmware In Device Name you can key in a new name in the...

Page 21: ...ck the button restore all factory defaults A confirmation dialog appears Click OK to confirm Upgrade NVS 10 Firmware Under Firmware Upgrade here you can upgrade the system firmware version Click the b...

Page 22: ...21 Firmware upgrading Firmware upgraded please click Reboot button to next step Please click Yes button and reboot NVS 10 Finder...

Page 23: ...r or Current PC Time you can upgrade the device time If you select Synchronize with Network Time Server choose your time zone enter NTP server details along with another server if necessary You can al...

Page 24: ...thorization Add Modify User Delete User User Authorization The User menu enables you to configure all user authorization settings Here you can enable user check by click Enable and click the button to...

Page 25: ...in Admin Not limits of authority User Only HOME menu can use Select user group and key in user name password and confirm password again click the button to add or modify user Delete User Here you can...

Page 26: ...ct Language had English Traditional Chinese and Simplified Chinese three kinds language let user select Note 1 NVS 10 Finder not supported Mozilla MAC IE5 23 for MAC 64bit IE 2 NVS 10 Finder not suppo...

Page 27: ...you can use VLC software to display video and audio from NVS 10 Note NVS 10 can support RTSP protocol Step1 Please download IE Tab Firefox plug in from https addons mozilla org en US firefox addon 14...

Page 28: ...27 Step2 Install IE Tab then click the right key of mouse to select View this page in IE Tab...

Page 29: ...28 Step3 Then NVS 10 can be operated in Firefox now...

Page 30: ...audio from NVS 10 in Mac OS X Step1 Please download VLC player from http www videolan org Step2 Select File Open Network Step3 Select Network and HTTP FTP MMS RTSP and then type NVS 10 IP Address Rea...

Page 31: ...Step4 VLC Player will display video and audio from NVS 10 Note The limitation while use VLC 1 Maximum bit rate 2Mbps 2 Once the Steam functions of browser have been changed please repeats Step2 to Ste...

Page 32: ...e BV Tel 31 30 261 96 56 Fax 31 30 261 96 57 E Mail service datavideo nl Datavideo UK Limited Tel 44 1457 851 000 Fax 44 1457 850 964 E Mail sales datavideo co uk Datavideo Technologies Co Ltd Tel 886...

Reviews: