background image


17 


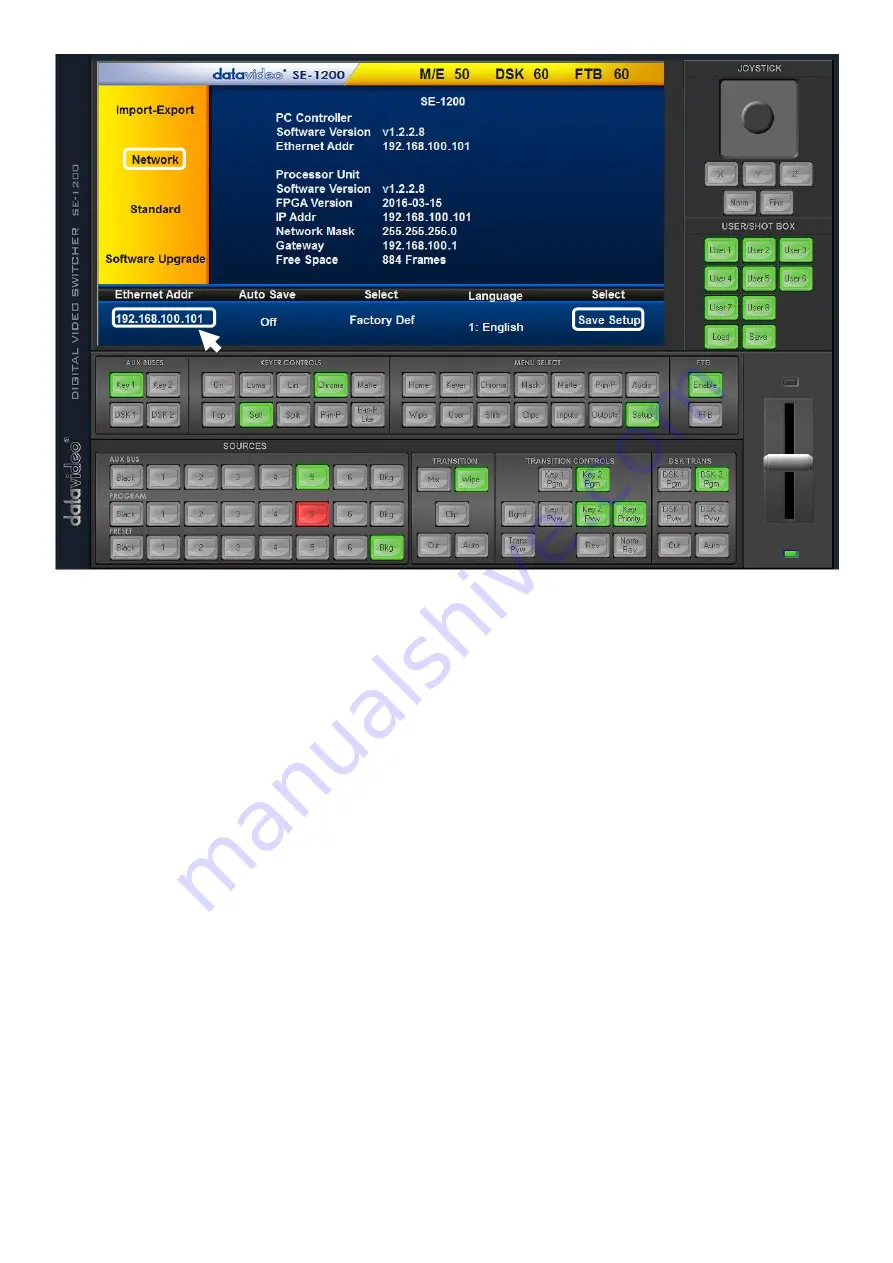
Ethernet Addr 

– This is the target IP address i.e. the location on the local network, or the internet, where 

the  software  can  talk  to  the  SE-1200  MU.  By  clicking 

Ethernet  Addr

  you  can  enter  a  new  address,  once 

entered click 

Enter

. The next time the software controller is opened, it will try to contact the switcher on 

this new Target IP address. 

Network 

– This option in the yellow menu column allows you to change the network options on the SE-

1200 MU. When delivered from the factory 

the default static IP settings should be:


Set up: 

Static (a manually set IP address that does not change even after power cycling the SE-1200 

MU unit) 

IP address: 

192.168.100.101


Subnet Mask: 

255.255.255.0


Gateway:

 192.168.100.1 


DHCP Setup

 - If the IP set up method is changed to DHCP then each time the SE-1200 MU is started, it may 

be given a different IP address by the network. Only use this method if you know how to find the SE-1200 
MU on the internal IP network. A device on the network (usually a router or server) will automatically give 
a  spare  or  fixed  IP  address  to  the  SE-1200  MU.  The  other  settings  such  as  IP  address,  Subnet  Mask  and 
Gateway may appear blank within the controller software as these would be automatically set by network 
router/DHCP server. 


Summary of Contents for SEB-1200

Page 1: ...SE 1200MU HD 6 CHANNEL DIGITAL VIDEO SWITCHER Instruction manual...

Page 2: ...Initial Network Setup on a MAC 18 3 2 2 Installing the SE 1200 MU Controller Software on MacBook 19 3 3 PHYSICAL KEYBOARD CONTROL 23 CHAPTER 4 BASIC VIDEO SETUP 24 4 1 SE 1200 MU MULTI VIEW OUTPUT 24...

Page 3: ...7 2 LINEAR KEY QUICK DSK 2 SETUP 50 7 3 PICTURE IN PICTURE PINP FUNCTION 52 7 3 1 PIP Position 53 7 3 2 PIP Border 54 7 3 3 PIP Crop 55 7 4 BUS MATTE SETUP 55 7 5 CLIPS QUICK SETUP 57 CHAPTER 8 CHROM...

Page 4: ...R DATAVIDEO TECHNOLOGIES CANNOT EXCLUDE THAT SOME INFORMATION IN THIS MANUAL FROM TIME TO TIME MAY NOT BE CORRECT OR MAY BE INCOMPLETE THIS MANUAL MAY CONTAIN TYPING ERRORS OMISSIONS OR INCORRECT INFO...

Page 5: ...ovided 7 This product should only be operated from the type of power source indicated on the marking label of the AC adapter If you are not sure of the type of power available consult your Datavideo d...

Page 6: ...deo logo have only one year warranty from the date of purchase Damage caused by accident misuse unauthorized repairs sand grit or water is not covered under warranty Viruses and malware infections on...

Page 7: ...nserve natural resources and ensure that it is recycled in a manner that protects human health and the environment For more information about where you can drop off your waste equipment for recycling...

Page 8: ...xer such as the Datavideo AM 100 or AD 200 Tally and RJ 45 connections allow the switcher to be connected to a Windows PC as well as providing tally light indications to crew and on screen talent via...

Page 9: ...9 1 2 System Diagram...

Page 10: ...different configurations including Program Preview and or Multi view See Section 4 2 HDMI 2 Multi view Output ONLY Note Both HDMI output ports operate at 1080i 1080p or 720p depending on the chosen vi...

Page 11: ...IN Connect the supplied 12V 19W PSU to this socket The connection can be secured by screwing the outer fastening ring of the DC In plug to the socket Grounding Terminal When connecting this unit to a...

Page 12: ...s of 192 168 100 101 by default The unit can be directly connected to a Windows based computer using an RJ 45 ethernet cable The following set up should allow you to initially configure the unit befor...

Page 13: ...U controller software has a built in IP finder which is designed for computer with multiple Ethernet cards or DHCP network environment Please note IP finder can only find devices that are on the same...

Page 14: ...top to expand Start Menu and then select Settings in it 2 Press Windows I on the keyboard to access Settings 3 Click the search box on the taskbar input setting in it and select Settings in the result...

Page 15: ...router to supply IP addresses in the 192 168 100 xxx range Use the router s LAN Setup or Configure LAN option to set the router s IP address as 192 168 100 1 and click save apply 9 Now reboot the rout...

Page 16: ...have a Windows 7 8 10 computer connected to the internet with VLC Player and the Controller software Port 5000 will allow streaming of the SE 1200 MU multi view from site A to VLC Player at site B Inc...

Page 17: ...e Set up Static a manually set IP address that does not change even after power cycling the SE 1200 MU unit IP address 192 168 100 101 Subnet Mask 255 255 255 0 Gateway 192 168 100 1 DHCP Setup If the...

Page 18: ...an iOS based computer using an RJ 45 ethernet cable The following set up should allow you to initially configure the unit before moving it to an existing DHCP LAN network An RJ 45 ethernet cable Appl...

Page 19: ...ultiple Ethernet cards or DHCP network environment Please note IP finder can only find devices that are on the same network domain as the computer If you cannot remember your device IP please contact...

Page 20: ...or your Datavideo regional office To create this simple dedicated SE 1200 MU IP network you will need An IP router which can assign give IP addresses Two RJ 45 patch leads Mac Computer or MacBook The...

Page 21: ...01 into the reservation box next to the SE 1200 MU s MAC address 14 The router should now give the IP address 192 168 100 101 to the SE 1200 MU when it is connected to the router 15 Click save apply t...

Page 22: ...f the network settings are wrong then you may not be able to control the SE 1200 MU Always keep a note of the last IP settings used and change these settings carefully to avoid problems Target IP Addr...

Page 23: ...may be given a different IP address by the network Only use this method if you know how to find the SE 1200 MU on the internal IP network A device on the network usually a router or server will automa...

Page 24: ...720P or 1080i depending on the video standard chosen see section 4 3 Chapter 4 The SE 1200 MU can also show audio level bars overlaid on the Program image within the multi view This confirms if analo...

Page 25: ...tputs can be reconfigured to one of the settings below using the menu option Outputs Windows PC Users 1 Multiview 2 PGM Out 3 PVW Out 4 PGM DSK1 5 PVW DSK1 6 Clean PGM 7 Clean PVW 8 Input 1 9 Input 2...

Page 26: ...rs The SE 1200 MU video standard can be changed by using the menu path SETUP STANDARD The SE 1200 MU is initially set up for the 1920 x 1080 i50 or i60 video standard when shipped from the factory dep...

Page 27: ...re of the Key 1 Key 2 layers can be used for displaying a smaller secondary image in front of the background video layer This smaller PIP image can be resized cropped repositioned and even keyed by th...

Page 28: ...customize the assignment of video input channels to program preset row buttons Windows PC Users The physical input sources can be swapped around within the SE 1200 MU by using the cross point section...

Page 29: ...ettings Note MAC users are not granted access to modify the video source labels 5 2 Video Stream Based Multi View The SE 1200 MU is able to send or stream its multi view image over the same IP network...

Page 30: ...er on the computer Click Media on the VLC menu bar and navigate to the Open Network streaming settings Enter the stream URL tcp 192 168 100 101 5000 and click Play after which you should be able to se...

Page 31: ...the size of the multi view stream may also help overcome delay latency issues over the network Click Stream Start then open VLC Media Player on the computer Click File on the VLC menu bar and navigate...

Page 32: ...n the multi view is unstable then slowly increase this caching value in 50 or 100ms step until you have a smooth video feed Note The VLC caching value and multi view stream size are also related to la...

Page 33: ...lti view delay or latency across the IP network The quality of the multi view image will also be affected by these settings The VLC media player window with SE 1200 MU multi view can be displayed on a...

Page 34: ...lack sources 1 to 6 and Matte Note See Section 7 4 Bus Matte Setup for configuring the Bkg Matte button 6 1 1 AUX BUS This row of buttons is typically used to assign sources for the setup of the PIP L...

Page 35: ...e currently selected Program source Input 1 Do not worry the selected Preset source Input 2 has not changed Click the Auto button TRANSITION panel or move the T Bar manually to preview the selected tr...

Page 36: ...riority of Key 1 and Key 2 when they are initially active on the Preview monitor output 6 3 Transition Effects The SE 1200 MU provides the user with options for cutting or transitioning between the se...

Page 37: ...ressing Mix will select a mix transition to use when moving from the current video source on the Program row to the selected next source on the Preset row Windows PC Users MAC Users To change the rate...

Page 38: ...controls area of the user interface Windows PC Users MAC Users Clicking Wipe will select the current wipe transition in use when moving from the current video source on the Program row to the selecte...

Page 39: ...nt wipe pattern needs to be changed first select Wipe from the MENU SELECT area and then click on the required wipe pattern or enter its wipe number Windows PC Users MAC Users Each wipe pattern consis...

Page 40: ...effect on or off Width changes the size of the border effect A low value results in a thin border and a high value gives a wide border Level sets how far the wipe has travelled or where it is displaye...

Page 41: ...the load is currently at It can be cancelled at any stage even before the load is complete Windows PC Users MAC Users Clicking Clip will select the current wipe transition in use when moving from the...

Page 42: ...n will take longer to complete Windows PC Users MAC Users The timing of a Mix transition can also be manually decided when moving the T Bar or completed over a set duration when using the AUTO button...

Page 43: ...on Green When the selected DSK LED is on the active DSK settings are seen in the multi view Program video image and at the Program outputs With the selected DSK already active in the Preview output p...

Page 44: ...tatic white text over the live video from input 2 Step 1 Choose the Keyer Bus that you wish to use In our example we will click the DSK 1 button on the AUX BUSES panel Windows PC Users MAC Users Step...

Page 45: ...m of the Screen will allow you to calibrate for a white or black key using the Lift Gain Opacity and Invert Functions The Keyer Control section 7 1 1 will explain the effects of Lift Gain Opacity and...

Page 46: ...lick on the Color Palette and the crosshair will move to display the currently selected color where the mouse pointer was located The selected color RGB values will also be shown to the right 3 The Lu...

Page 47: ...tte to be chosen as above A white keyer matte can be created from Luma 100 Sat zero and Hue zero MAC Users 1 Click Keyer Matte in the yellow menu area 2 Then in the blue bar at the bottom click either...

Page 48: ...or Slider RGB Color Slider CMYK Color Slider HSB Color Slider After selecting an option from the above drag the corresponding color component sliders to select a color Below the sliders the color sele...

Page 49: ...e The fourth option is the Image Color Plate Move the mouse cursor over and click on the desired color Below the color plate the color selected will be shown at the leftmost end in a square box To sav...

Page 50: ...sh to use In our example we clicked the DSK 2 button on the AUX BUSES panel Windows PC Users MAC Users Step 2 We then choose the Lin or Linear and Split buttons from the KEYER CONTROLS panel to select...

Page 51: ...m of the Screen will allow you to calibrate for a white or black key using the Lift Gain Opacity and Invert Functions The Keyer Control section 7 1 1 will explain the effects of Lift Gain Opacity and...

Page 52: ...Select the Key 2 effect by clicking the P in P button backlit green in the Keyer Controls panel Windows PC Users MAC Users Step 3 Turn the Key 2 PIP effect on in the Multi view Preview output by clic...

Page 53: ...size Where the value 1 0 makes the PIP occupy the whole screen 100 0 5 reduces the PIP size to half screen 50 Windows PC Users Click and hold the joystick circle then drag the joystick circle in the...

Page 54: ...d 3 The Hue parameter moves the crosshair around the color palette in the clockwise or anti clockwise direction The Hue value angle can be adjusted using the Hue Function dial 4 Size defines the width...

Page 55: ...r Size slider right below the red rectangle Increase the border thickness by dragging it to the right 7 3 3 PIP Crop The PIP Crop values are displayed along the bottom of the screen as shown below Win...

Page 56: ...color palette to the outer edge of the circle The Sat value can be finely adjusted by clicking on the Sat value and entering a new value If the Hue angle is set to 180 degrees 6 o clock position then...

Page 57: ...e center of the blue screen For details on different ways to set this value see section 7 1 2 5 The Hue parameter determines the hue value of the selected color The Hue value can be adjusted by manual...

Page 58: ...location in our example below the file name is AE TEST_00000 png Windows PC Users MAC Users Click open to start the clip import If your files are not the SE 1200 MU s pic format they will be automati...

Page 59: ...The camera must be correctly white balanced to minimize the subject picking up any color cast green or blue from the background Of course the white balance settings will vary according to the type of...

Page 60: ...shown along the bottom of the display below The Hue can be changed by clicking on and dragging the crosshair around the color palette with the mouse pointer The Hue value can also be finely adjusted...

Page 61: ...be adjusted by manually entering a value or clicking the red rectangle at the center of the blue screen For details on different ways to set this value see section 7 1 2 The Bgnd Suppress or Backgroun...

Page 62: ...the bottom of the display The respective sliders are shown in the diagram Key Range is a range of hues or colors that closely match the background color to be keyed as set in Chroma Matte The user ca...

Page 63: ...nd values are shown along the bottom of the display below These settings are used to control remove any unwanted Chroma or color Spill from the background onto the foreground subject There are two par...

Page 64: ...ge but would eventually replace the background video if a transition or cut is completed Windows PC Users MAC Users Step 4 The Chroma key effect with the current settings may already be shown in the P...

Page 65: ...f the screen width or height thus 0 indicates no mask edge and 50 means masking to half of the screen area from the selected outside edge 1 To configure the Mask function click the MASK button on the...

Page 66: ...ndows PC Users MAC Users 2 Six video input channel selection buttons will be displayed Click on the input channel button that you wish to Freeze Windows PC Users MAC Users 3 The Freeze parameters will...

Page 67: ...the left of the currently stored image matrix Up to 1000 images can be stored within the SE 1200 MU Windows PC Users MAC Users 4 Click the Still value in the bottom row of options and enter the stills...

Page 68: ...atch the desired bus channel that you wish to use to display the still image In our example we have chosen Input 1 5 Now select the required saved still within the stills matrix Use the up and down tr...

Page 69: ...when exported from the switcher are stored on the computer within the following folders C Datavideo se1200 user_data Exported Still picture files can be found in the export based stills folder see the...

Page 70: ...the computer into the SE 1200 MU select Import Still To export an existing Still file from the SE 1200 MU to the computer select Export then Export Still Caution When importing or exporting make sure...

Page 71: ...rted there will be two files a thumbnail picture ending mini and the full screen image ending pic These files can be then imported to another SE 1200 MU by pasting the files into the Import based stil...

Page 72: ...etups can be stored within the SE 1200 MU numbered from 0 to 999 Note User 0 is the DEFAULT USER preset By changing User 0 you change the default start up configuration of the SE 1200 MU 10 1 Saving t...

Page 73: ...y slot Note The label can accept up to 16 characters but only the first 10 are displayed 6 Click Save Memory to store the setup to the assigned user memory slot 10 2 Labelling an Existing User Memory...

Page 74: ...User Setups stored in the SE 1200 MU then use the up down arrows to browse through all user memory slots The user memory slots are displayed in numerical order empty positions will have no number 10...

Page 75: ...then displays up to 16 user memory slots at a time Click on a user memory slot and the selected user slot will have a yellow border Note User 0 is the DEFAULT USER preset By changing User 0 you change...

Page 76: ...s up to 16 user memory slots at a time Click on a user memory slot and the selected user slot will have a yellow border Note User 0 is the DEFAULT USER preset By changing User 0 you change the default...

Page 77: ...ry located at the bottom of the screen 10 5 Exporting and Importing User Setups A previously saved SE 1200 MU User memory can be exported from the unit to the User s computer This User file can then b...

Page 78: ...puter select Export then Export User The User files when exported from the SE 1200 MU are stored on the computer in the following folders C Datavideo se1200 user_data Exported User files can be found...

Page 79: ...to the computer select Export then Export User Locate the exported User file on your MAC The file should be located in the program directory in which the software is installed Exported User files can...

Page 80: ...U can only accept external audio using the analogue XLR inputs on the rear panel Ideally a master audio mixer should be used alongside the SE 1200 MU A Datavideo AM 100 audio mixer or AD 200 audio del...

Page 81: ...e of the audio The Audio sub options for SDI and HDMI allow the user to individually turn ON OFF the audio at the SDI 1 SDI 2 and HDMI 1 outputs Audio Level relates to the preferred audio standard for...

Page 82: ...the SE 1200 MU to the chosen record or playback device as they are not all the same The cabling required can be made by yourself or a competent technician Please speak with your Dealer or local Datavi...

Page 83: ...Preview 1 Open collector output Tally output of input video Preview 1 4 RCOM GND Ground Ground 5 Program 4 Open collector output Tally output of input video Program 4 6 Program 2 Open collector outpu...

Page 84: ...om your local Datavideo office supplier A simple router IP network Static IP setup see example in Section 3 1 1 Windows PC 3 2 1 MAC Firmware Update Procedure 1 Install the latest SE 1200 MU Control P...

Page 85: ...10 Go to the Setup Menu again to confirm the FW version has updated and that control is still working 11 Once control is working load a USER memory to quickly return to your preferred SE 1200 MU setu...

Page 86: ...S 232 PIN definition on the device end which is a female connector The user may establish the RS 232 connection between RMC 260 and SE 1200 MU using a male to male cable with the wiring scheme as depi...

Page 87: ...87 Appendix 6 Dimensions All measurements in millimetres mm...

Page 88: ...w DSK Clean PROGRAM PREVIEW w o DSK MULTISCREEN Input 1 4 Audio Indicator on Multi view Y output 2CH Tally Out Y GPI Y Level Pulse Trigger selectable Software Updates Ethernet Standards HD Format Supp...

Page 89: ...s for instant access Control Panel Compatibility Use PC via Ethernet Control panel Input Voltage 12V Power Consumption 23W Control Protocol DVIP Operating Temperature 0 C to 40 C Humidity 10 to 80 Cha...

Page 90: ...Nov 12 2019 Version E7 Datavideo Technologies Co Ltd All rights reserved 2020 www datavideo com product SE 1200MU...

Reviews: