background image

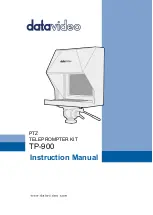
PTZ TELEPROMPTER KIT                      TP-900


11 


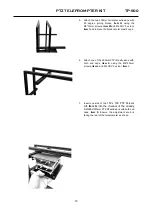
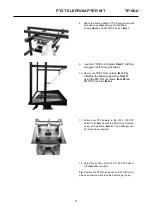
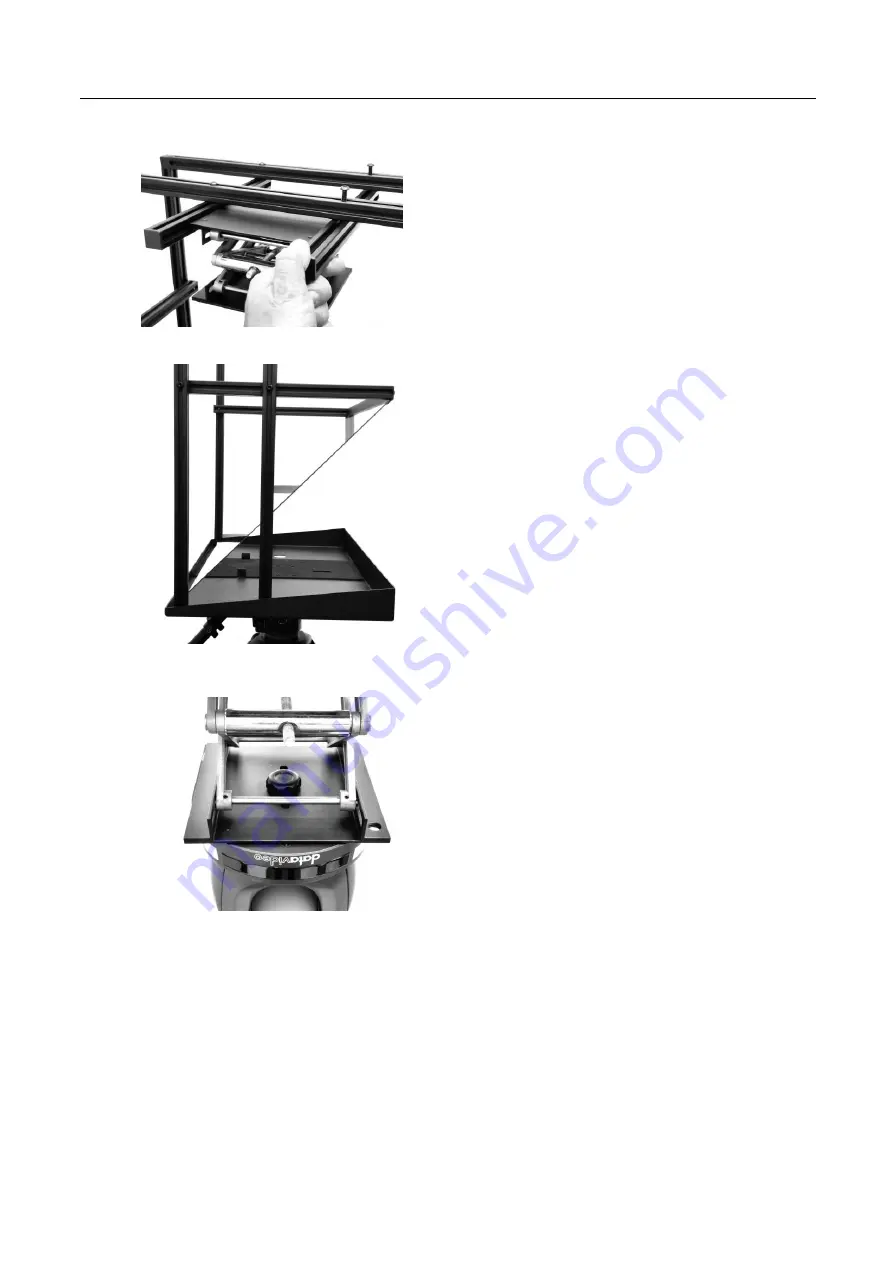
8.  Attach the second 250mm PTZ lift extrusions with 

both end caps, 

Item S

 using the M6*40mm 

screws, 

Item L

 and M4 CRV hex tool, 

Item I.


9.  Insert the 

70/30 mirror glass, 

Item T

 with the 

two green dots facing the talent.


10.  Secure the 

70/30 mirror glass, 

Item T

 by 

installing the Glass support bar, 

Item U


using the M6*14mm screws, 

Item M

 and 

M4 CRV hex tool, 

Item I.


11.  Attach  your  PTZ  camera  to  the  150  x  150  PTZ 

Scissor Lift, 

Item G

 with the 9mm long ¼  thumb 

screw with washers, 

Item K

. The washer(s) can 

be removed as required. 


12.  Adjust the position of the 150 x 150 PTZ Scissor 

Lift, 

Item G 

as required.  


Tip:

 Position the PTZ lens as close to the 70/30 mirror 

glass as possible to achieve the best range of pan. 


Summary of Contents for TP-900

Page 1: ...PTZ TELEPROMPTER KIT TP 900 0 PTZ TP 900 TELEPROMPTER KIT Instruction Manual ...

Page 2: ...NTROLS 17 WR 500 HANDHELD CONTROLLER 17 Control Buttons 18 Remote Accessories 18 Lanyard Necklace 18 CR2032 Battery 19 FS 30 FOOT SWITCH 20 Control Buttons 20 GENERIC PRESENTATION CLICKERS 21 Control Buttons 21 DVPROMPTER PLUS APP 22 DOCUMENTS SCREEN 22 CREATING AND EDITING TEXT SCRIPTS AND SLIDES 23 Text Scripts 23 Slides 23 REAL TIME EDITING 28 PLAYLISTS 29 Adding a script to the playlist 29 Cha...

Page 3: ...me may not be correct or may be incomplete This manual may contain typing errors omissions or incorrect information Datavideo Technologies always recommend that you double check the information in this document for accuracy before making any purchase decision or using the product Datavideo Technologies is not responsible for any omissions or errors or for any subsequent loss or damage caused by us...

Page 4: ...is unit make sure that the total of the ampere ratings on the products plugged into the extension cord do not exceed the extension cord rating 10 Make sure that the total amperes of all the units that are plugged into a single wall outlet do not exceed 15 amperes 11 Never push objects of any kind into this unit through the cabinet ventilation slots as they may touch dangerous voltage points or sho...

Page 5: ...ion to the standard warranty providing the product is registered with Datavideo within 30 days of purchase Certain parts with limited lifetime expectancy such as LCD panels DVD drives Hard Drive Solid State Drive SD Card USB Thumb Drive Lighting Camera module PCIe Card are covered for 1 year The three year warranty must be registered on Datavideo s official website or with your local Datavideo off...

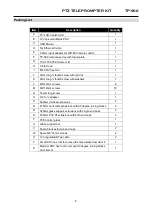
Page 6: ...thumb screw with washers 1 L M6 40mm screws 8 M M6 14mm screws 10 N 16mm long screw 1 O 3 8 to adapter 1 P 565mm Vertical extrusions 4 Q 475mm horizontal extrusions with 90 degree joining blocks 2 R 325mm glass support extrusions with single end caps 2 S 250mm PTZ lift extrusions with both end caps 2 T 70 30 mirror glass 1 U Glass support bar 1 V Spare black extrusion end caps 2 W Spare M6 14mm sc...

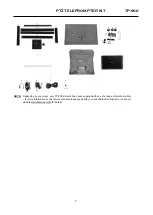
Page 7: ...ding on your order your TP 900 kit could have been supplied with one of a range of remote controls for more information on the remote controls please speak with your local Datavideo supplier or check our website www datavideo info for details ...

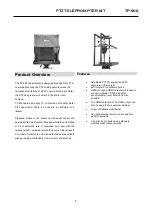
Page 8: ...led at a set automatic rate or controlled by a user with the optional wired wireless remote for a more natural result A number of clear fonts colours and text sizes are available making reading comfortable from a variety of distances Features Adjustable PTZ lift supports all PTZ cameras on the market dvPrompter Plus software built in HDMI input and HDMI output can be used to connect multiple TP 90...

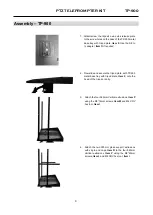
Page 9: ...red 2 Now slide and secure the tripod plate with TP 900 metal base tray with tripod plate Item F onto the head of the tripod or dolly 3 Attach the four 565mm Vertical extrusions Item P using the M6 14mm screws Item M and M4 CRV hex tool Item I 4 Attach the two 325mm glass support extrusions with single end caps Item R to the four 565mm Vertical extrusions Item P using the M6 40mm screws Item L and...

Page 10: ...e black circular plastic caps 6 Attach one of the 250mm PTZ lift extrusions with both end caps Item S using the M6 40mm screws Item L and M4 CRV hex tool Item I 7 Insert one side of the 150 x 150 PTZ Scissor Lift Item G into the channel of the already installed 250mm PTZ lift extrusions with both end caps Item S Ensure the adjustment knob is facing the rear of the teleprompter as shown ...

Page 11: ...0 mirror glass Item T by installing the Glass support bar Item U using the M6 14mm screws Item M and M4 CRV hex tool Item I 11 Attach your PTZ camera to the 150 x 150 PTZ Scissor Lift Item G with the 9mm long thumb screw with washers Item K The washer s can be removed as required 12 Adjust the position of the 150 x 150 PTZ Scissor Lift Item G as required Tip Position the PTZ lens as close to the 7...

Page 12: ...on of the 150 x 150 PTZ Scissor Lift Item G with the 16mm long screw Item N 14 Install the 15 LCD Control Unit Item A by inserting the the 9mm long thumb screw with red dot Item J through the slot in the TP 900 metal base tray with tripod plate Item F ...

Page 13: ...he TP 900 frame 16 Turn on the 15 LCD control unit by connecting the mains power supply Item V the power cable can be routed through the hole in TP 900 metal base tray with tripod plate Item F The dvPrompter Plus software will automatically load please see the appropriate section of this manual for detailed software usage instructions 17 If required adjust the position of the 15 LCD control unit 1...

Page 14: ...Windows computer and set it to static IP set up within the Windows Network and Sharing Centre In our example the computer is given the following IP settings so that the computer matches the same IP range as the TP 900 5 Open a web browser and navigate to http 192 168 10 10 9789 you will see the main control page shown below 6 Please see the appropriate section of this manual for software operation...

Page 15: ...Z TELEPROMPTER KIT TP 900 15 7 Click the menu bar and then Network 8 The network control URL will be shown as below 9 Please see the appropriate section of this manual for software operation instructions ...

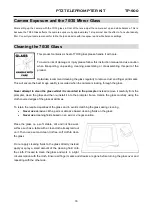
Page 16: ...hen the camera is looking through the glass Never attempt to clean the glass whilst it is mounted in the prompter instead remove it carefully from the prompter clean the glass and then re install it into the prompter frame Handle the glass carefully using the cloth covered edges of the glass at all times To retain the required qualities of the glass and to avoid scratching the glass during cleanin...

Page 17: ...pports Bluetooth and Wired operation only wired operation is supported by TP 900 The WR 500 supports control of both scrolling text and slides When first removed from the retail package the WR 500 remote is already in wired mode When a button is pressed a RED LED will flash In wired mode the remote needs to be physically cabled to the TP 900 A four pole jack to jack plug cable is provided with thi...

Page 18: ...PTZ TELEPROMPTER KIT TP 900 18 Control Buttons LED Indicators RED LED Wired Mode GREEN LED Bluetooth 4 Remote Accessories Lanyard Necklace Plug the lanyard necklace into the jack plug socket ...

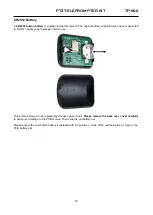
Page 19: ...cted to last for 3 years under average normal use This button battery can be replaced by the user when it dies Please remove the back case cover carefully to avoid user damage to the PCB or case Then slide the old battery out Please ensure the new button battery is installed with the positive side of the cell facing the sign on the PCB battery slot ...

Page 20: ...s running dvPrompter Plus version 1581 or newer please see the appropriate section of this manual for information on updating the dvPrompter Plus software Please connect the FS 30 to the white USB port on the teleprompters 15 LCD monitor the FS 30 will work as soon as its connected there is no need to set any control options within the dvPrompter Plus application The table below details the functi...

Page 21: ...Buttons Please connect the USB receiver to the white USB port on the teleprompters 15 LCD monitor the presentation clicker will work as soon as its connected there is no need to set any control options within the dvPrompter Plus application The table below details the functions the buttons commonly found on most presentation clickers Left Slow down scroll Previous break marker Previous slide Right...

Page 22: ...s App The TP 900 includes a fully unlocked version of the prompter Plus application Documents Screen When you first launch the app you will see the screen below The menu bar in the top left hand corner provides access to the various settings menus ...

Page 23: ...ddition to text based scripts you can now import your Powerpoint or Keynote presentation slides via the web interface slides can be controlled using the hardware WR 500 control or the web based remote control interface dvPrompter Plus supports seamlessly switching between text based scripts and slides you can even add slides and text based scripts to a playlist dvPrompter Plus supports mirroring s...

Page 24: ... and enter a name for the image file 5 Select the Save As type down arrow to display a list of file formats By default PowerPoint Presentation pptx appears in the text box On Mac use the menu next to File Format 6 Select the image format you wish to save your presentation Choose JPEG 7 Select Save In PowerPoint for Mac choose either Save Every Slide or Save Current Slide Only then select Export 8 ...

Page 25: ... more than one PowerPoint slide to separate image files a new folder is created in the destination folder This new folder uses the same name as the presentation If you haven t saved the PowerPoint file your exported slide images are saved in a folder with a default name for example Presentation1 ...

Page 26: ...e Export to Images 3 Select the JPEG High Quality format and specify the range of slides that you want to save as images If you want to save all the slides check the point ALL 4 Click Next 5 In the opened window select the folder where you want to save the images Set the default name for the slide During the export KeyNote will automatically add the sequence number to this name ...

Page 27: ...My Slides 3 To import multiple slides click button 2 Button 1 can be used to add a single slide to an existing slide deck 4 Select all the slides you want to import CTRL A can be used to select all 5 Your slides will be imported in alphanumerical order individual slides can be delete by clicking the blue trashcan icon next to each slide ...

Page 28: ...lso save changes using the blue save button on the top right corner of the editor To edit slides simply tap or click the Edit button the slides will be saved automatically when you close the rich text editor by tap or clicking the X Real time editing Real time editing allows you to modify a script that is currently on screen simply modify the script via the web interface and watch it update in rea...

Page 29: ... app to automatically load the next script in the list it also allows you to quickly jump between scripts using the hardware remote control see the control section of this guide for more information Changing the playlist order To change the running order of the playlist simply click the horizontal bars to the right of the script name and drag to the desired position ...

Page 30: ...loaded will display the menu bar shown below A Decrease text size when scrolling jump to previous script in playlist when paused B Start Pause scrolling C Start Pause scrolling D Increase text size when scrolling jump to next script in playlist when paused E Unload script and return to documents screen ...

Page 31: ... F Increase speed when scrolling jump to previous break marker when paused G Decrease speed when scrolling jump to next break marker when paused Keyboard Shortcuts Keyboard shortcuts can be assigned to any of the buttons A to G detailed above To enable and assign keyboard shortcuts first enable the Enable Hotkeys option from the Settings menu on the web interface the default shortcuts are shown be...

Page 32: ...PTZ TELEPROMPTER KIT TP 900 32 Using Optional Hardware Remote Controls Please see the Optional Teleprompter Remote Controls section of this manual for more information ...

Page 33: ...ay the menu shown below you will see three options Home Return to the documents screen Settings Display all app settings Network Display the address required to access the app from any device with a web browser over the local Ethernet network Help Links directly to the dvPrompter Plus QSG i Displays the dvPrompter Plus app version ...

Page 34: ...PTZ TELEPROMPTER KIT TP 900 34 Settings ...

Page 35: ... only scroll on the second display the main display can be used to create and edit scripts as well as control the text Border Used to add a border around the scrolling text this is useful if the text is too close to the edge of your monitor and or beam splitter glass Timer Display a timer showing the time the text as been scrolling on screen the timer will reset when a new script is loaded and pau...

Page 36: ...option can only be configured via the web interface Network If your device is connected to a Wi Fi or Ethernet network you can fully control the app over the network simply enter the webui address into the web browser of another device on the same network You can see an example of the remote control interface below ...

Page 37: ...PTZ TELEPROMPTER KIT TP 900 37 ...

Page 38: ... on two or more TP 900s via an Ethernet network Requirements All devices must be identical for synchronization to work devices with identical screen heights may work but this cannot be guaranteed Slave devices will place additional load on the master device the number of slave devices that can be connected is dependent on the performance of the master device All slave devices must be connected to ...

Page 39: ...u will see the screen below while the slave establishes a connection to the master 5 Once connected the screen will turn white then black the slave will now mirror the master 6 To exit slave mode tap the screen then press the blue exit button the app will close ...

Page 40: ...evice screen free for script control and editing The script control options can be access via the menu bar as seen below External Display Rotation By default the internal LCD screen is rotation angle is set to 180 degrees and the external HDMI output is set to 0 degrees This is the correct configuration for connecting multiple TP 900 units via HDM however if using the HDMI output to connect to an ...

Page 41: ...menu 4 Download the latest App from www datavideo com product TP 900 5 Copy the downloaded apk file to the root directory of a USB flash drive 6 Connect the USB flash drive containing the file to one of the TP 900s USB ports 7 Connect the supplied USB mouse to the other USB port 8 Open the File Manager App by clicking it once 9 Open the USB flash drive by clicking it once ...

Page 42: ...PTZ TELEPROMPTER KIT TP 900 42 7 Double click the dvPrompter Plus apk file you downloaded earlier 19 The update will install the dvprompter App will automatically open when complete ...

Page 43: ...sh Portuguese Russian Prompter Size Max Width 535 Height 590 Depth 350 LCD Native Resolution 1024 x 768 LCD Brightness 350 NIT Remote Control Monitoring and control via LAN Optional WR 500 wired hardware remote Weight Net Weight 10 3KG Gross Weight 13 3KG Operating Temperature 0 40 C Gift box size 610x510x2650 mm Power 12V 2A DC Mains adapter supplied ...

Page 44: ...ce and Support Datavideo Technologies Co Ltd All rights reserved 2020 www datavideo com product TP 900 Feb 17 2022 G082060918E1 www datavideo com product TP 900 Datavideo Technologies Co Ltd All rights reserved 2020 Dec 23 2022 Version E1 ...

Reviews: