43
7. How to Use the Chromakey Function of the VGB-2000
The Datavideo VGB-2000 2-Channel Pro Presentation System allows users to do the video chromakey
by using the SE-1200MU. Please follow following steps for chromakeying by the SE-1200MU.
7.1 Inputs Settings for the SE-1200MU
Before operating the VGB-2000, it is necessary for users to know the corresponding relationships
between the interfaces which are located on the rear panel of the SE-1200 MU HD 6-Channel Digital
Video Switcher and the interfaces which are located on the rear panel of the VGB-2000. The
corresponding relationships between the interfaces of the SE-1200MU rear panel and the VGB-2000
rear panel are shown as following table.
Dual Camera
VGB-2000 Rear Panel Interfaces= SE-1200MU
Rear Panel Interface
Functions
CAMERA 1= SDI 1
Connects to Camera (for shooting half-body
Screen).
CAMERA 2= SDI 2
Connects to Camera (for shooting full-body
screen)
CAMERA 3= SDI 3
Inputs the Still image (Still 1)(for the long-shot
of the virtual scene)
CAMERA 4= SDI 4
Inputs the Still image 2 (Still 2)(for the near-
shot of the virtual scene)
HDMI 5= SWITCHER HDMI IN(CAM1)
Inputs Logo
HDMI 6= SWITCHER HDMI IN(CAM2)
Inputs Powerpoint slide
Single Camera
VGB-2000 Rear Panel Interfaces=SE-1200MURear
Panel Interfaces
Functions
CAMERA 1= SDI 1
Connects to Camera (for shooting half-body
Screen).
CAMERA 2= SDI 2
N/A
CAMERA 3= SDI 3
N/A
CAMERA 4= SDI 4
Inputs the Still image 2 (Still 2)(for the near-
shot of the virtual scene)
SWITCHER HDMI IN(CAM1)= HDMI 5
Inputs Logo
SWITCHER HDMI IN(CAM2)=HDMI 6
Inputs Powerpoint slide
Note: Please make sure that the two BC-100 Interchangeable Lens Cameras are connected to the
CAMERA 1 and CAMERA 2 interfaces on the rear panel of the VGB-2000 simultaneously no matter
for the dual-camera or single-camera shooting.
Summary of Contents for VGB-2000
Page 1: ...VGB 2000 Instruction Manual...
Page 7: ...7 1 2 System Diagram 2 Channel Pro Presentation System VGB 2000...
Page 26: ...26 LBK 1 Look Back Kit Exploded View...
Page 27: ...27 LBK1 1 1 Main Support Exploded View...
Page 28: ...28 LBK1 1 2 22 Monitor and LCD Display Mount...
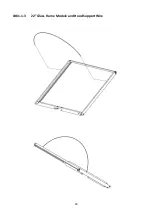
Page 29: ...29 LBK1 1 3 22 Glass Frame Module and Hood Support Wire...
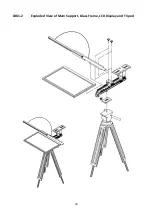
Page 30: ...30 LBK1 2 Exploded View of Main Support Glass Frame LCD Display and Tripod...
Page 31: ...31 LBK1 3 Look Back Kit Assembly...
Page 71: ...71 Close Up with Chromakey Slides Close Up Interactive Pen Mark...
Page 72: ...72 Wide Shot Interactive Pen Mark Logo Interactive Pen Mark Logo...
Page 73: ...73 Dual Camera Effects Interactive Pen Mark Close Up Interactive Pen Mark...
Page 74: ...74 Wide Angle with Chromakey Interactive Pen Mark Wide Shot Interactive Pen Mark Logo...
Page 75: ...75 Interactive Pen Mark Logo Close Up with Chromakey...
Page 76: ...76 Wide Angle with Chromakey...
Page 79: ...79 14 Dimensions...
Page 80: ...80 Unit mm...
Page 83: ...83 Note...

