background image


19602P-99 (07-18)


7 of 20


Microphone Adjustment 

Microphone booms on Series 9100 Headsets are hybrid style, in that the lower half is a hinged 
wire type (where it meets the ear cup), mated to a bendable flex boom (terminates in the 
microphone bracket). 

On over-the-head style Headsets, microphone booms can be rotated 280°, so as to be worn on 
either the user’s left or right side. The same is true on behind-the head styles as well, though on 
these models the additional action of rotating the headband spring 180° over the top of each 
dome stop is necessary to change the left/right orientation of the mic boom. 

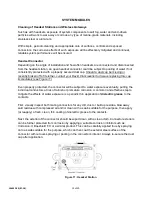
For optimum mic performance, 

the microphone must not only pick up the user’s speech but also 

cancel background noise. To achieve this, 

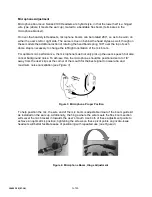
the microphone should be positioned zero to 1/8” 

away from the user’s lips at the corner of the mouth for the best signal to noise ratio and 
maximum noise cancellation 

(see Figure 3)


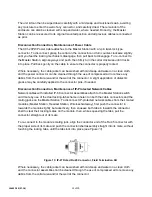
To help position the mic, the wire end of the mic boom is adjustable in/out of the boom guide kit 
as installed on the ear cup. Additionally, the hinge where the wire meets the flex boom section 
will swivel the mic 

bracket in towards the user’s mouth. Use both of these adjustment points to 

achieve an optimal mic position; tightening the screws on these pivot points on private-issue 
headsets will better facilitate ease of positioning with repeated use 

(see Figure 4)


Figure 4: Microphone Boom, Hinge Adjustment 


Figure 3: Microphone, Proper Position 


Summary of Contents for 9100 SERIES

Page 1: ...19602P 99 07 18 2018 DAVID CLARK COMPANY INCORPORATED COMPONENT MAINTENANCE MANUAL SERIES 9100 DIGITAL INTERCOM SYSTEM...

Page 2: ......

Page 3: ...on Inhibitors 11 Protection of Electrical Contacts 11 Use of Cloth Covers Ear Seals Head Pad 12 SYSTEM MODULES Cleaning of Headset Stations and Wireless Gateways 13 Headset Connector 13 Module Surface...

Page 4: ...tall 9 7 Overhead Gasket Temp Position 9 8 Microphone Removal Windscreen Kit Install 10 9 OTH Head Pad with Comfort Cover Installed 12 10 Comfort Cover Installed on Ear Seal 12 11 Headset Station 13 1...

Page 5: ...s apparent immediately file a claim with the carrier and notify your David Clark product supplier ELECTRICAL HAZARD Disconnect electrical power when making any internal adjustments or repairs All repa...

Page 6: ...sure to the elements From there the CMM covers the necessary maintenance information for the other system components that are subject to at least partial exposure to environmental stresses and neglect...

Page 7: ...the instructions below for proper fit Over The Head Styles H9130 H9180 H9190 For models worn over the head first open the headband adjustment all the way and fit the headset over your ears Push the he...

Page 8: ...2500G 02 on the frame of your glasses is an inexpensive and effective method of restoring a significant degree of such lost attenuation by reclosing these gaps Behind The Head Styles H9140 H9141 H9140...

Page 9: ...the microphone must not only pick up the user s speech but also cancel background noise To achieve this the microphone should be positioned zero to 1 8 away from the user s lips at the corner of the...

Page 10: ...hing red dots are also present on both connector mates as a visual guide aligning these dots will also help locate the keyway Push into the keyway until an audible click confirms a locked mating of bo...

Page 11: ...eal Stretching and Partial Install Behind The Head Styles H9140 H9141 H9140 HT 1 Remove old ear seals by pulling off of each ear cup 2 Stretch gaskets from overhead support assembly over each ear cup...

Page 12: ...thumb and forefinger and pull out assertively from the boom bracket Do not use pliers as this can cause damage to the microphone see Figure 8 4 To insert a new microphone align the notched sides of t...

Page 13: ...kill germs Application of Corrosion Inhibitors The use of appropriate corrosion inhibitors will keep hardware and connectors from seizing due to salt and debris build up and proper application on a r...

Page 14: ...able with mild soap and water and work to keep the user comfortably protected from hot spots and help to reduce perspiration Particularly when used in marine environments users should ensure these cov...

Page 15: ...ap immediately see Figure 11 Even properly protected the connector will be subject to water exposure eventually putting the individual conductors at risk of tarnish or premature corrosion A common and...

Page 16: ...ate the surface before wiping clear Master Station Where Master Stations in the vast majority of marine applications are installed in environmentally protected areas and system aspects such as cable c...

Page 17: ...connector A slight application of dielectric grease may be carefully applied to the connector pins if needed Disconnection Connection Maintenance of IP Protected Network Cables Network cables with ins...

Page 18: ...lt Station will similarly ensure the reliability and longevity of the unit To thoroughly clean a wireless belt station first remove the rubber exterior skin from the enclosure The skin can be washed d...

Page 19: ...lt Stations are powered by Lithium Ion rechargeable batteries P N 40688G 90 A relatively new battery within its warranty term 1 year from purchase 2 years from date code on the battery label should no...

Page 20: ...imited to extremes of heat or cold operation or storage conditions exposure to water or corrosive environments or chemicals state of charge prior to storage and or age of battery prior to use Prior to...

Page 21: ...Station off of the deck or users seat also keeping these units dry and out of the way Figure 16 Headset Restraint as used with Headset and Wireless Belt Station David Clark also offers a Headset Carry...

Page 22: ...or inadvertent setting during programming of the system itself Prior to sending any units in to David Clark for service inspection please refer to the Troubleshooting steps in the main Installation Op...

Reviews: