background image


Avoid installing in locations where the temperature and humidity are excessively high, and where contact with any  

Do not install in locations where there is excessive vibration or impact. Injury and damage could result from the monitor mount

.    

Use the specified  screws in the specified places and tighten firmly. Failure to do this could cause injury if the monitor.

 could result with injury due to the monitor mount falling. . 

.  


C A U T I O N :  I N S T A L L A T I O N  O F  U N I T  I S  T O  B E  C A R R I E D  O U T  B Y  Q U A L I F I E D  T E C H N I C I A N S  O N L Y. I N S T A L L  I N  

A N  A P P R O P R I A T E  L O C A T I O N  B Y  C H E C K I N G  T H E   S T R U C T U R E  A N D  D U R A B I L I T Y  F O R  S A F E T Y  A N D   

A C C I D E N T  P R E V E N T I O N .


Do not alter any of the parts. Do not use broken parts. This

2

CAUTION

WARNING

WARNING

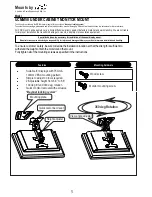
The cabinet where the mount is to be installed must be capable of long-term support of 
the total load of the monitor and mount. Measures should be taken to ensure sufficient  
strength to withstand the force of earthquakes , vibrations and other external forces.

Incorrect installation can cause the projector mount to fall and cause injury.

Total load of the mount ( m Mount)


 Maximum weight - 20 Lbs ( 10Kg.)


Rev 112907


INSTALLATION LOCATION 


          water is possible. These can result in fire or electric shock. 

falling. 


mount falls. 


Note: 


Summary of Contents for PDR UCMM50

Page 1: ...n equipment Mounts by A division of David Engineering Mfg Inc Suitable for displays with 75mm 100mm VESA mounting pattern Simple to adjust no tools required 2 Adjustable height from 6 8 to 8 8 100 deg tilt and 360 deg rotation Quick monitor removal with exclusive Bayonet locking system Features Thank you for purchasing the PDR monitor mount with the exclusive Bayonet locking system Toensurecustome...

Page 2: ...N A P P R O P R I AT E L O C AT I O N B Y C H E C K I N G T H E S T R U C T U R E A N D D U R A B I L I T Y F O R S A F E T Y A N D A C C I D E N T P R E V E N T I O N Do not alter any of the parts Do not use broken parts This 2 CAUTION WARNING WARNING The cabinet where the mount is to be installed must be capable of long term support of the total load of the monitor and mount Measures should be t...

Page 3: ...od screws supplied attach the mounting bracket to the underside of the cabinet Place the narrow end of the plate up against the cabinet front lip A spacer and longer screws may be required if the lip is deeper than 2 See fig 3 and fig 4 2 ATTACH THE MOUNT TO THE MONITOR 3 1 FASTENING THE MOUNTING PLATE TO THE CABINET BOTTOM NOTE Do not over tighten the bracket mounting screws as damage to the moni...

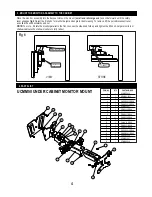
Page 4: ...the front Loosen the side knob fold up and tighten the tilt knob Larger monitors or shallow cabinet will not allow monitors to fully retract 6 12 16 5 4 3 14 13 7 1 15 8 2 10 9 18 17 11 19 ITEM NO QTY PART NUMBER 1 1 UCMM50 002 2 1 MDWM50 003 1 3 1 UCMM50 005 4 1 PMCW50 012 REV A 5 1 PMCW50 010 REV A 6 1 UCMM50 001 7 2 PDM 0013 REV A 8 1 UCMM50 006 9 4 PDM 0021 REV A 10 11 PDM 0008 REV A 11 4 PDM ...

Reviews: