background image

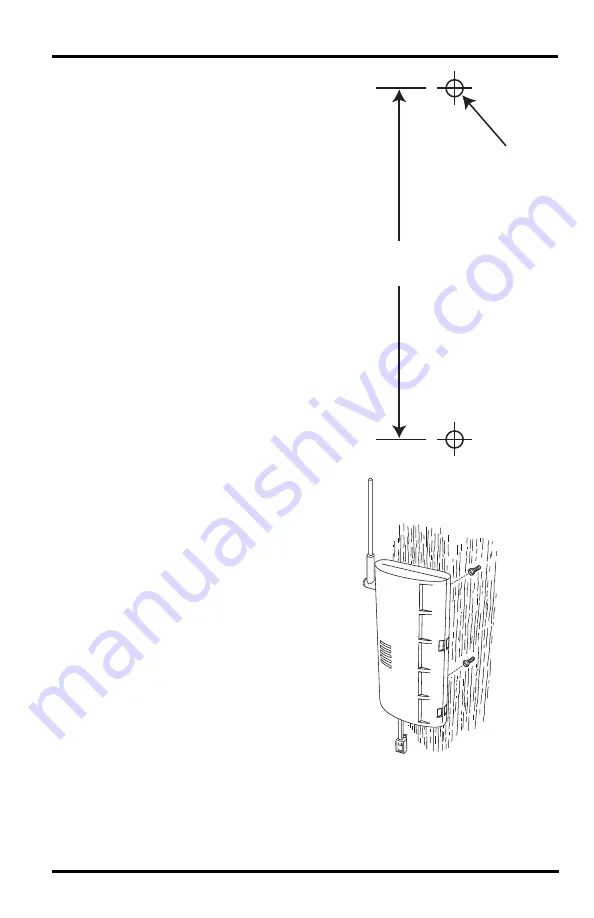
Mount Your Weather Envoy

9

The screws should be 3.25

''

 (82.5 mm) 

apart and lined up vertically.

3. Drill the marked locations with a 3/32

''

 or 

7/64

''

 (2.2 to 2.7 mm) drill bit.

4. Drive the two #6 x 1

''

 (3.5 mm x 25 mm) 

pan head self-threading screws into the 
wall. 

5. Leave at least a 1/8

''

 (3 mm) space 

between the wall and the heads of the 
screws.

6. Slide the keyholes on the back of the 

case over the two screw heads. 

3.25"

(82.55mm)

Drill 3/32" 

or 7/64" 

(~2.2 to 2.7mm) 

Holes

#6 X 1"
Pan-Head
Screws

Summary of Contents for 6316

Page 1: ...For Vantage Pro2 Vantage Pro2 Plus and Vantage Vue Product number 6316 R Weather Envoy USER MANUAL Davis Instruments 3465 Diablo Avenue Hayward CA 94545 2778 U S A 510 732 9229 www davisnet com R ...

Page 2: ...installation If this equipment does cause harmful interference to radio or television reception which can be determined by turning the equipment on and off the user is encouraged to try to correct the interference by one or more of the following measures Reorient or relocate the receiving antenna Increase the separation between the equipment and receiver Connect the equipment into an outlet on a c...

Page 3: ...ble Used with our WeatherLink software and data logger the Weather Envoy allows you to view store plot analyze export share and print your weather data Contents Before continuing please be sure your Weather Envoy package includes the following Weather Envoy Two 6 x 1 screws for wall mounting AC power adapter Required for Operation You will also need the following Davis weather products to use your...

Page 4: ...band Router with one free port An Always on connection to the Internet A high speed DSL or cable internet connection that maintains constant connection to the internet Local Connection Macintosh Computer Requirements Your Weather Envoy requires the following for a local Macintosh computer connection Macintosh computer running Mac OS X v10 or later with at least 5 MB of free disk space One free USB...

Page 5: ...s applied to the Envoy can lock up or damage the logger The WeatherLink data logger must be installed before you install the batteries or plug in the AC power adapter 1 Remove the three screws from the back of the Envoy case 2 Separate the case halves to expose the data logger connector ...

Page 6: ...er is plugged in firmly and completely Inserting the Serial USB or IP data logger into the Envoy 4 Rejoin the case halves making sure the data logger cable passes through the cable channel 5 Fasten using the three screws you removed in step 1 Data Logger Cable Channel Serial Data Logger Data Logger Cable Channel USB Data Logger Data Logger Cable Channel WeatherLinkIP Data Logger ...

Page 7: ...vis Instruments Technical Support See Contacting Davis Technical Support on page 20 4 Replace the battery cover on the case Optional Connecting AC Power The operating battery power for a cabled Weather Envoy is approximately 10 days For a wireless Weather Envoy the battery power is approximately 5 months Note For a wireless Weather Envoy connected to a WeatherLinkIP data logger the battery power i...

Page 8: ...tware Optional Adding an External Temperature Probe Wireless Envoy Only Your wireless Weather Envoy has a built in temperature humidity sensor as well as the barometer The temperature and humidity are reported as Inside Temperature and Inside Humidity In some instances such as when your Envoy is mounted outside in a shelter the temperature inside the shelter is of little interest You may replace t...

Page 9: ... into the RJ jack on the Envoy Note Note It may take several minutes for the temperature reading to stabilize If the Envoy is mounted outside in a weather proof shelter you should thread the probe cable up through one of the holes in the base of the shelter See your shelter manual for instructions on how to secure the cable and make a weather proof seal External Temperature Sensor RJ Connector RJ ...

Page 10: ...n as possible for best results Typical maximum ranges are Line of sight 1000 feet 300 m Under most conditions 200 400 feet 60 120 m Other range and transmission considerations include Range may be reduced by walls ceilings trees foliage a metal roof or other large metal structures or objects such as aluminum siding metal ducts and metal appliances such as refrigerators Transmission between wireles...

Page 11: ...r 7 64 2 2 to 2 7 mm drill bit 4 Drive the two 6 x 1 3 5 mm x 25 mm pan head self threading screws into the wall 5 Leave at least a 1 8 3 mm space between the wall and the heads of the screws 6 Slide the keyholes on the back of the case over the two screw heads 3 25 82 55mm Drill 3 32 or 7 64 2 2 to 2 7mm Holes 6 X 1 Pan Head Screws ...

Page 12: ...WeatherLink Online Help for additional setup instructions USB Connection Locate a free USB port on your computer and connect the USB connector of the 8 cable to the port and connect the Mini B connector to the data logger The connection between the Envoy and the computer can be extended up to 16 5 m using a Mini B to USB connector cable Note Do not attempt to use more than a 16 extension cable or ...

Page 13: ...times occurring within one second of each other On power up the IP data logger will negotiate its connection with the router 6 Write down the Device ID and Key located on the side of the WeatherLinkIP data logger for further use The Device ID DID and Key uniquely identify your data logger on the WeatherLink Network www weatherlink com They are both required to create a login on WeatherLink com and...

Page 14: ...data logger may have difficulty communicating with the computer Warning Do not use phone cable Our cable looks like a phone cable but it is wired differently Note The data logger does not require a constant connection with a computer to continue logging and storing data Although the data logger should remain connected to the Envoy at all times the data logger only needs to be connected to the comp...

Page 15: ...in your CD ROM drive The install program should start automatically If the install program does not start select Run from the Start menu type D SETUP or the correct letter for your CD ROM drive and click OK to begin the installation 2 Follow the on screen prompts to complete the installation Macintosh Computer 1 Place the Install Disk in your CD ROM drive 2 Copy install sit from the CD to your des...

Page 16: ...he Set Transceiver dialog box displays 2 Select a Station Type for each of the possible 8 transmitter IDs channels the Envoy may be receiving See the WeatherLink Online Help System for more information on configuring the stations the retransmit feature and configuring the Envoy for using repeaters ...

Page 17: ...ng The second beep verifies the installation of the data logger If you do not hear two beeps contact Davis Instruments Technical Support 5 If you hear both beeps see Troubleshooting Serial Port Communication on page 15 for instructions on checking your standard serial ports See Trou bleshooting USB Communication on page 17 if you are troubleshooting a USB connection See Troubleshooting WeatherLink...

Page 18: ...up menu The Communications Port dialog box displays 4 Click Loopback The software searches all standard ports and displays the COM port number where the loopback connector is located The correct COM port is automatically selected in the Communications Port dialog box If the loopback connector is not found on any COM port your serial port may not be working If a connection still does not exist or i...

Page 19: ...lug the cable back into the Envoy Open the WeatherLink software again Open the Communications Port dialog box Select USB if USB is not selected in the communications field and follow the prompts Click Test to verify communication between the station and the software If the test is unsuccessful either the station is malfunctioning or the drivers for communicating with USB have not been installed su...

Page 20: ...er up you will hear two beeps 6 Check if the green light on the WeatherLink IP data logger is on If it is not on contact Technical Support 7 For Weatherlink com Wait five minutes Go to www weatherlink com and register the WeatherLinkIP data logger using the Device ID and Key If you have already registered check that your My Weather page is currently being updated 8 For WeatherLink Software Open We...

Page 21: ...hat can I do The Vantage Pro2 system is smart enough to send only data it hasn t already sent to the computer So when you initiate a new download the program will retrieve the first record after the last record shown in the WeatherLink s Browse Window Reboot and reseat the data logger Follow the steps on page 15 Communications Problems Older data may still be in the data logger if you have not cle...

Page 22: ...lled in your weather station be sure check the Station Configuration in the Setup Menu and make sure the sensor has been selected Contacting Davis Technical Support If you have questions about the Envoy or encounter problems installing or operating the Envoy please contact Davis Technical Support 510 732 7814 Monday Friday 7 00 a m 5 30 p m Pacific Time 510 670 0589 Technical Support Fax support d...

Page 23: ...the temperature of liquids such as water Apparent Temperatures The Weather Envoy calculates four apparent temperature readings wind chill heat index the temperature humidity wind index THW Index and the temperature humidity solar radiation wind index THSW Index Wind chill Wind chill takes into account how the speed of the wind affects our perception of the air temperature Our bodies warm the surro...

Page 24: ...hat the air can contain varies with air temperature and pressure Relative humidity takes into account these factors and offers a humidity reading which reflects the amount of water vapor in the air as a percentage of the amount the air is capable of holding Relative humidity therefore is not actually a measure of the amount of water vapor in the air but a ratio of the air s water vapor content to ...

Page 25: ...layed Converting at display time reduces possible compounded rounding errors over time Four separate variables track rain totals rain storm daily rain monthly rain and yearly rain Rain rate calculations are based on the interval of time between each bucket tip which is each 0 01 rainfall increment or 0 2 mm Barometric Pressure The weight of the air that makes up our atmosphere exerts a pressure on...

Page 26: ...ress the immune system The Weather Envoy can help analyze the changing levels of UV radiation and can advise of situations where exposure is particularly unacceptable CAUTION Be aware that the UV sensor readings do not take into account UV reflected off snow sand or water which can significantly increase the amount of UV to which you are exposed Nor do the readings take into account the dangers of...

Page 27: ...s 2 Sometimes tans usually burns Very light brown sometimes freckles Usually burns pinkish or red coloring appears can gradually develop light brown tan 3 Usually tans sometimes burns Light tan brown or olive distinctly pigmented Rarely burns shows moderately rapid tanning response 4 Always tans rarely burns Brown dark brown or black Rarely burns shows very rapid tanning response Skin Type Skin Co...

Page 28: ...dopted by the World Meteorological Organization UV Index assigns a number between 0 and 16 to the current UV intensity The US EPA categorizes the Index values as shown below The lower the number the lower the danger of sunburn The Index value published by the U S National Weather Service is a forecast of the next day s noontime UV intensity The Index value displayed in Weath erLink is the result o...

Page 29: ...ess sensor 6420 Leaf wetness provides an indication of whether the surface of foliage in the area of the sensor is wet or dry by indicating how wet the surface of the sensor is The leaf wetness reading ranges from 0 dry to 15 Soil Moisture Note Soil Moisture is only available with the wireless Weather Envoy using the optional Leaf and Soil Moisture Temperature station 6345 with a Soil Moisture sen...

Page 30: ...ceive Frequency US Models 902 928 MHz FHSS Overseas Models 868 0 868 6 MHz FHSS ID Codes Available 8 Output Power 902 928 MHz FHSS FCC certified low power less than 8 mW no license required 868 0 868 6 MHz FHSS CE certified less than 8 mW no license required Range Line of Sight up to 1000 feet 300 m Range Through Walls 200 to 400 feet 60 to 120 m Sensor Inputs RF Filtering RC low pass filter on ea...

Page 31: ... 0 5 mm Hg Slowly Trend Indication 5 position arrow Rising rapidly or slowly Steady or Falling rapidly or slowly Update Interval 1 minute Current Historical Data Based on WeatherLink display Alarms High Threshold from Current Trend for Storm Clearing Rising Trend Low Threshold from Current Trend for Storm Warning Falling Trend Range for Rising and Falling Trend Alarms 0 01 to 0 25 Hg 0 1 to 6 4 mm...

Page 32: ...ise Sunset Report F7 NOAA This Month F8 NOAA This Year Strip Chart Window ESC Halt Redraw Ctrl M Make Default Ctrl P Print Strip Chart F1 Context Sensitive Help F3 Zoom In F4 Zoom Out Plot Window ESC Halt Redraw Ctrl D Choose Date Ctrl M Make Default Ctrl P Print Plot F1 Context Sensitive Help F3 Zoom In F4 Zoom Out F9 Overlay Plots F10 Last Year Plot Database Window Ctrl D Choose Date Ctrl N Add ...

Reviews: