13
Verify Data from the ISS Sensors
1. Near the center of the screen, look for the outside temperature (TEMP OUT).
2. Spin the wind cups to check wind speed, pressing WIND if necessary to alternate
between speed and direction in the compass rose.
3. Turn the wind vane and allow five seconds for the wind direction display to
stabilize before moving it again.
4. Approximately one minute after power-up the outside relative humidity (HUM
OUT) reading should be displayed on the console.
5. Check to see if your console is receiving rain readings. On your console screen,
look for the DAILY RAIN display. Remove the rain collector cone and tip the
spoon, then wait to see if the display registers a rain reading. Each tip indicates
0.01" or 0.2 mm of rain and may take up to a minute to register at the console. If
the spoons are tipped too quickly, the number on the console display may not
change.
6. If the ISS contains a UV sensor and/or solar sensor, press 2ND and then press
RAIN YR for current ultraviolet readings or press 2ND then press RAIN DAY for
solar radiation readings.
The UV reading displays in the center of the console. The solar reading displays
in the bottom right corner of the console display. UV and solar readings should be
zero or close to zero if the ISS is inside. Zero is a valid reading. Dashes(--) are
displayed if no data comes from the sensors.
7. Current weather data displayed on the console confirms communication.
Once the ISS has been powered and the console has successfully received accurate
readings from all the sensors, prepare the ISS for installation. Continue on to “Plan
the ISS Installation” on page 20 for more information.
If there is a communication problem between the wireless ISS and the console, see
below: “Troubleshooting Cabled ISS Communication” on page 14.
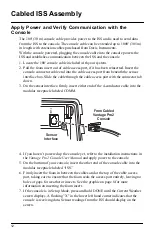
To make installation easier at a location, disconnect the console cable from the
sensor interface. Remove the foam and slide the cable out through access port. Once
a location for both the ISS and the console has been arranged, reinsert the cable
through the access port, into the console connector, and reinsert the foam.
Summary of Contents for 6322C
Page 47: ......

