Page 2
Tools and Materials Needed
The installation requires some or all of the following tools and
materials. Please make sure you have all necessary items before
proceeding with the installation.
❏
Medium Phillips Screwdriver
❏
Crimping Tool
❏
Pliers
❏
Electric Drill with 2.5 mm (7/64") Drill Bit
❏
Fuse Tap
❏
Multimeter
I
NSTALLATION
The instructions contained in the following sections provide
guidelines for installation of the Trip 500AL.
Planning the Installation
The installation is similar to installing a vehicle stereo or vehi-
cle alarm. The DriveRight requires three electrical inputs;
+12 V, vehicle ground, and your vehicle's VSS signal. The steps
required to install the DriveRight are:
1. Determine where to mount the DriveRight display.
2. Locate and tap your VSS wire.
3. Locate and tap power (+12V from battery) and ground.
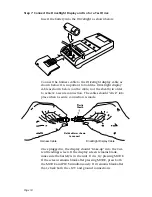
4. Connect the harness cable to the 3 main tap wires.
5. Choose the correct switch settings.
6. Mount the DriveRight in the vehicle.
7. Connect the DriveRight and go for a test drive.
WARNING:
Installing the DriveRight can be hazardous to both the
installer and your vehicle’s electrical system if not done by
an experienced professional. This manual assumes you are
aware of the inherent dangers of working in and around a
vehicle and have a working understanding of electricity.


