background image

H

A R D W A R E

  I

N S T A L L A T I O N

Preparing the Envoy

4

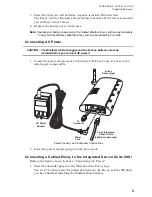
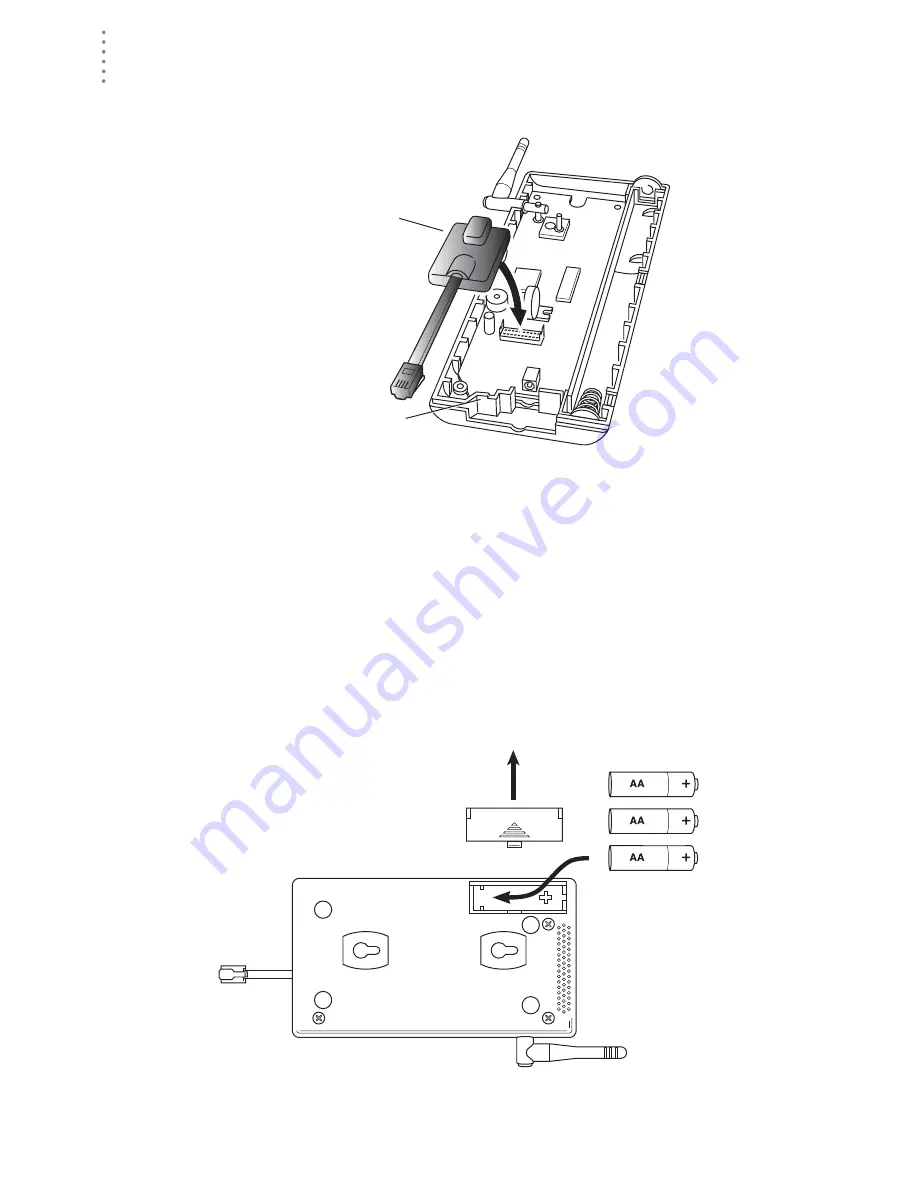
3. Carefully insert the data logger into the connector.

Note:

Be sure to push down firmly on the data logger to seat the connection.

4. Rejoin the case halves, making sure the data logger cable passes through the 

cable channel.

5. Fasten using the three screws you previously removed.

Installing the Batteries

CAUTION: The WeatherLink Data Logger must be installed before you install the 

backup batteries!

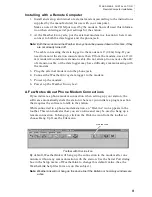
1. Find the battery cover on the back side of the Envoy case.

2. Remove the battery cover by pressing on the arrow embossed on the cover 

and sliding the cover away from the case. 

Data Logger Cable Channel

Data Logger

Installing the Data Logger

Installing the Batteries

Summary of Contents for Weather Envoy 6314

Page 1: ...Vantage Pro Weather Envoy Installation Manual Product 6314 6314C...

Page 2: ...alled and used in accordance with the instructions may cause harmful interference to radio com munications However there is no guarantee that interference will not occur in a particular installation I...

Page 3: ...necting AC Power 5 Connecting a Cabled Envoy to the Integrated Sensor Suite ISS 5 Mounting the Envoy 6 Local Computer Installation 7 Installing with a Local Computer 7 Remote Computer Installation 8 R...

Page 4: ...alculated 25 Wind 25 Temperature 25 Apparent Temperatures 25 Humidity 26 Dew Point 27 Rainfall 27 Barometric Pressure 27 Solar Radiation 28 UV Ultra Violet Radiation 28 EvapoTranspiration ET 31 Leaf W...

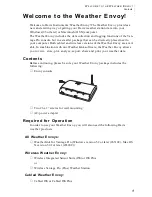
Page 5: ...le In combination with our WeatherLink software the Weather Envoy allows you to view store plot analyze export share and print your weather data Contents Before continuing please be sure your Weather...

Page 6: ...Every day in the database has an additional two records totalling 176 bytes that store daily summary informa tion A database containing data stored at a 30 minute archive interval requires approximat...

Page 7: ...Install the Batteries Mount your Envoy Make the Envoy Connections Test using WeatherLink Setup the Envoy using WeatherLink Installing the Data Logger CAUTION The WeatherLink data logger must be instal...

Page 8: ...able channel 5 Fasten using the three screws you previously removed Installing the Batteries CAUTION The WeatherLink Data Logger must be installed before you install the backup batteries 1 Find the ba...

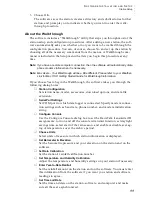
Page 9: ...d the backup batteries must be installed before you connect AC power 1 Locate the power adapter jack on the end of the Envoy case It s next to the data logger output cable 2 Insert the power adapter p...

Page 10: ...mplate against the wall where you want to mount the Envoy and use a pencil to mark the location for the two mounting screws The screws should be 3 25 82 5mm apart and lined up vertically 3 Drill the m...

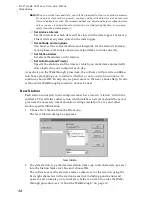
Page 11: ...the end of the 8 cable into the DB9 adapter The cable connecting the data logger to the computer is 8 2 4 m long If you need to place the station console more than 8 from the computer use a 40 12 m st...

Page 12: ...a direct connection like that shown in the section above Remote Modem Connection Hardware Requirements The following additional hardware is required for a phone modem connection One internal or exter...

Page 13: ...ng with the modem 3 Plug the external modem into the phone jack 4 Connect the Weather Envoy data logger to the modem 5 Power up the modem 6 Power up the Weather Envoy last A Few Notes About Phone Mode...

Page 14: ...con If you have no stations in the program directory when you run the software the software will prompt you to add a station see below for details If you have more than one station in the program dire...

Page 15: ...es you through the following dialog boxes Station Configuration Set station name model accessories download options and data file extension Serial Port Settings Set COM port to which data logger is co...

Page 16: ...lly downloaded to your computer each day At each step in the Walkthrough procedure the software will provide confirma tion boxes prompting you to indicate whether or not you wish to continue To contin...

Page 17: ...files If you change the station name the software will prompt you to change the name of the station directory Model Select the weather station model from the drop down list Select Vantage Pro or Vant...

Page 18: ...ion and releasing the serial port during an idle con nection If for example you ve dialed your station downloaded data and then left the connection open without the bulleting or summary running the so...

Page 19: ...te whether or not it successfully connected to your Weather Envoy If you cannot connect to the station you may use Loopback see Finding the Correct Serial Port on page 33 to determine the correct seri...

Page 20: ...y of the month you select 6 Set Average Temp Over Archive Period The defalt is to log the temperature at the end of the archive period 7 When finished configuring the console choose Set The software s...

Page 21: ...arometer from the Setup menu The software opens the Set Barometer dialog box 2 Enter the elevation The elevation is required for the forecast to work correctly and to report the adjusted baromtric pre...

Page 22: ...pears The raw reading shown in this dialog box indicates the unad justed reading coming from the sen sor The adjusted reading indicates what the software displays adjusted for any previously entered c...

Page 23: ...before setting the time and date and then clear your archive memory when finished Note The Weather Envoy internal clock is more accurate than most computer clocks We recommend you double check the co...

Page 24: ...e interval and choose OK The software warns you that it is about to clear the archive memory 3 To continue choose OK The software sets the archive interval and clears the archive memory Set Latitude a...

Page 25: ...latitude and longitude http www geocode com eagle html ssi http www topozone com US only http www calle com world Outside US only This dialog box includes text boxes to input your position You can en...

Page 26: ...Choose Set Alarms from the Setup menu or press Ctrl A The Set Station Alarms dialog box appears 2 Enter the following information High Low Alarm For all standard high low alarms enter the desired alar...

Page 27: ...cally 2 To add a station to the Auto Download List double click on the station name or select the station from the Station Names list and choose Add The station name will be moved to the Auto Download...

Page 28: ...am 6 After setting the download time s choose OK The software saves the automatic download time settings Alarms The Weather Envoy features more than 30 alarms that can be programmed to sound whenever...

Page 29: ...ther conditions measured and or calculated by the Weather Envoy by the Vantage Pro Integrated Sensor Suite ISS and by optional Vantage Pro sensors Each section includes a brief discussion of the weath...

Page 30: ...more slowly THW Temperature Humidity Wind Finally like Heat Index the THW Index uses humidity and temperature to calculate an apparent temperature but includes the cooling and heating effects of wind...

Page 31: ...nts of 0 01 in If you display in mm the console converts from inches to mm If you display millimeters you may occasionally see the counter skip a reading due to rounding Barometric Pressure The weight...

Page 32: ...is particularly unacceptable CAUTION Be aware however that the UV sensor readings do not take into account UV reflected off snow sand or water which can significantly increase the amount of UV to whic...

Page 33: ...rn painful swelling skin peels 2 Sometimes tans usually burns Very light brown sometimes freckles Usually burns pinkish or red color ing appears can gradually develop light brown tan 3 Usually tans so...

Page 34: ...ince been adopted by the World Meteorological Organization UV Index assigns a number between 0 and 16 to the current UV intensity The US EPA categorizes the Index values as shown below The lower the n...

Page 35: ...ther Envoy using the optional Leaf and Soil Moisture Temperature station 6343 with a Leaf Wetness sensor 6420 Leaf wetness provides an indication of whether the surface of foliage in the area of the s...

Page 36: ...l Port on page 33 for instructions on checking your standard serial ports If this identifies a serial port other than the one you selected in station setup try connecting to the data logger again Note...

Page 37: ...cable with a phone jack on one end and a red plastic tip on the other supplied with Weatherlink 1 If necessary disconnect the cable between your station and the adapter connected to the COM port 2 Ins...

Page 38: ...you use another communications program after using the modem with the Weather Link Software you may need to re initialize the modem using the modem string expected by the other program Program Problem...

Page 39: ...see if the time and date on your station are incorrect This can hap pen if you have a power outage and your battery is dead If so the data was written into the wrong month day and or time Reset the ti...

Page 40: ...w Wireless 0 77 mA average 15 mA peak plus 125 mA for each optional wireless transmitter in use at 4 to 6 VDC AC Power Adapter 5 VDC 200 mA regulated Batteries 3 AA cells Battery Life Cabled up to 10...

Reviews: