• Do not use filter materials that are not refractory instead of the filter.
• Do not use the product without a filter or remove the filters when the product is in operation.
• In the event of a flame, cut off the power supply to the product and cooking appliances.
• Disconnect the power supply before the maintenance procedure.
• If there is a gas or other fuel-operated appliance in the same room as the hood (eg gas, wood, oil-fired
heaters), there should be adequate ventilation (open window door).
• When a chimney is connected to the hood, ducts or 120 mm are used. The airway connection should be as
small as possible, with minimal bending.
• Make sure children do not play with the hood. Do not allow children to use the hood.
• Keep packaging materials out of the reach of children, they may be dangerous to them.
• If the power cord is damaged, it must be replaced by the manufacturer or service provider or a certified
technician.
• In the event of a flame, cut off the power supply to the cooker hood and appliances. Cover the flame. Never
use water to put it out.
• Accessible parts of the appliance can be heated sufficiently when the cookers are open.
• After installation, the hood must be at least 65
(* 3)
cm away from electric hobs and 75 cm from gas or other
fuel sources.• The air outlet of the hood must not be connected to chimneys that flush out smoke from other
sources.
• Take special care when the appliance operates on the same site as combustion appliances (gas, diesel, carbon,
etc.). The hood releases air outside the room and can adversely affect the combustion process.
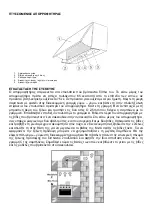
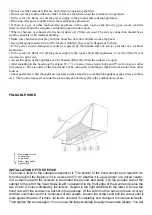
FOLDABLE HOOD
6.
Removable cornice
7.
Grease filter
8.
Lamp cover
9.
Gear / Light switch
10. Light switch
INSTALLATION OF THE DEVICE
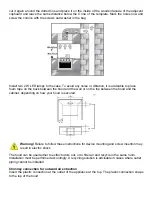
The hood is fixed to the cabinets adjacent to it. The bottom of the hood should be at least 65 cm
from the level of the fireplace if it is a stove and 75 cm whether it is a gas cooker or a mixed cooker.
Cut a small hole with the scissors in the dotted line around, and place it on the wooden side of the
cabinet to the left of the hood. Make line B correspond to the front edge of the wood and pierce the
two 2.5mm O holes indicated by the letter b. Repeat in the right cabinet with the letter A. Screw the
hood now with the screws in a sachet in the package. At the bottom of the hood you have a corner
with two oval holes, and it is composed of two screws. Loosen the screws and pull the corner until it
rests against the wall. If it does not touch, unscrew it completely and change it to increase its depth.
Then tighten the screws again. You can use the large template to apply the wooden facade. You will


