23
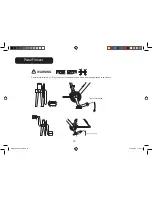
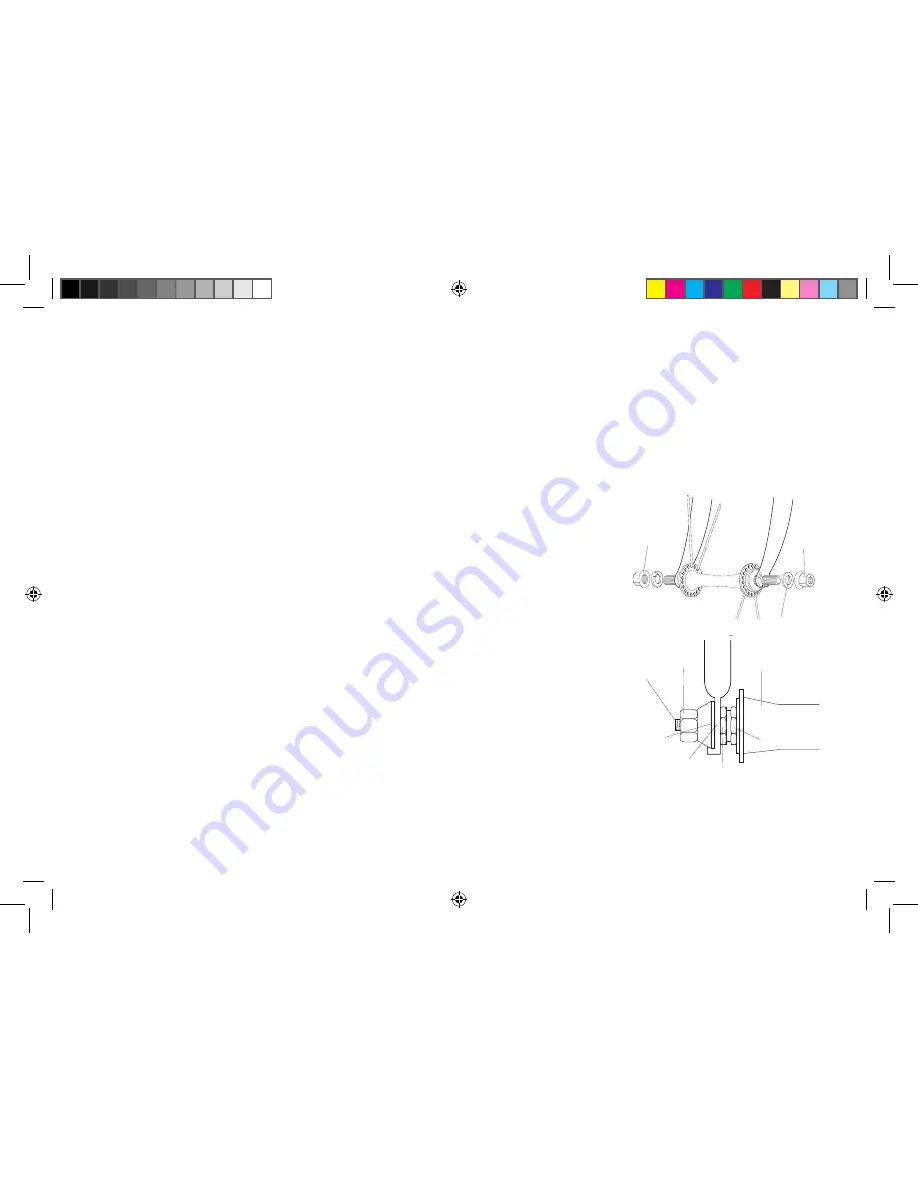
Retention device or standard washer
Nut
Nut
Axle
Nut
Front Hub
Cone
Front Fork
Retention
washer
(if fitted)
Cone Locknut
Tyre care and wheel adjustments
To obtain maximum life and full benefit from your tyres, it is essential to maintain the recommended pressure indicated on the tyre sidewall.
Unnecessary hard braking and skidding greatly reduces tyre life. Make sure your tyres do not come into contact with oil, petrol, paraffin or other rubber
solvents. Make sure that your wheels run true and are in the correct alignment to avoid chafing the tyre sidewall against the bicycle frame or fork tubes.
Tyres should regularly be inspected for wear and cuts. Check that the tyre tread pattern is clearly showing all around the outside edge of the tyre. Check
there are not any breaks, cuts or uneven wear in the tyre. Tyres should be replaced if damaged. Tyre punctures can be caused by careless riding over
sharp stones, holes in the road, or by hitting curbstones. If you are storing your bicycle for a long period of time, it is advisable to store the machine
with the tyres off the ground to prevent them from becoming distorted. To inflate tyres, a foot pump or normal bicycle inflator fitted with a suitable valve
connector should be used along with an accurate tyre pressure gauge. Wheels should be checked regularly for spoke tension. Perform this check more
frequently if the bicycle is used on rough roads.
Front wheels
Caution:
Your front wheel comes with a retention device to keep the wheel axle from disengaging from the fork-ends if
the wheel nuts are incorrectly assembled. The devices are of two types.
1. Small protrusions machined or formed on the outer face of the fork ends.
2. Shaped washers that contain a small tap/prong that engages in a hole within the fork-end.
Front wheel removal and replacement
.
Disengage the brake quick release lever if your bicycle is so equipped. Loosen both axle nuts by turning it
in a counter clockwise direction. Remove axle nuts, washers and axle retention device if fitted. Remove the
front wheel. The axle cone bearing adjustment should permit smooth rotation of the wheel with the cone
locknut securely fastened against the axle cone to prevent loosening.
Replace the front wheel between the fork blades ensuring that the projecting prong/tab of the retention
device are securely fitted into the slot in the fork ends or with standard washers securely in position butting
against the protrusions on the fork end. Securely tighten all wheel nuts ensuring that the wheel is central
withing the forks. Refer to page 25 for recommended torque settings.
Note:
Reset brake quick release mechanism and check brake for proper operation.
To Remove Rear Wheel
Move the chain onto the smallest rear sprocket. Loosen both axle nuts by turning in a counter clockwise
direction. Pull the derailleur mechanism gear rearwards for additional clearance. Remove the rear wheel
by sliding forward or down and out of the frame. To install the wheel, locate the top section of the chain
on the small sprocket and replace the wheel into the frame by pushing back and centralising between the
chainstays. While holding the wheel in this position tighten the axle nuts in a clockwise direction securely ensuring that the wheel is central with the
chainstays. Refer to page 25 for recommended torque values.
The wheel should turn freely and have no side play.
Reset the brake quick release mechanism and check brake for proper operation.
folding bike manual.indd 23
20/06/2011 11:00:20

