


(1)
Owner's Manual
Thank You for purchasing a S
TAR
LOOK
-
D-instrument.
This manual covers the operation and maintenance of the S
TAR
LOOK
-
D
instrument.
All information in this publication is based on the latest product information available at the
time of printing.
Emitor AB reserves the right to make changes at any time without notice and without incurring
any obligation.
No part of this publication may be reproduced without written permission.
This manual should be considered a permanent part of the instrument and should remain with
it if it is resold.
If a problem should arise, or if You have any questions about the instrument, consult an
DAWNco
.
! Notice !
Operating a S
TAR
LOOK
-
D
instrument requires special skills. Please read this Owner's
Manual thoroughly before operating the instrument.
Contents:
I. Description.
II. Operation.
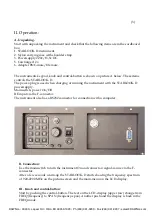
A. Unpacking.
B. Connection.
C. Knob and control-button.
D. Information:
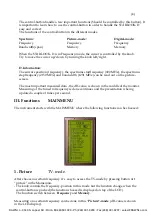
III. Functions:
1.
Picture.
2.
Digital.
3.
Full spectrum – Max zoom in.
4.
Attenuation.
5.
DiSEqC-control
6.
Setup.
7.
Beeper.
8.
Special.
9.
Memory.
IV. Maintenance.
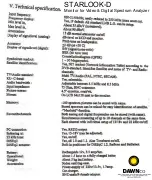
V. Technical specification.
DAWNco • 3340 S. Lapeer Rd • Orion, MI 48359-1320 • Ph (248) 391-9200 • Fax (248) 391-9207 • sales@DAWNco.com


